ChevyParts
My Garage
My Account
Cart
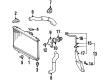
OEM Chevrolet Prizm Radiator
Cooling Radiator- Select Vehicle by Model
- Select Vehicle by VIN
Select Vehicle by Model
orMake
Model
Year
Select Vehicle by VIN
For the most accurate results, select vehicle by your VIN (Vehicle Identification Number).
2 Radiators found

Chevrolet Prizm Radiator Assembly Part Number: 94856862
Chevrolet Prizm Radiator Assembly Part Number: 52474582
Chevrolet Prizm Radiator
Want to cut long-term maintenance and repair costs? Choose OEM Radiator. Those parts deliver top durability you can trust. On our site, you'll find a huge catalog of genuine Chevrolet Prizm parts. Prices are unbeatable, so you can keep more in your pocket. Every OEM Chevrolet Prizm Radiator includes a manufacturer's warranty. You can also get an easy return policy that keeps buying risk free. Fast delivery, get your car on the road quickly. It's simple to search, compare, and order. Stop guessing about quality or fit. Order today and save with parts that last.
The Radiator is an essential AC part of the vehicle, which was manufactured from 1989 to 2002 and involved in the dealing of several Prizm models. Through the accomplishing of this crucial segment, the unnecessary heat produced within the domain of the engine is appropriately let out to uphold the warm efficiencies that allow for overall enhancement of the device. Made out of aluminium cores as well as shrunk tank technologies, the Radiator is developed to endure the day to day usage without compromising its heat dissipation performance. The model can be inserted into numerous Prizm generations, and both 1.6 L and 1.8 L engines are crucial to the car's design. The Radiator does not only improve the lifespan of the engine; it also has a significant part when it comes to safety of any driver and passengers in cases where the car might overheat. The characteristics of Radiator, like lighter weight than standard, enhanced coolant flow, make them unique in auto merchandise to deliver heightened performance. Cleaning and changes in coolant and system flushes really do go a long way in maintaining the functionality of the radiator so as to continue providing efficient operations on the part of the Chevrolet Prizm. Therefore, the Chevrolet Prizm Radi is a vital component of the vehicle, which effectively performs intended functions, while being safe, reliable, and long-enduring, which contributes to the maker's positive reputation for this model, establishing the Chevrolet Prizm Radi among the optimal parts of this automobile maker.
Chevrolet Prizm Radiator Parts Questions & Experts Answers
- Q: How to replace a radiator on Chevrolet Prizm?A:Draining the cooling system should be your first step before raising the vehicle. Support it correctly for the next process. Placing a pan under vehicles with automatic transmission becomes essential to catch leaking fluid during the removal process of right and left engine splash shields. Start by disconnecting transmission fluid cooler hoses from the Radiator when removing its hose clamps. After that loosen the lower Radiator outlet hose clamp and remove its connecting hose. Perform the following procedure one: lower the car and detach the 2 upper Radiator bracket bolts and afterward detach the four a/c condenser bolt setup if your model has these components installed. First disconnect both cooling fan electrical connectors and then loosen the clamp on the upper Radiator inlet hose before separating the hose from the inlet. Separate the Radiator overflow hose by untightening the clamp to disconnect it from the Radiator filler neck area. Dismount the Radiator with cooling fan assembly from the automobile and move essential components from the original Radiator to the new one. Before assembly install the Radiator with the cooling fan in the vehicle and fasten the upper bolts at 13 nm (9 ft. Lbs.) tension and tighten the a/c condenser bracket bolts to 10 nm (89 inch lbs.). Position the overflow hose over Radiator filler neck flares and use a hose clamp for attachment. The Radiator inlet hose requires connection to the Radiator through similar installation. Finally, reconnect the cooling fan electrical connectors. After raising the vehicle to its stable position you should install the transmission fluid cooler hoses onto the Radiator while tightening them with hose clamps. The outlet Radiator Hose needs installation at the Radiator's positioning above the flares then clamping with a hoseclamp. After inserting the right and left engine splash shields the vehicle should be lowered while you fill the Radiator with approved coolant up to the base of the filler neck while checking for overheating during engine operation with the cap removed. Let the engine operate until the coolant warms to its operational temperature which will be clear through flowing coolant and heated hoses. Follow the Radiator filler neck until successively adding coolant before installing the Radiator cap. A thorough examination should be carried out on the Radiator while checking Coolant Reservoirs and coolant pipe connections and hose connections for leaks with necessary connection tightening followed by Radiator cap installation and transmission fluid level verification on automatic transmission vehicles.

Related Chevrolet Prizm Parts
 Chevrolet Prizm A/C Condenser Fan
 Chevrolet Prizm Coolant Reservoir
 Chevrolet Prizm Coolant Reservoir Cap
 Chevrolet Prizm Cooling Hose
 Chevrolet Prizm Fan Motor
 Chevrolet Prizm Fan Shroud
 Chevrolet Prizm Radiator Hose
 Chevrolet Prizm Radiator fan
 Chevrolet Prizm Thermostat
 Chevrolet Prizm Thermostat Gasket
 Chevrolet Prizm Thermostat Housing
 Chevrolet Prizm Water Pump