ChevyParts
My Garage
My Account
Cart
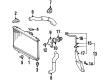
OEM 2000 Chevrolet Prizm Radiator
Cooling Radiator- Select Vehicle by Model
- Select Vehicle by VIN
Select Vehicle by Model
orMake
Model
Year
Select Vehicle by VIN
For the most accurate results, select vehicle by your VIN (Vehicle Identification Number).
2 Radiators found

2000 Chevrolet Prizm Radiator Assembly Part Number: 94856862
Product Specifications- Other Name: Radiator, Coolant; Radiator; Radiator, Radiator
- Item Weight: 8.00 Pounds
- Item Dimensions: 40.1 x 25.6 x 8.9 inches
- Condition: New
- Fitment Type: Direct Replacement
- SKU: 94856862
- Warranty: This genuine part is guaranteed by GM's factory warranty.
2000 Chevrolet Prizm Radiator Assembly Part Number: 52474582
Product Specifications- Other Name: Radiator, Coolant; Radiator; Radiator, Radiator
- Item Weight: 12.40 Pounds
- Item Dimensions: 41.2 x 6.1 x 25.0 inches
- Condition: New
- Fitment Type: Direct Replacement
- SKU: 52474582
- Warranty: This genuine part is guaranteed by GM's factory warranty.
2000 Chevrolet Prizm Radiator
With a comprehensive array of OEM 2000 Chevrolet Prizm Radiator, from fuel pumps to door handles, our website is a one-stop-shop for your needs. All our genuine 2000 Chevrolet Prizm Radiator are backed by the manufacturer's warranty and are offered at competitive prices in the market. Rest assured, you can shop with complete confidence.
2000 Chevrolet Prizm Radiator Parts Questions & Experts Answers
- Q: How to service and repair the radiator on 2000 Chevrolet Prizm?A: The Radiator requires service or repair operations by draining all cooling system liquid. The service requires users to lift the vehicle and take off the right and left splash shields from the engine. You should put a pan below the Radiator to collect automatic transmission fluid in case of leaks. First disconnect both hoses connected to the transmission fluid cooler from the Radiator while loosening the clamp on the lower Radiator outlet hose to remove it. First lower the vehicle then remove the upper Radiator bolts and after that eliminate four a/c condenser bracket bolts when your vehicle has this equipment. Following disconnection of both cooling fan electrical connectors users should loosen and detach the upper Radiator inlet hose using its clamp. First loosen the Radiator overflow hose clamp while disconnecting this hose from its filler neck on the Radiator. The Radiator and cooling fan assembly should be carefully removed from the vehicle then all vital components shall be transferred to the replacement Radiator. The Radiator combined with cooling fan assembly should be positioned into the vehicle then secured by tightening the two upper bolts to 13 nm (9 ft. Lbs.) and securing the a/c condenser bracket bolts to 10 nm (89 inch lbs.). Install the overflow hose on the Radiator filler neck while positioning it over the flared edges and using a hose clamp for its attachment. The Radiator inlet hose connections should be performed following the same process. Complete pipeline connection of the cooling fan electrical connectors before raising and supporting the vehicle. The transmission fluid cooler hoses get installed to the Radiator then secured with hose clamps before final connection of the Radiator outlet hose through hose clamp installation. Reinstall both engine splash guards and drop the vehicle frame before filling the Radiator with approved coolant until it reaches the base of the filler neck while monitoring thermostat temperature during engine operation without the Radiator Cap. Turn on the engine to heat the coolant until the proper operating temperature shows by warm hoses and flowing coolant. Place coolant into the Radiator until it gets to the filler neck before adding the Radiator Cap. Check the Radiator and Coolant Reservoir alongside coolant pipe connections and hose connections for leaks before tightening all loose connections such as these. Finish the process by installing the Radiator Cap while checking the transmission fluid level among vehicles with automatic transmission.
Related 2000 Chevrolet Prizm Parts
 2000 Chevrolet Prizm A/C Condenser Fan
 2000 Chevrolet Prizm Coolant Reservoir
 2000 Chevrolet Prizm Coolant Reservoir Cap
 2000 Chevrolet Prizm Cooling Hose
 2000 Chevrolet Prizm Fan Motor
 2000 Chevrolet Prizm Fan Shroud
 2000 Chevrolet Prizm Radiator Hose
 2000 Chevrolet Prizm Radiator fan
 2000 Chevrolet Prizm Thermostat
 2000 Chevrolet Prizm Thermostat Gasket
 2000 Chevrolet Prizm Thermostat Housing
 2000 Chevrolet Prizm Water Pump