ChevyParts
My Garage
My Account
Cart
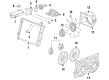
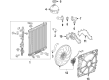
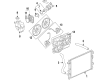
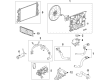
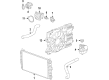
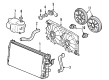
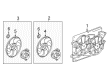
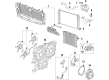
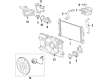
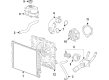
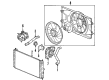
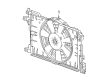
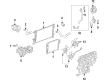
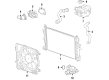
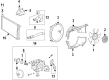
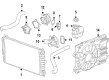
OEM Chevrolet Radiator fan
Radiator Cooling Fan- Select Vehicle by Model
- Select Vehicle by VIN
Select Vehicle by Model
orMake
Model
Year
Select Vehicle by VIN
For the most accurate results, select vehicle by your VIN (Vehicle Identification Number).
255 Radiator fans found


Chevrolet Fan Blade Part Number: 15780794
$100.67 MSRP: $206.86You Save: $106.19 (52%)Ships in 1-2 Business DaysProduct Specifications- Other Name: Blade Kit, Engine Cooling; Dual Radiator and Condenser Fan Assembly; Radiator Fan Assembly; Cooling Fan Assembly


Chevrolet Fan Blade Part Number: 89023366
$90.19 MSRP: $185.34You Save: $95.15 (52%)Ships in 1-2 Business DaysProduct Specifications- Other Name: Blade Kit, Engine Cooling; Dual Radiator and Condenser Fan Assembly; Radiator Fan Assembly; Cooling Fan Assembly

Chevrolet Fan Blade Part Number: 89024933
$96.78 MSRP: $198.88You Save: $102.10 (52%)Ships in 1-2 Business DaysProduct Specifications- Other Name: Blade Kit, Engine Cooling; Dual Radiator and Condenser Fan Assembly; Radiator Fan Assembly; Cooling Fan Assembly
- Replaces: 89023367


Chevrolet Fan & Motor Part Number: 23419653
$457.89 MSRP: $828.78You Save: $370.89 (45%)Ships in 1-2 Business DaysProduct Specifications- Other Name: Fan Assembly-Engine Cooler; Radiator Fan Assembly; Fan Assembly; Fan, Engine Air Cooling(Electrical)

Chevrolet Fan Blade Part Number: 89019143
$117.98 MSRP: $213.52You Save: $95.54 (45%)Ships in 1-2 Business DaysProduct Specifications- Other Name: Blade, Engine Cooling; Radiator Fan Assembly; Blade, Engine Air Cooling(Electrical)

Chevrolet Fan Assembly Part Number: 60002453
$181.89 MSRP: $373.79You Save: $191.90 (52%)Ships in 1-3 Business DaysProduct Specifications- Other Name: Fan Assembly-Engine Cooler; Radiator Fan Assembly; Cooling Fan Module; Fan Module; Fan, Engine Air Cooling(Electrical)
- Replaced by: 60009121

Chevrolet Fan Assembly Part Number: 85109577
$281.36 MSRP: $504.68You Save: $223.32 (45%)Ships in 1-3 Business DaysProduct Specifications- Other Name: Fan Assembly-Engine Cooler; Fan, Engine Air Cooling(Electrical)
- Replaces: 84523874

Chevrolet Cooling Fan, Passenger Side Part Number: 19129814
$44.40 MSRP: $83.38You Save: $38.98 (47%)Ships in 1-2 Business DaysProduct Specifications- Other Name: Blade Kit, Engine Cooling; Dual Radiator and Condenser Fan Assembly; Cooling Fan Assembly; Fan Blade
- Position: Passenger Side

Chevrolet Fan Blade, Driver Side Part Number: 25952780
$46.58 MSRP: $84.30You Save: $37.72 (45%)Ships in 1-2 Business DaysProduct Specifications- Other Name: Blade Kit, Engine Cooling; Dual Radiator and Condenser Fan Assembly; Radiator Fan Assembly; Cooling Fan Assembly; Blade, Engine Air Cooling(Electrical); Blade, Engine Cooling
- Position: Driver Side

Chevrolet Fan & Motor, Passenger Side Part Number: 84580369
$176.93 MSRP: $317.36You Save: $140.43 (45%)Product Specifications- Other Name: Motor Assembly-Engine Cooling Fan; Radiator Fan Assembly; Fan Motor
- Position: Passenger Side
- Replaced by: 86778037

Chevrolet Fan Blade Part Number: 42364567
$197.00 MSRP: $356.56You Save: $159.56 (45%)Ships in 1-2 Business DaysProduct Specifications- Other Name: Fan, Engine Cooling; Radiator Fan Assembly; Fan, Engine Air Cooling(Electrical); Blade, Engine Cooling
- Replaces: 95018604

Chevrolet Fan Assembly Part Number: 85151156
$228.61 MSRP: $469.80You Save: $241.19 (52%)Ships in 1-3 Business DaysProduct Specifications- Other Name: Fan Assembly-Engine Cooler; Radiator Fan Assembly; Fan Module; Fan, Engine Air Cooling(Electrical)
- Replaced by: 86579042
- Replaces: 84861224, 84980929

Chevrolet Cooling Fan Part Number: 22718765
$209.83 MSRP: $431.21You Save: $221.38 (52%)Ships in 1-2 Business DaysProduct Specifications- Other Name: Fan, Engine Air Cooling; Dual Radiator and Condenser Fan Assembly.; Fan Assembly; Fan, Engine Air Cooling(Electrical)
Chevrolet Fan Assembly Part Number: 84725045
$294.48 MSRP: $605.16You Save: $310.68 (52%)Ships in 1-2 Business DaysProduct Specifications- Other Name: Fan Assembly-Engine Cooler; Radiator Fan Assembly; Cooling Fan Module; Fan Module; Fan, Engine Air Cooling(Electrical)
- Replaces: 84199039

Chevrolet Fan & Motor Part Number: 42726204
$131.32 MSRP: $300.58You Save: $169.26 (57%)Ships in 1-2 Business DaysProduct Specifications- Other Name: Fan Assembly-Engine Cooler; Fan Assembly
- Replaced by: 42426778

Chevrolet Fan Assembly Part Number: 22960941
$458.67 MSRP: $751.92You Save: $293.25 (39%)Ships in 1-2 Business DaysProduct Specifications- Other Name: Fan Assembly-Engine Cooler; Radiator Fan Assembly; Fan, Engine Air Cooling(Electrical)

Chevrolet Fan & Motor, Passenger Side Part Number: 84543313
$171.72 MSRP: $310.80You Save: $139.08 (45%)Ships in 1-2 Business DaysProduct Specifications- Other Name: Motor Kit, Engine Air Cooling (Electrical); Radiator Fan Assembly; Fan Motor
- Position: Passenger Side
- Replaced by: 85600145

Chevrolet Fan Assembly Part Number: 95205515
$253.63 MSRP: $459.05You Save: $205.42 (45%)Ships in 1-2 Business DaysProduct Specifications- Other Name: Fan Assembly-Engine Cooler; Dual Radiator and Condenser Fan; Cooling Fan Module; Fan Module; Fan, Engine Air Cooling(Electrical)

Chevrolet Fan Blade Part Number: 84723175
$108.18 MSRP: $193.18You Save: $85.00 (44%)Ships in 1-3 Business DaysProduct Specifications- Other Name: Fan, Engine Cooling; Radiator Fan Assembly; Blade, Engine Cooling
- Replaced by: 86532393

Chevrolet Fan Assembly Part Number: 42441974
$192.99 MSRP: $396.58You Save: $203.59 (52%)Ships in 1-3 Business DaysProduct Specifications- Other Name: Fan Assembly-Engine Cooler; Radiator Fan Assembly; Cooling Fan Module; Fan Module
- Replaced by: 42806371
| Page 1 of 13 |Next >
1-20 of 255 Results
Chevrolet Radiator fan
Want to cut long-term maintenance and repair costs? Choose OEM Radiator fan. Those parts deliver top durability you can trust. On our site, you'll find a huge catalog of genuine Chevrolet parts. Prices are unbeatable, so you can keep more in your pocket. Every OEM Chevrolet Radiator fan includes a manufacturer's warranty. You can also get an easy return policy that keeps buying risk free. Fast delivery, get your car on the road quickly. It's simple to search, compare, and order. Stop guessing about quality or fit. Order today and save with parts that last.
Chevrolet Radiator fan Parts Questions & Experts Answers
- Q: How to Replace the Radiator Fan and Fan Shroud for LZ4 and LZ9 on Chevrolet Malibu?A:Draining coolant into a drain pan is the first step for replacing Radiator fan and shroud units on models lz4 and lz9. Semiconductor cooling begins by taking off both headlamps before disassociating the upper transmission oil cooler pipe from the Radiator. The condenser upper tabs require a rope which should then be secured to the upper tie bar. Remove first the upper Radiator support brackets by taking off their bolts before extracting the brackets completely. You should pry the fan shroud tabs upward at the Radiator clips before lifting the vehicle. First remove the retainers and deflector from the lower Radiator air deflectors before taking out the right front fender liner together with right and left Radiator air deflectors and their retainers. Make use of hose clamp pliers (J 38185) to reposition the Radiator outlet hose clamp before removing the outlet hose from the Radiator at its position. Reposition the Radiator outlet hose clamp at the Radiator using hose clamp pliers (J 38185) before removing the lower Radiator support bracket bolts and disconnecting fan wire harness connectors and lower Radiator support brackets. A drain pan should be placed under the transmission oil cooler pipes before proceeding with the removal of the attachment nut from the transmission and both pipes and the clip from the fan shroud. The technician should extract both the lower transmission oil cooler pipe from the Radiator and the transmission oil cooler pipes. Disassemble the fan piece by disconnecting its wire harness connectors. When installing the equipment begin by repositioning the fan shroud assembly followed by transmission oil cooler pipe installation. Reposition the lower transmission oil cooler pipe on the Radiator followed by fan shroud clip installation and both pipes need to be connected to the transmission with an attachment nut torqued to 7 n.m (62 lb in). Position the Radiator air side seals correctly before placing the lower Radiator support brackets and their bolts at 60 n.m (44 lb ft). Relink the fan wire harness connectors alongside the Radiator outlet hose after repositioning the clamp through the use of hose clamp pliers (J 38185). After installing retainers on the left and right Radiator air deflectors it is necessary to secure the right front fender liner and lower Radiator air deflector with its retainers in place. Next lower the vehicle until you can install the fan shroud tabs into the Radiator clips followed by removing the rope from the condenser and upper tie bar. Tighten the bolts of upper Radiator support brackets to 10 n.m but avoid twisting the upper bracket while installation. Put the upper transmission oil cooler pipe in place on the Radiator and afterward reattach the headlamps before filling coolant and checking transmission fluid quantities.
- Q: How to service the radiator fan in the engine compartment on Chevrolet Tracker?A:Service of the Radiator fan starts by disconnecting the negative Battery Cable. Detach the Power Steering Reservoir while you remove the 4 fan nuts and separate the 4 Radiator shroud clips before relocating the reservoir away and avoiding Radiator damage during fan removal. The Radiator shroud should be positioned toward the motor before removing the hub-pulley connection to take out the fan and clutch unit. Start by installing the fan/clutch assembly to the vehicle before using the 4 clips to fasten the shroud. After bracket-mounting the Power Steering Reservoir consist of fan/clutch assembly installation on the pulley hub. The installation requires tightening of the 4 fan nuts to 11 nm (97 inch lbs.) while using a second wrench to stabilize the fan shaft. To complete the procedure connect the negative Battery Cable while tightening the Battery Cable bolt to 15 nm (11 ft. Lbs.).
- Q: How to replace the radiator fan on Chevrolet Venture?A:Start by disconnecting the Radiator fan harness electrical connector when the ignition is switched off to replace the electric Radiator fan. Start by partially loosening the bolts on the engine mount strut at the engine end before disconnecting all bracket brace bolts from the upper radiator support. Finally, rotate the brackets to the rear direction. Start by removing the air cleaner together with its duct assembly then disconnect the Radiator fan shroud bolts from the housing. To enhance access remove the transmission oil cooler lines from their mounting brackets after detaching those brackets. Then move the wiring harness near the upper radiator support. You must remove both radiator fans as well as the Radiator fan shroud. The wiring harness should be repositioned before installing the radiator fans with the Radiator fan shroud along with tightening the Radiator fan shroud bolts to 6 nm (53 inch lbs.). Both transmission oil cooler lines should be attached to their retainers before reinstalling the air cleaner assembly alongside its duct. The next step installs engine mount strut bracket brace bolts at the upper radiator support before returning the struts and brackets in place while you tighten the engine mount strut bolts at the engine side. Reconnect the Radiator fan harness electrical connector as the last step.


Related Chevrolet Parts
 Chevrolet Water Pump
 Chevrolet Thermostat
 Chevrolet Coolant Reservoir
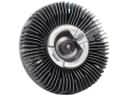 Chevrolet Fan Clutch
 Chevrolet Radiator Hose
 Chevrolet Water Pump Gasket
 Chevrolet Automatic Transmission Oil Cooler Line
 Chevrolet Belt Tensioner Bolt
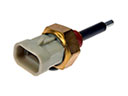 Chevrolet Coolant Level Sensor
 Chevrolet Cooling Hose
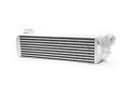 Chevrolet Intercooler
 Chevrolet Transmission Oil Cooler Hose
Browse Chevrolet Radiator fan by Models
Nova S10 Colorado C10 Tahoe Cruze Malibu Camaro Equinox Impala SS SSR Avalanche Silverado 1500 Silverado 2500 HD Caprice Classic Cobalt Suburban Traverse Blazer HHR Sonic Tracker El Camino K10 Spark Trax Trailblazer Astro Cavalier Corvette C20 Aveo Beretta Bolt EUV Bolt EV C1500 C2500 C30 C3500 Celebrity Chevette City Express Corsica Express 1500 Express 2500 Express 3500 G10 G20 G30 K1500 K20 K2500 K30 K3500 K5 Blazer Lumina Metro Monte Carlo P30 Prizm S10 Blazer Silverado 2500 Sprint Uplander Venture Lumina APV Silverado 3500 Suburban 1500 Trailblazer EXT Avalanche 1500 Avalanche 2500 Aveo5 C10 Suburban C1500 Suburban C20 Suburban C2500 Suburban Captiva Sport Citation II Cruze Limited Impala Limited K10 Suburban K1500 Suburban K20 Suburban K2500 Suburban Malibu Limited P20 R10 R10 Suburban R1500 Suburban R20 R20 Suburban R2500 R2500 Suburban R30 R3500 Silverado 1500 Classic Silverado 1500 HD Silverado 1500 HD Classic Silverado 1500 LD Silverado 1500 LTD Silverado 2500 HD Classic Silverado 3500 Classic Silverado 3500 HD Spark EV Spectrum Suburban 2500 V10 V10 Suburban V1500 Suburban V20 V20 Suburban V2500 Suburban V30 V3500