ChevyParts
My Garage
My Account
Cart
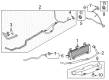
OEM Chevrolet Transmission Oil Cooler
Trans Oil Cooler- Select Vehicle by Model
- Select Vehicle by VIN
Select Vehicle by Model
orMake
Model
Year
Select Vehicle by VIN
For the most accurate results, select vehicle by your VIN (Vehicle Identification Number).
60 Transmission Oil Coolers found


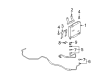
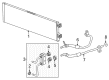
Chevrolet Transmission Cooler Part Number: 89022535
$186.49 MSRP: $278.77You Save: $92.28 (34%)Ships in 1-2 Business DaysProduct Specifications- Other Name: Cooler, Engine Oil Cooler; Cooler, Transmission Oil Cooler
- Replaces: 15995536


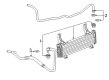
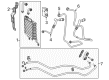
Chevrolet Transmission Cooler Part Number: 22819356
$182.50 MSRP: $272.80You Save: $90.30 (34%)Ships in 1-2 Business DaysProduct Specifications- Other Name: Cooler Assembly-Transmission Fluid Auxiliary; Automatic Transmission Oil Cooler; Cooler, Transmission Oil Cooler
- Replaces: 20851062


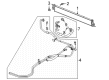
Chevrolet Transmission Cooler Part Number: 22908628
$275.80 MSRP: $412.25You Save: $136.45 (34%)Ships in 1-2 Business DaysProduct Specifications- Other Name: Cooler Assembly-Transmission Fluid Auxiliary; Oil Cooler; Cooler, Transmission Oil Cooler


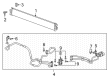
Chevrolet Transmission Cooler Part Number: 84173162
$254.03 MSRP: $379.72You Save: $125.69 (34%)Ships in 1-2 Business DaysProduct Specifications- Other Name: Cooler Assembly-Transmission Fluid Auxiliary; Automatic Transmission Oil Cooler; Cooler, Transmission Oil Cooler
- Replaces: 23448374

Chevrolet Heat Exchanger Part Number: 24043104
$100.67 MSRP: $157.64You Save: $56.97 (37%)Ships in 1-3 Business DaysProduct Specifications- Other Name: Exchanger Assembly-Automatic Transmission Fluid Cooling; Exchanger, Transmission Oil Cooler
- Replaced by: 24044769
- Replaces: 24294591

Chevrolet Transmission Cooler Part Number: 24045331
$69.82 MSRP: $118.87You Save: $49.05 (42%)Ships in 1-2 Business DaysProduct Specifications- Other Name: Exchanger Assembly-Automatic Transmission Fluid Cooling; Oil Cooler; Exchanger, Transmission Oil Cooler

Chevrolet Transmission Cooler Part Number: 24290617
$103.99 MSRP: $162.89You Save: $58.90 (37%)Product Specifications- Other Name: Exchanger Assembly-Automatic Transmission Fluid Cooling; Oil Cooler; Exchanger, Transmission Oil Cooler
- Replaced by: 24042617

Chevrolet Transmission Cooler Part Number: 84173163
$184.26 MSRP: $363.37You Save: $179.11 (50%)Ships in 1-2 Business DaysProduct Specifications- Other Name: Cooler Assembly-Transmission Fluid Auxiliary; Automatic Transmission Oil Cooler; Cooler, Transmission Oil Cooler
- Replaces: 23448375
Chevrolet Transmission Cooler Part Number: 23283460
$308.55 MSRP: $461.21You Save: $152.66 (34%)Ships in 1-3 Business DaysProduct Specifications- Other Name: Cooler, Transmission Oil Cooler; Oil Cooler
- Position: Rear
- Replaces: 23224810, 22981629

Chevrolet Transmission Cooler Part Number: 84153644
$174.78 MSRP: $261.26You Save: $86.48 (34%)Ships in 1-3 Business DaysProduct Specifications- Other Name: Cooler Assembly-Transmission Fluid Auxiliary; Automatic Transmission Oil Cooler; Oil Cooler; Cooler, Transmission Oil Cooler
- Replaces: 23142730

Chevrolet Transmission Cooler Part Number: 92457299
$219.06 MSRP: $327.45You Save: $108.39 (34%)Ships in 1-3 Business DaysProduct Specifications- Other Name: Cooler, Transmission Oil Cooler; Oil Cooler; Cooler
- Replaces: 92251656


Chevrolet Transmission Cooler Part Number: 84493650
$129.75 MSRP: $193.95You Save: $64.20 (34%)Ships in 1-2 Business DaysProduct Specifications- Other Name: Cooler Assembly-Transmission Fluid Auxiliary; Cooler, Transmission Oil Cooler
- Replaces: 84174838

Chevrolet Transmission Cooler Part Number: 84682180
$152.51 MSRP: $227.97You Save: $75.46 (34%)Ships in 1-2 Business DaysProduct Specifications- Other Name: Cooler Assembly-Transmission Fluid Auxiliary; Automatic Transmission Oil Cooler; Cooler, Transmission Oil Cooler
- Replaced by: 85829175

Chevrolet Transmission Cooler Part Number: 84342541
$160.05 MSRP: $239.23You Save: $79.18 (34%)Ships in 1-3 Business DaysProduct Specifications- Other Name: Cooler Assembly-Transmission Fluid Auxiliary; Oil Cooler; Cooler, Transmission Oil Cooler
- Replaced by: 85822148

Chevrolet Transmission Cooler Part Number: 84397531
$134.45 MSRP: $200.97You Save: $66.52 (34%)Ships in 1-3 Business DaysProduct Specifications- Other Name: Cooler Assembly-Transmission Fluid Auxiliary; Automatic Transmission Oil Cooler; Cooler, Transmission Oil Cooler
- Replaces: 84212785

Chevrolet Transmission Cooler Part Number: 23395755
$147.29 MSRP: $220.17You Save: $72.88 (34%)Ships in 1-2 Business DaysProduct Specifications- Other Name: Cooler Assembly-Transmission Fluid Auxiliary; Cooler, Transmission Oil Cooler
- Replaced by: 85829174

Chevrolet Transmission Cooler Part Number: 84397525
$163.21 MSRP: $243.96You Save: $80.75 (34%)Product Specifications- Other Name: Cooler Assembly-Transmission Fluid Auxiliary; Automatic Transmission Oil Cooler; Cooler, Transmission Oil Cooler
- Replaces: 84212782


Chevrolet Transmission Cooler Part Number: 15059397
$168.58 MSRP: $256.48You Save: $87.90 (35%)Ships in 1-2 Business DaysProduct Specifications- Other Name: Cooler Assembly-Transmission Fluid Auxiliary; Cooler, Transmission Oil Cooler
- Replaces: 15153151, 15970092

Chevrolet Auxiliary Cooler Part Number: 19317494
$232.37 MSRP: $347.34You Save: $114.97 (34%)Ships in 1-3 Business DaysProduct Specifications- Other Name: Cooler, Engine Oil Cooler; Cooler, Transmission Oil Cooler


Chevrolet Transmission Cooler Part Number: 22762593
$180.38 MSRP: $269.63You Save: $89.25 (34%)Product Specifications- Other Name: Cooler Assembly-Transmission Fluid Auxiliary; Cooler, Transmission Oil Cooler
| Page 1 of 3 |Next >
1-20 of 60 Results
Chevrolet Transmission Oil Cooler
Want to cut long-term maintenance and repair costs? Choose OEM Transmission Oil Cooler. Those parts deliver top durability you can trust. On our site, you'll find a huge catalog of genuine Chevrolet parts. Prices are unbeatable, so you can keep more in your pocket. Every OEM Chevrolet Transmission Oil Cooler includes a manufacturer's warranty. You can also get an easy return policy that keeps buying risk free. Fast delivery, get your car on the road quickly. It's simple to search, compare, and order. Stop guessing about quality or fit. Order today and save with parts that last.
Chevrolet Transmission Oil Cooler Parts Questions & Experts Answers
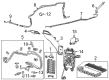
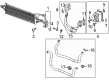
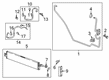
- Q: How to replace the auxiliary transmission oil cooler on Chevrolet Impala?A:To begin the replacement process of the transmission oil cooler, review clearance surrounding transaxle oil cooler pipes and hoses for safety reasons against potential fluid loss through wear or damage. Start work by unbolting the transmission oil cooler bolt from the upper radiator support and then uninstall the upper radiator air baffle. The installation begins with removing lower radiator air baffles and transmission oil cooler bolts which secure the lower radiator support. First detach the inlet and outlet transmission oil cooler lines from their supporting clips before lowering the cooler down below the front bumper. Pull off the inlet and outlet hoses connected to the transmission oil cooler. Install the cooler by first connecting inlet and outlet hoses then repositioning the device into its original position. Reinstall inlet and outlet lines to support clips while strictly adhering to the fastener notice. Fasten the transmission oil cooler bolts onto the lower radiator support where torque reaches 10 N.m (89 lb in) then reinstall the lower radiator air baffle. Install the transmission oil cooler bolt onto the upper radiator support using 25 N.m (18 lb ft) of torque then put back the upper radiator air baffle after which adjust the fluid level.
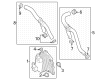
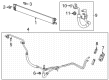
- Q: How to replace the Transmission Oil Cooler on a 4L60-E/4L65-E/4L70-E automatic transmission on Chevrolet Silverado 1500?A:Replacing the transmission fluid auxiliary cooler on a 4l60-e/4l65-e/4l70-e automatic transmission requires starting by removing the front grill assembly. Position a drain pan underneath the vehicle and remove the Transmission Oil Cooler lines that connect to the Transmission Oil Cooler. First disconnect the Transmission Oil Cooler bolts while pulling out the push pins. After this remove the Transmission Oil Cooler from the vehicle. Place the Transmission Oil Cooler into position first before installing its bolts which match with push pins at the radiator brace. Securely tighten each bolt to 12 nm (9 lb ft). After installing the Transmission Oil Cooler lines complete the installation by putting back the front grill assembly.
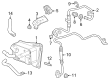
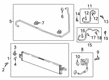
- Q: How to flush the Transmission Oil Cooler and lines after installing a repaired or replacement transmission on Chevrolet Tahoe?A:Leave the oil cooler lines disconnected during installation of the repaired or replacement transmission. The j35944-a Transmission Oil Cooler and line flusher requires 0.6 l (20-21 oz.) of flushing solution which needs to be added before applying 550-700 kpa (80-100 psi) of shop air pressure. Use the discharge hose to connect with the oil cooler return line and attach it to an oil drain container. Install the j35944-a below the vehicle using the hook attachment then join the hose from the j35944-a to the second oil cooler line. Following water valve off positioning on j35944-a you should connect your water hose from the supply and enable water access through the faucet. The j35944-a allows water to flush through its oil cooler lines for ten seconds by setting the valve to on position to drain transmission fluid. Proceed with caution when flushing the cooler lines because blocked materials require diagnosis and repair before you continue. Use the j35944-a off water control to deactivate the water supply then fasten the drainage hose to a covered five-gallon pail. Apply on position to the water valve on j35944-a while pressing the trigger to mix flushing solution with water until vigorous foam appears. Keep the trigger down using the handle clip. The flushing operation combines water with solution for two minutes while connecting the short burst of compressed air to the j35944-a air valve at 3 to 5 second intervals throughout a 15 to 20 second period before releasing the trigger and turning off the water supply. You should disconnect both hoses from their current lines then transfer them to work with the opposite oil cooler line before repeating the flushing process. Zero in the water supply then use air pressure to drain the water from the oil cooler and lines until only clear air emerges from the discharge hose. During the flow check test you need to disconnect both hoses from the oil cooler lines then link the oil cooler feed line to the transmission and the return line to the discharge hose before clamping the discharge hose onto an empty oil drain container. Begin by filling your transmission with automatic transmission fluid and start the engine in park range until it runs for thirty seconds while expecting fluid discharge to reach 1.9 liters (2 quarts). Go to the following step when fluid flow reaches more than 1.9 l (2 quarts). To lower the fluid output below 1.9 l (2 quarts) disconnect the oil cooler feed line at the radiator before using it to connect to the empty oil drain container. Let your vehicle run for 30 seconds while it's in the park position where discharge must reach at least 1.9 l (2 quarts). An insufficient amount of feed flow requires transmission inspection. Check both the return line of the cooler and the cooler itself if inspection reveals sufficient condition. Finish by disconnecting the discharge tube then reestablishing connections between the transmission's feed and return lines and restocking the unit to the recommended fluid amount.


Related Chevrolet Parts
 Chevrolet Thermostat Housing
 Chevrolet Thermostat
 Chevrolet Coolant Reservoir
 Chevrolet Fan Blade
 Chevrolet Fan Shroud
 Chevrolet Radiator Hose
 Chevrolet Radiator fan
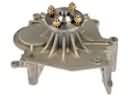 Chevrolet Cooling Fan Bracket
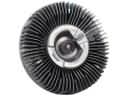 Chevrolet Cooling Fan Clutch
 Chevrolet Cooling Hose
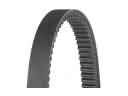 Chevrolet Drive Belt
 Chevrolet Transmission Oil Cooler Hose
Browse Chevrolet Transmission Oil Cooler by Models
Colorado Tahoe Cruze Malibu Camaro Impala SS Avalanche Silverado 1500 Silverado 2500 HD Caprice Suburban Traverse Blazer Volt Trax Trailblazer Corvette C1500 C2500 C3500 City Express Express 1500 Express 2500 Express 3500 K1500 K2500 K3500 Lumina Monte Carlo P30 Silverado 2500 Silverado 3500 Suburban 1500 Trailblazer EXT Avalanche 1500 Avalanche 2500 Impala Limited Silverado 1500 Classic Silverado 1500 HD Silverado 1500 HD Classic Silverado 1500 LD Silverado 1500 LTD Silverado 2500 HD Classic Silverado 3500 Classic Silverado 3500 HD Spark EV Suburban 2500