ChevyParts
My Garage
My Account
Cart
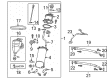
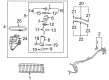
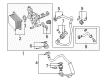
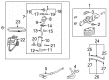
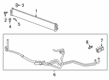
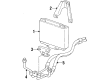
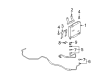
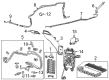
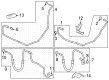
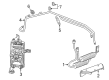
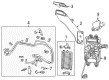
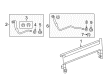
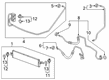
OEM Chevrolet Oil Cooler Hose
Oil Cooler Line- Select Vehicle by Model
- Select Vehicle by VIN
Select Vehicle by Model
orMake
Model
Year
Select Vehicle by VIN
For the most accurate results, select vehicle by your VIN (Vehicle Identification Number).
334 Oil Cooler Hoses found


Chevrolet Outlet Hose Part Number: 23299435
$97.36 MSRP: $165.75You Save: $68.39 (42%)Ships in 1-2 Business DaysProduct Specifications- Other Name: Hose Assembly-Auxiliary Engine Oil Tank Outlet; Oil Cooler Hose; Hose, Engine Oil Cooler
- Replaces: 22768510


Chevrolet Oil Cooler Pipe Part Number: 15848590
$177.41 MSRP: $302.00You Save: $124.59 (42%)Ships in 1-2 Business DaysProduct Specifications- Other Name: Hose Assembly-Engine Oil Cooler Inlet & Outlet; Hose, Engine Oil Cooler
- Replaces: 20842845


Chevrolet Connector Pipe Part Number: 84318909
$35.51 MSRP: $60.44You Save: $24.93 (42%)Ships in 1-2 Business DaysProduct Specifications- Other Name: Pipe Assembly-Transmission Fluid Cooler; Transmission Oil Cooler Line; Oil Cooler Tube; Line; Pipe, Transmission Oil Cooler
- Replaces: 23159471


Chevrolet Upper Hose Part Number: 15870518
$46.27 MSRP: $76.27You Save: $30.00 (40%)Ships in 1-2 Business DaysProduct Specifications- Other Name: Hose Assembly-Engine Oil Cooler Coolant Inlet; Hose, Engine Oil Cooler


Chevrolet Inlet Hose Part Number: 23299434
$76.35 MSRP: $131.13You Save: $54.78 (42%)Ships in 1-2 Business DaysProduct Specifications- Other Name: Hose Assembly-Auxiliary Engine Oil Tank Inlet; Oil Cooler Hose; Hose, Engine Oil Cooler
- Replaces: 22768509

Chevrolet Cooler Pipe Part Number: 87847291
$188.44 MSRP: $296.44You Save: $108.00 (37%)Ships in 1-2 Business DaysProduct Specifications- Other Name: Pipe, Transmission Oil Cooler
- Replaced by: 85669017

Chevrolet Outlet Hose Part Number: 12472265
$75.93 MSRP: $121.59You Save: $45.66 (38%)Ships in 1-2 Business DaysProduct Specifications- Other Name: Hose Assembly, Engine Oil Cooler Outlet; Oil Cooler Hose; Hose, Engine Oil Cooler
- Replaces: 15657399, 15695822

Chevrolet Inlet Hose Part Number: 15748403
$65.34 MSRP: $103.74You Save: $38.40 (38%)Ships in 1-2 Business DaysProduct Specifications- Other Name: Hose, Transmission Oil Cooler
- Replaces: 15996165

Chevrolet Hose & Tube Assembly Part Number: 84329752
$66.38 MSRP: $160.05You Save: $93.67 (59%)Ships in 1-2 Business DaysProduct Specifications- Other Name: Pipe, Transmission Oil Cooler; Line
- Replaces: 84059369, 84241659, 84002526, 84169610

Chevrolet Cooler Pipe Part Number: 84518997
$138.71 MSRP: $220.22You Save: $81.51 (38%)Ships in 1-2 Business DaysProduct Specifications- Other Name: Pipe, Transmission Oil Cooler; Transmission Oil Cooler Line; Line
- Replaces: 23307979, 23252365, 23370670

Chevrolet Inlet Hose Part Number: 84211765
$54.86 MSRP: $87.10You Save: $32.24 (38%)Ships in 1-2 Business DaysProduct Specifications- Other Name: Pipe, Transmission Oil Cooler; Transmission Oil Cooler Hose; Transmission Oil Cooler Line; Outlet Hose; Hose & Tube Assembly; Oil Outlet Tube; Line
- Replaced by: 86584620

Chevrolet Cooler Pipe Part Number: 23127984
$49.22 MSRP: $81.07You Save: $31.85 (40%)Ships in 1-2 Business DaysProduct Specifications- Other Name: Pipe, Transmission Oil Cooler; Transmission Oil Cooler Line

Chevrolet Inlet Hose Part Number: 12472290
$36.53 MSRP: $88.05You Save: $51.52 (59%)Ships in 1-2 Business DaysProduct Specifications- Other Name: Hose, Engine Oil Cooler; Oil Cooler Hose
- Replaces: 15696690, 15695859

Chevrolet Cooler Pipe Part Number: 23488083
$109.36 MSRP: $180.16You Save: $70.80 (40%)Ships in 1-2 Business DaysProduct Specifications- Other Name: Pipe, Transmission Oil Cooler
- Replaces: 23127987

Chevrolet Outlet Pipe Part Number: 22914932
$22.23 MSRP: $36.61You Save: $14.38 (40%)Ships in 1-2 Business DaysProduct Specifications- Other Name: Pipe, Transmission Fluid Cooler Outlet; Pipe, Transmission Oil Cooler
- Replaces: 22786871
Chevrolet Cooler Pipe Part Number: 23488081
$104.71 MSRP: $166.24You Save: $61.53 (38%)Product Specifications- Other Name: Pipe, Transmission Oil Cooler; Transmission Oil Cooler Line
- Replaces: 22809154

Chevrolet Line Part Number: 84211282
$149.73 MSRP: $246.61You Save: $96.88 (40%)Ships in 1-2 Business DaysProduct Specifications- Other Name: Pipe, Transmission Oil Cooler
- Replaced by: 86592714


Chevrolet Oil Inlet Tube Part Number: 12662673
$41.19 MSRP: $65.33You Save: $24.14 (37%)Ships in 1-2 Business DaysProduct Specifications- Other Name: Pipe, Engine Oil Cooler; Oil Cooler Hose; Oil Cooler Line; Hoses

Chevrolet Outlet Pipe Part Number: 84132342
$30.55 MSRP: $50.31You Save: $19.76 (40%)Ships in 1-2 Business DaysProduct Specifications- Other Name: Pipe Assembly-Transmission Fluid Auxiliary Cooler Outlet; Transmission Oil Cooler Line; Outlet Hose; Oil Return Tube; Line; Pipe, Transmission Oil Cooler
- Replaces: 23119936

Chevrolet Inlet Hose Part Number: 84389087
$56.40 MSRP: $92.89You Save: $36.49 (40%)Ships in 1-2 Business DaysProduct Specifications- Other Name: Pipe Assembly-Transmission Fluid Cooler Inlet; Transmission Oil Cooler Hose; Transmission Oil Cooler Line; Oil Inlet Tube; Hose & Tube Assembly; Line; Pipe, Transmission Oil Cooler
| Page 1 of 17 |Next >
1-20 of 334 Results
Chevrolet Oil Cooler Hose
Want to cut long-term maintenance and repair costs? Choose OEM Oil Cooler Hose. Those parts deliver top durability you can trust. On our site, you'll find a huge catalog of genuine Chevrolet parts. Prices are unbeatable, so you can keep more in your pocket. Every OEM Chevrolet Oil Cooler Hose includes a manufacturer's warranty. You can also get an easy return policy that keeps buying risk free. Fast delivery, get your car on the road quickly. It's simple to search, compare, and order. Stop guessing about quality or fit. Order today and save with parts that last.
Chevrolet Oil Cooler Hose Parts Questions & Experts Answers
- Q: How to replace the engine oil cooler hose/pipe without KPS on Chevrolet Corvette?A:Start by placing an oil drain pan underneath the vehicle to replace the engine Oil Cooler Hose/pipe. Starting by taking out the left Catalytic Converter and left fender liner. Detach the external Oil Cooler Hose/pipe from the engine oil cooler and then remove its retaining clip from the Fan Shroud. Start by using an 8-mm bolt wrench to remove the bolt that maintains the engine Oil Cooler Hose/pipe assembly to the engine block followed by the 8-mm bolts that maintain the engine Oil Cooler Hose/pipe to the oil filter housing. Transfer the hose/pipe assembly out of the vehicle along with the discarding of all seals. Begin by applying new engine Oil Cooler Hose/pipe seals after which you can attach the hose/pipe assembly to the vehicle. Secure the hose/pipe at the oil filter housing using bolts which need to be torqued to 12 nm (106 lb in) and bolt the assembly to the engine block using a torque of 25 nm (18 lb ft). Put the drain pan away while checking the quick connector engagement by performing a pushing followed by a pulling motion. Secure the installation of engine Oil Cooler Hose/pipes to the external oil cooler before installing the hose/pipe clip onto the Fan Shroud. Put the left fender liner and left Catalytic Converter back into position. Complete the process by filling the engine with oil and inspecting all fluid lines for leaks.
- Q: How to Ensure Proper Installation of the Oil Cooler Hose on Chevrolet Equinox?A:Before starting the hose/pipe replacement maintain the vehicle in a secure position to shield against possible harm. Raising the vehicle hood requires first placement of the drain pan below the vehicle body on the hoist. The maintenance starts by detaching the upper transaxle oil cooler line from the Radiator before vehicle lifting followed by disconnecting the lower transaxle oil cooler line. First disengage both transaxle cooler lines from their position on the Fan Shroud then remove the transaxle cooler line assembly nut from the transaxle before taking out the transaxle cooler lines from the vehicle. The installation requires new transaxle oil cooler pipe seals. The installation process begins with putting the transaxle oil cooler lines inside the vehicle before connecting the transaxle oil cooler line assembly to the transaxle while tightening both parts to 9 n.m (80 lb in) using the transaxle oil cooler line assembly nut. The lower transaxle oil cooler line should connect to the Radiator before securing lines by the Fan Shroud. Lower the vehicle first while connecting both ends of the upper transaxle oil cooler line to the Radiator. The gm t-iv fluid p/n 88900925 serves as the proper fluid for the application whereas using dexron(R) vi automatic transmission fluid will damage the transaxle. Start the engine after adding fluid to the transaxle to perform leakage inspection.
- Q: How to replace the Engine Oil Cooler Hose/Pipe on Chevrolet Impala?A:First, remove the right engine splash shield and the lower air baffle to replace the Engine Oil Cooler hose/pipe. Then remove the support clip from the Engine Oil Cooler lines after that taking out the Engine Oil Cooler lines on the Engine Oil Cooler, the engine oil filter adapter and the vehicle. For installation, start with reconnecting the Engine Oil Cooler lines back to the vehicle, then connect the cooler to the Engine Oil Cooler and to the engine oil filter adapter. Reinstall the right engine splash shield and the lower air baffle, and reattach the support clip to the Engine Oil Cooler lines. Lastly, fill with the right amount of engine oil.


Related Chevrolet Parts
 Chevrolet Radiator
 Chevrolet Thermostat Housing
 Chevrolet Fan Shroud
 Chevrolet Radiator Cap
 Chevrolet Radiator Hose
 Chevrolet Radiator fan
 Chevrolet Belt Tensioner Bolt
 Chevrolet Coolant Pipe
 Chevrolet Coolant Reservoir Cap
 Chevrolet Cooling Fan Bracket
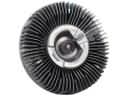 Chevrolet Cooling Fan Clutch
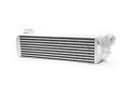 Chevrolet Intercooler
Browse Chevrolet Oil Cooler Hose by Models
S10 Colorado C10 Tahoe Cruze Malibu Camaro Equinox Impala SS Avalanche Silverado 1500 Silverado 2500 HD Caprice Suburban Traverse Blazer Sonic Volt K10 Spark Trax Trailblazer Astro Cavalier Corvette C20 Aveo C1500 C2500 C30 C3500 Express 1500 Express 2500 Express 3500 K1500 K20 K2500 K30 K3500 K5 Blazer Lumina Monte Carlo P30 Silverado 2500 Uplander Venture Silverado 3500 Suburban 1500 Avalanche 1500 Avalanche 2500 Aveo5 C1500 Suburban C2500 Suburban Cruze Limited Impala Limited K1500 Suburban K2500 Suburban R10 R20 R2500 R30 R3500 Silverado 1500 Classic Silverado 1500 HD Silverado 1500 HD Classic Silverado 1500 LD Silverado 1500 LTD Silverado 2500 HD Classic Silverado 3500 Classic Silverado 3500 HD Suburban 2500 V10 V20 V30 V3500