ChevyParts
My Garage
My Account
Cart
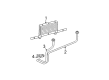
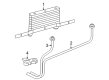
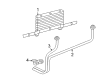
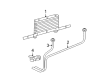
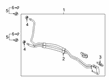
OEM Chevrolet Silverado 1500 Oil Cooler Hose
Oil Cooler Line- Select Vehicle by Model
- Select Vehicle by VIN
Select Vehicle by Model
orMake
Model
Year
Select Vehicle by VIN
For the most accurate results, select vehicle by your VIN (Vehicle Identification Number).
23 Oil Cooler Hoses found


Chevrolet Silverado 1500 Outlet Pipe, Lower Part Number: 15773661
$35.11 MSRP: $57.85You Save: $22.74 (40%)Ships in 1-2 Business Days


Chevrolet Silverado 1500 Outlet Pipe Part Number: 25999419
$103.51 MSRP: $177.77You Save: $74.26 (42%)Ships in 1-3 Business Days

Chevrolet Silverado 1500 Outlet Pipe, Upper Part Number: 25999415
$35.12 MSRP: $57.86You Save: $22.74 (40%)Ships in 1 Business Day


Chevrolet Silverado 1500 Inlet Pipe Part Number: 15809057
$31.52 MSRP: $51.93You Save: $20.41 (40%)Ships in 1 Business Day


Chevrolet Silverado 1500 Inlet Pipe, Upper Part Number: 15809053
$39.59 MSRP: $67.98You Save: $28.39 (42%)Ships in 1-2 Business Days


Chevrolet Silverado 1500 Inlet Pipe Part Number: 15809058
$26.78 MSRP: $44.12You Save: $17.34 (40%)Ships in 1 Business Day


Chevrolet Silverado 1500 Auxiliary Fluid Cooler Inlet Line Part Number: 15779543
$25.49 MSRP: $41.98You Save: $16.49 (40%)Ships in 1-3 Business Days
Chevrolet Silverado 1500 Cooler Pipe Part Number: 86818095
$181.97 MSRP: $315.67You Save: $133.70 (43%)Ships in 1-2 Business Days
Chevrolet Silverado 1500 Pipe Assembly Part Number: 85522974
$132.75 MSRP: $227.99You Save: $95.24 (42%)Ships in 1-2 Business Days
Chevrolet Silverado 1500 Outlet Hose Part Number: 12701099
$24.09 MSRP: $37.71You Save: $13.62 (37%)Ships in 1-3 Business Days
Chevrolet Silverado 1500 Cooler Pipe Part Number: 85149482
$143.13 MSRP: $225.17You Save: $82.04 (37%)Chevrolet Silverado 1500 Cooler Pipe Part Number: 85532819
$99.52 MSRP: $170.90You Save: $71.38 (42%)Ships in 1-3 Business Days
Chevrolet Silverado 1500 Inlet Hose Part Number: 24001331
$10.02 MSRP: $15.69You Save: $5.67 (37%)Ships in 1-2 Business Days
Chevrolet Silverado 1500 Cooler Pipe Part Number: 85563684
$103.42 MSRP: $161.99You Save: $58.57 (37%)
Chevrolet Silverado 1500 Inlet Hose Part Number: 12687164
$11.07 MSRP: $17.58You Save: $6.51 (38%)Ships in 1-2 Business DaysChevrolet Silverado 1500 Pipe Assembly Part Number: 84828850
$141.06 MSRP: $240.17You Save: $99.11 (42%)Ships in 1-2 Business Days
Chevrolet Silverado 1500 Hose & Tube Assembly Part Number: 84975141
$67.07 MSRP: $105.03You Save: $37.96 (37%)
Chevrolet Silverado 1500 Coolant Line Part Number: 86788215
$109.96 MSRP: $188.80You Save: $78.84 (42%)
Chevrolet Silverado 1500 Cooler Pipe Part Number: 24289109
$62.76 MSRP: $102.70You Save: $39.94 (39%)Ships in 1-2 Business Days
Chevrolet Silverado 1500 Cooler Pipe Part Number: 85563686
$135.66 MSRP: $213.42You Save: $77.76 (37%)
| Page 1 of 2 |Next >
1-20 of 23 Results
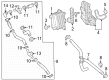
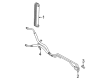
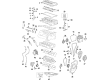
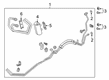
Chevrolet Silverado 1500 Oil Cooler Hose
Want to cut long-term maintenance and repair costs? Choose OEM Oil Cooler Hose. Those parts deliver top durability you can trust. On our site, you'll find a huge catalog of genuine Chevrolet Silverado 1500 parts. Prices are unbeatable, so you can keep more in your pocket. Every OEM Chevrolet Silverado 1500 Oil Cooler Hose includes a manufacturer's warranty. You can also get an easy return policy that keeps buying risk free. Fast delivery, get your car on the road quickly. It's simple to search, compare, and order. Stop guessing about quality or fit. Order today and save with parts that last.
Chevrolet Silverado 1500 Oil Cooler Hose Parts Questions & Experts Answers
- Q: How to replace the Engine Oil Cooler Hose/Pipe on Chevrolet Silverado 1500?A:The oil cooler which can be unitized with Radiator or installed separately in front of the Radiator are serviceable cooler lines and hoses. To replace Engine Oil Cooler hose/pipe, first the remove the plastic caps from the quick connect, pull them back from the pipe. Hold one end of the retaining clip and use a small pick type tool or bent screwdriver to pry the other end free from the quick connect fitting, then rotate and pull the clip off and discard the old clip. For a 6.0l engine, detach from the clip hose for the oil cooler that is located on the lower concealing fan; pull back the hoses but pull the pipe fittings straight out of the q/c fitting in the Radiator. Lift the vehicle, and detach the Exhaust Manifold pipe nuts and relocate the pipe. An 8.1l engine, remove the oil cooler hoses from the clip, and pull the pipe fittings straight out from the Radiator quick connect fittings, then raise and support the vehicle. If equipped, take off the engine shield bolts and the shield. For a 6.0l engine, unscrew the Oil Cooler Hose bracket bolt and the Oil Cooler Hose adapter bolts, sliding off the hoses assembly and replacing the gasket, tossing it aside to inspect the fittings and hoses for damage. In the case of an 8.1l engine, the instructions are as follows: use an allen wrench to remove the bolt for the hose bracket; remove the quick connect fittings at the engine and the hose assembly; discard the gasket and inspect for damage. While installing confirm a snap can be heard when the tube ends of the hose assembly are connected to quick-connectors and the full insertion of the tube can be checked by pulling forcefully. For an 8.1l engine, the quick connect fittings at the engine are connected, the hose bracket bolt is installed, and tightened up to 50 nm (37 ft. Lbs). For a 6.0l engine install hose assembly with a new gasket with tightening adapter bolts to 12 nm (106-inch lbs.), bracket bolt to 25 nm (18 ft. Lbs.). If so provided, mount the engine shield and bolts which you tighten to 20 nm (15 ft. Lbs.) in torque. Place the new retaining clip on the quick connect fitting, making sure that it bites into all the slotted areas: leave this to twist all the way until it locks in place allowing the ears to be visible and the clip to be mobile. Mount a new retaining clip into the other fitting; connect the pipe to the Exhaust Manifold and tighten the nuts to 50 nm (37 ft. Lbs.). Lower the vehicle, then for a 6.0l engines, connect the hoses to the hose clip on the Fan Shroud and push it closed. Put on a plastic cap at the end of the oil cooler line which goes to the quick connect fitting. If damaged or lost, get a new cap prior to installation. For 8.1l, attach the hoses to the clip, connect to the Radiator and pull back sharply to ensure the line enter the fitting until you hear or feel a click. Finally tighten the snap of the plastic cap onto the quick connect fitting ensuring that there is no gap between them.

Related Chevrolet Silverado 1500 Parts
 Chevrolet Silverado 1500 Radiator
 Chevrolet Silverado 1500 Water Pump
 Chevrolet Silverado 1500 A/C Condenser Fan
 Chevrolet Silverado 1500 Automatic Transmission Oil Cooler Line
 Chevrolet Silverado 1500 Coolant Pipe
 Chevrolet Silverado 1500 Coolant Reservoir
 Chevrolet Silverado 1500 Cooling Hose
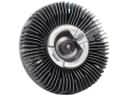 Chevrolet Silverado 1500 Fan Clutch
 Chevrolet Silverado 1500 Fan Motor
 Chevrolet Silverado 1500 Radiator Hose
 Chevrolet Silverado 1500 Thermostat Gasket
 Chevrolet Silverado 1500 Transmission Oil Cooler Hose