ChevyParts
My Garage
My Account
Cart
OEM 2000 Chevrolet Corvette Engine Mount
Engine Motor Mount- Select Vehicle by Model
- Select Vehicle by VIN
Select Vehicle by Model
orMake
Model
Year
Select Vehicle by VIN
For the most accurate results, select vehicle by your VIN (Vehicle Identification Number).
3 Engine Mounts found


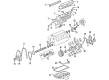
2000 Chevrolet Corvette Motor Mount Part Number: 15254700
$80.15 MSRP: $136.45You Save: $56.30 (42%)Product Specifications- Other Name: Mount Assembly-Engine; Engine Mount Bracket; Front Mount; Mount; Mount, Engine Mounting
- Replaces: 10284134
- Item Weight: 3.70 Pounds
- Item Dimensions: 8.2 x 5.4 x 5.6 inches
- Condition: New
- Fitment Type: Direct Replacement
- SKU: 15254700
- Warranty: This genuine part is guaranteed by GM's factory warranty.


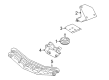 Product Specifications
- Other Name: Bracket, Engine Mounting; Engine Mount Bracket; Motor Mount; Bracket
- Position: Driver Side
- Item Weight: 2.40 Pounds
- Item Dimensions: 8.3 x 6.2 x 4.5 inches
- Condition: New
- Fitment Type: Direct Replacement
- SKU: 10260642
- Warranty: This genuine part is guaranteed by GM's factory warranty.

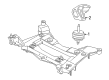 Product Specifications
- Other Name: Bracket, Engine Mounting; Engine Mount Bracket; Motor Mount
- Position: Passenger Side
- Item Weight: 1.90 Pounds
- Item Dimensions: 8.0 x 6.4 x 4.4 inches
- Condition: New
- Fitment Type: Direct Replacement
- SKU: 10260643
- Warranty: This genuine part is guaranteed by GM's factory warranty.
2000 Chevrolet Corvette Engine Mount
With a comprehensive array of OEM 2000 Chevrolet Corvette Engine Mount, from fuel pumps to door handles, our website is a one-stop-shop for your needs. All our genuine 2000 Chevrolet Corvette Engine Mount are backed by the manufacturer's warranty and are offered at competitive prices in the market. Rest assured, you can shop with complete confidence.
2000 Chevrolet Corvette Engine Mount Parts and Q&A
- Q: How to service and repair the engine mount on 2000 Chevrolet Corvette?A: Removal of generator and solvent reservoir of the washer is required to service and repair the engine mount. Prop up the engine, lift the vehicle and take off the front tire. Unconnect different parts, uninstall the old engine mount and connect the new one. Install the generator and the washer solvent reservoir again.
Related 2000 Chevrolet Corvette Parts
 2000 Chevrolet Corvette Camshaft Bearing
 2000 Chevrolet Corvette Crankshaft
 2000 Chevrolet Corvette Crankshaft Seal
 2000 Chevrolet Corvette Dipstick
 2000 Chevrolet Corvette Engine Mount Bracket
 2000 Chevrolet Corvette Intake Valve
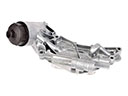 2000 Chevrolet Corvette Oil Cooler
 2000 Chevrolet Corvette Oil Pan
 2000 Chevrolet Corvette Oil Pump
 2000 Chevrolet Corvette Piston Ring
 2000 Chevrolet Corvette Valve Cover Gasket
 2000 Chevrolet Corvette Variable Timing Sprocket