ChevyParts
My Garage
My Account
Cart
OEM 2000 Chevrolet Prizm Timing Chain
Engine Timing Chain- Select Vehicle by Model
- Select Vehicle by VIN
Select Vehicle by Model
orMake
Model
Year
Select Vehicle by VIN
For the most accurate results, select vehicle by your VIN (Vehicle Identification Number).
1 Timing Chain found

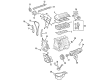
2000 Chevrolet Prizm Timing Chain Part Number: 88969017
Product Specifications- Other Name: Chain, Engine Timing
- Replaces: 94856697
- Item Weight: 1.30 Pounds
- Item Dimensions: 6.4 x 4.2 x 4.2 inches
- Condition: New
- Fitment Type: Direct Replacement
- SKU: 88969017
- Warranty: This genuine part is guaranteed by GM's factory warranty.
2000 Chevrolet Prizm Timing Chain
With a comprehensive array of OEM 2000 Chevrolet Prizm Timing Chain, from fuel pumps to door handles, our website is a one-stop-shop for your needs. All our genuine 2000 Chevrolet Prizm Timing Chain are backed by the manufacturer's warranty and are offered at competitive prices in the market. Rest assured, you can shop with complete confidence.
2000 Chevrolet Prizm Timing Chain Parts and Q&A
- Q: How to replace the Timing Chain and Variable Timing Sprocket on 2000 Chevrolet Prizm?A: To replace the timing chain and sprockets, start with unlocking the camshaft actuator locking pin and removing the accessory Drive Belt, subsequently removing the generator. Turn off ignition and start switch, remove the negative Battery Cable to avoid electrical sparks and drain its cooling system. The reservoir for windshield washer fluid is removed by a dismounting the bolt with the resiver, removing the connector pump as well as unhooking the fluid line from pump and plugging the outlet for the pump. Mount the engine support fixture, then remove the right side Engine Mount fasteners, loosen the a/c receiver pinch clamp, and elevate a/c receiver to access mount. As stated in the manual, there are also some steps that you have to follow if you need to deal with the engine removal for service. First of all, you have to remove the right side Engine Mount and the cylinder head cover, then you can set the number one Piston to the top dead center, and make the alignment of the camshaft timing sprockets. Increase and support the car, then disconnect the oil pressure switch that is part of the power steering, and remove the right lower side splash of the engine. Remove the Power Steering Pump and pull the Crankshaft Pulley and retaining bolt with j 8614-01. For verify, take apart the Crankshaft Position Sensor and bolt, lower the vehicle, and remove the Drive Belt tensioner and Timing Chain Tensioner. Disassemble the timing chain cover and Crankshaft sensor reluctor, timing chain dampener, and shoe. Disassembling Crankshaft sprocket and the timing chain and removing the front camshaft bearing cap will allow you to reach the cmp actuator. While pressing the actuator using air pressure, ensure it turns smoothly and locks accordingly; replace it and if it doesn't, then replace it of course. Mount the front camshaft bearing cap and tighten the bolts with 23 nm (17 ft. Lbs.). Line up the camshaft timing marks with a wrench, turn the camshafts, and place the Crankshaft bolt temporarily. Turn the Crankshaft to align the keyway upwards and then fit the timing chain and Crankshaft timing sprocket. Secure the timing chain shoe with two bolts fastened to a 10 nm (89 in. Lbs.) torque, and what is guaranteed is the timing chain links aligning to the timing marks. Mount the timing chain dampener, Crankshaft sensor reluctor, apply a bead of gm p/n 12346240 to the timing chain cover mating surface. Thereupon release the locking pin of the intake camshaft actuator and mount the timing chain cover and fasten it with the appropriate fastenings and tighten them to the specked volumetric values. Mount the Timing Chain Tensioner with two bolts with a torque of 10 nm (89 in. Lbs.), and the right side engine mounting bracket with three bolts tightened with a torque of 54 nm (40 ft. Lbs.). Mount the Drive Belt tensioner, Crankshaft position sensor, and Crankshaft Pulley, securing the corresponding fasteners to their specified torque value. Reinstall Power Steering Pump and tighten it by screwing the bolts and nuts, reinsert the right side lower engine splash shield and lower the vehicle. Join power steering oil pressure switch connector, turn the cranks shaft clockwise to ensure timing chain push release, and check the correctness of timing chain arrangement. For the final step before starting the engine, install the cylinder head cover and the right side Engine Mount, and bolt it down to 15 nm (11 ft. Lbs.), unfasten the engine support fixture (J28467-A), reinstall the generator, connect the components of the windshield spray, fill the cooling system, and reconnect the negative Battery Cable, but bolt it down to 15 nm (11 ft. Lbs.).
Related 2000 Chevrolet Prizm Parts
 2000 Chevrolet Prizm Camshaft
 2000 Chevrolet Prizm Crankshaft Pulley
 2000 Chevrolet Prizm Crankshaft Seal
 2000 Chevrolet Prizm Head Gasket
 2000 Chevrolet Prizm Intake Valve
 2000 Chevrolet Prizm Oil Pan
 2000 Chevrolet Prizm Oil Pump
 2000 Chevrolet Prizm Rod Bearing
 2000 Chevrolet Prizm Timing Belt Tensioner
 2000 Chevrolet Prizm Timing Chain Tensioner
 2000 Chevrolet Prizm Timing Cover
 2000 Chevrolet Prizm Variable Timing Sprocket