ChevyParts
My Garage
My Account
Cart
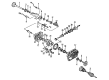
OEM 2001 Chevrolet Astro Universal Joint
U-Joint- Select Vehicle by Model
- Select Vehicle by VIN
Select Vehicle by Model
orMake
Model
Year
Select Vehicle by VIN
For the most accurate results, select vehicle by your VIN (Vehicle Identification Number).
2 Universal Joints found


2001 Chevrolet Astro Universal Joints Part Number: 89059111
$163.83 MSRP: $273.43You Save: $109.60 (41%)Ships in 1-2 Business DaysProduct Specifications- Other Name: Joint Kit, Front Axle Propeller Shaft Universal *Outside Snap; Slip Yoke; Joint Kit, Propeller Shaft Universal Joint
- Position: Front
- Replaces: 12472409, 12476231, 12471503, 12522048, 26049843, 88982758, 88964507, 94772179, 12476230
- Item Weight: 1.90 Pounds
- Item Dimensions: 4.1 x 4.1 x 1.6 inches
- Condition: New
- Fitment Type: Direct Replacement
- SKU: 89059111
- Warranty: This genuine part is guaranteed by GM's factory warranty.


2001 Chevrolet Astro Universal Joints Part Number: 23104840
$36.45 MSRP: $88.98You Save: $52.53 (60%)Product Specifications- Other Name: Joint Kit, Propeller Shaft Universal Joint; U Joint
- Position: Front
- Replaces: 12471502, 12479126, 26042371
- Item Weight: 1.80 Pounds
- Item Dimensions: 5.9 x 5.4 x 2.9 inches
- Condition: New
- Fitment Type: Direct Replacement
- SKU: 23104840
- Warranty: This genuine part is guaranteed by GM's factory warranty.
2001 Chevrolet Astro Universal Joint
With a comprehensive array of OEM 2001 Chevrolet Astro Universal Joint, from fuel pumps to door handles, our website is a one-stop-shop for your needs. All our genuine 2001 Chevrolet Astro Universal Joint are backed by the manufacturer's warranty and are offered at competitive prices in the market. Rest assured, you can shop with complete confidence.
2001 Chevrolet Astro Universal Joint Parts and Q&A
- Q: What tools are required to service and repair the universal joint with an external snap ring on 2001 Chevrolet Astro?A: A crimping tool, retaining snap ring, snap ring pliers, axle wrench, and grease gun. U joint bearing separator (J9522-3) and u joint bearing spacer remover (J9522-5). Start by unscrewing the shaft of the propeller and support it horizontally on a press ignorant of its supporting mechanism. Mark the propeller shaft in order to show that end that connects to the transmission or transfer case and the end that connects to rear or front axle. Pinch the snap rings with pliers, where you can pinch the ends of the snap rings. If slipping bearing cannot easily be removed, tap on end of the bearong cup to relieve pressure. Support the Universal Joint with the lower ear of the yoke with a 30 mm (1 1-8 inch) socket and drive the lower bearing cup out of the yoke ear with the u joint bearing separator (J9522-3). If the bearing cup is not completely removed, lift the cross and install a u joint bearing spacer remover (J9522 5) that is inserted between the seal and the bearing cup, then press it out. Put on gloves and rotate the propeller shaft to force the opposite cup on the bearing out, take off the cross and the remaining universal parts from the yoke. To remove the bearing cups in the Slip Yoke, similarly remove the front Universal Joint replacement (rear axle only). Check retaining ring grooves and bearing cup bores for dirt, corrosion, or imperfections, and clean the grooves if required. As for installation, take off the vakes of the bearing cups from new Universal Joint journals, lubricate the needle bearings, put one bearing cup semi-club into the one side yoke. Take down the ear of the yoke, insert the cross, and press the bearing cup flush into the yoke. Do the same on the opposite bearing cup, placing them with trunnions in line. With observation of free movement of trunnions, press the opposite bearing cup into the yoke now that the groove of the bearing retainer is visible, install the bearing retainer and press it until the retainers snap into place using chassis grease where necessary. If the retainer does not seat, tap the yoke slightly using a dead blow hammer. Finally, install the propeller shaft.
Related 2001 Chevrolet Astro Parts
 2001 Chevrolet Astro Differential
 2001 Chevrolet Astro Differential Bearing
 2001 Chevrolet Astro Differential Cover
 2001 Chevrolet Astro Differential Seal
 2001 Chevrolet Astro Driveshaft Yokes
 2001 Chevrolet Astro Pinion Bearing
 2001 Chevrolet Astro Pinion Washer
 2001 Chevrolet Astro Slip Yoke
 2001 Chevrolet Astro Wheel Seal