ChevyParts
My Garage
My Account
Cart
OEM 2001 Chevrolet Prizm Rack And Pinion
Steering Rack And Pinion- Select Vehicle by Model
- Select Vehicle by VIN
Select Vehicle by Model
orMake
Model
Year
Select Vehicle by VIN
For the most accurate results, select vehicle by your VIN (Vehicle Identification Number).
2 Rack And Pinions found

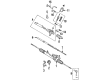
2001 Chevrolet Prizm Rack Part Number: 94852836
Product Specifications- Other Name: Rack, Steering Gear
- Item Weight: 4.70 Pounds
- Item Dimensions: 25.0 x 6.7 x 6.7 inches
- Condition: New
- Fitment Type: Direct Replacement
- SKU: 94852836
- Warranty: This genuine part is guaranteed by GM's factory warranty.

2001 Chevrolet Prizm Steering Gear Part Number: 94857859
Product Specifications- Other Name: Gear; Gear Assembly; Gear, Steering
- Item Weight: 17.60 Pounds
- Item Dimensions: 49.2 x 10.4 x 6.8 inches
- Condition: New
- Fitment Type: Direct Replacement
- SKU: 94857859
- Warranty: This genuine part is guaranteed by GM's factory warranty.
2001 Chevrolet Prizm Rack And Pinion
With a comprehensive array of OEM 2001 Chevrolet Prizm Rack And Pinion, from fuel pumps to door handles, our website is a one-stop-shop for your needs. All our genuine 2001 Chevrolet Prizm Rack And Pinion are backed by the manufacturer's warranty and are offered at competitive prices in the market. Rest assured, you can shop with complete confidence.
2001 Chevrolet Prizm Rack And Pinion Parts Questions & Experts Answers
- Q: What steps should be taken before disconnecting the steering column or intermediate shaft from the Rack and Pinion on 2001 Chevrolet Prizm?A: With the wheels pointing straight ahead and Steering Column in lock, disconnect the Steering Column or the intermediate shaft from the Rack And Pinion to avoid damages to the coil assembly. First, unbolt the 5 Steering Column upper cover bolts and the Steering Column upper cover, as well as the steering shaft lower coupling bolt. On the following step, remove the outlet pipe heat shield bolt as well as the outlet pipe heat shield. Remove the lh Rack And Pinion inlet and outlet pipe clip bolt, rh Rack And Pinion outlet pipe clip bolt and lh Rack And Pinion inlet and outlet pipe clip. Put a drain pan under the vehicle to catch power steering fluid, then disconnect the Rack And Pinion inlet pipe and the Rack And Pinion outlet pipe. Remove the Oxygen Sensor and that of the gasket, install the engine support fixture and lift the vehicle. Take off the 6 bolts and the rh lower engine splash shield, and then the 6 bolts on the lh lower engine splash shield. Remove the Exhaust Manifold pipe Drive Shaft heat shield, the 1 nut, and the 2 bolts. Take off the front tire and wheel assemblies, 2 outer tie rods, and 2 nuts (4,6) and front suspension brace. Take off the front suspension crossmember, the trans support, fig. 8, and 9 - the 2 control arms and the front stabilizer shaft, as the unit to gain the access to the Rack And Pinion. Second, unbolt the rear transaxle mount through bolt and rear transaxle mount, along with the 3 retastaxle mount bracket bolts and bracket. Remove the 2 Exhaust Pipe bolts & 2 springs and disconnect the Exhaust Pipe from the Exhaust Manifold. Remove the 1 Rack And Pinion boot shield bolt, the 1 Rack And Pinion boot heat shield nut, and Rack And Pinion boot the heat shield. Unfasten the 2 Rack And Pinion mounting flap bolts, the 2 Rack And Pinion clamp nuts, and the 2 Rack And Pinion clamps from the Rack And Pinion. Shift the Rack And Pinion to the rh side of the vehicles and then remove it by lowering and removing from the lh side. Mount 2 insulators to the new Rack And Pinion, then put the Rack And Pinion into the vehicle by lifting it from the lh and then moving it to the rh side before putting it back on the lh side. Apply 2 Rack And Pinion clamps, 2 Rack And Pinion clamp bolts and the 2 Rack And Pinion clamp nuts tightening them to 71 nm (52fts Lbs). Secure the boot heat shield to Rack And Pinion boot; mount with 1 bolt and nut, applied to 5.4 nm (48 in lbs). Reattach the Exhaust Pipe to the Exhaust Manifold, and secure with the 2 Exhaust Pipe springs and the 2 Exhaust Pipe bolts, torque 62 nm (46 ft. Lbs.). Install the rear bracket of the transaxle mount with 3 bolts that are to be tightened to 77 nm (57 ft. Lbs.) confirming through the rear transaxle mount secured with the through bolt tightened to 87 nm (64 ft. Lbs.). Replace the front suspension crossmember, the trans support, the 2 control arms (8, 9), and the stabilizer shaft as a unit, and then tighten the front suspension brace with 2 nuts (4, 6) to 69 nm (51 ft. Lbs.). Reattach the outer tie rod, the front tire and wheel assemblies as well as the Exhaust Manifold pipe Drive Shaft heat shield using with 1 nut and with 2 bolts which are tightened to 5.4 nm(48 inch lbs). Install the lh lower engine splash shield using 6 bolts that should be tightened to 10nm(89 ft.lbs.). Use the same procedure for the rh lower engine splash shield using 6 bolts that should be tightened to 10nm(89 ft.lbs.). Drop the vehicle and take off the engine support fixture. Mount the Oxygen Sensor gasket and the Oxygen Sensor. Install the Rack And Pinion outlet pipe and inlet pipe to the Rack And Pinion and fasten them with a nut that is tightened to 13 nm (108 in.lb.). Install the lh Rack And Pinion inlet pipe clip, the lh Rack And Pinion outlet clip bolt and the rh Rack And Pinion outlet clip bolt and tighten to 5.4 nm (48 inch lbs.). Replace the outlet pipe heat shield and the outlet pipe heat shield bolt and tighten the bolt to 5.4 rnm (48 inche. Lbs.)). Mount the steering shaft lower coupling bolt and tighten it to 35 nm (26 ft. Lbs.). Finally, fasten the Steering Column upper cover with 5 bolts at 4.9 nm (43 inch lbs.), top up power steering fluid in the reservoir, bleed the power steering, and align the wheels, if required.
Related 2001 Chevrolet Prizm Parts
 2001 Chevrolet Prizm Power Steering Hose
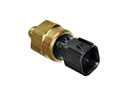 2001 Chevrolet Prizm Power Steering Pressure Switch
 2001 Chevrolet Prizm Power Steering Pump
 2001 Chevrolet Prizm Power Steering Reservoir
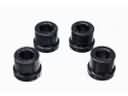 2001 Chevrolet Prizm Rack & Pinion Bushing
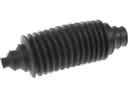 2001 Chevrolet Prizm Rack and Pinion Boot
 2001 Chevrolet Prizm Steering Column
 2001 Chevrolet Prizm Steering Column Cover
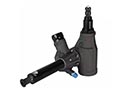 2001 Chevrolet Prizm Steering Gearbox
 2001 Chevrolet Prizm Steering Wheel
 2001 Chevrolet Prizm Tie Rod
 2001 Chevrolet Prizm Tie Rod End