ChevyParts
My Garage
My Account
Cart
OEM Chevrolet Prizm Rack And Pinion
Steering Rack And Pinion- Select Vehicle by Model
- Select Vehicle by VIN
Select Vehicle by Model
orMake
Model
Year
Select Vehicle by VIN
For the most accurate results, select vehicle by your VIN (Vehicle Identification Number).
2 Rack And Pinions found

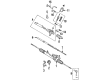
Chevrolet Prizm Steering Gear Part Number: 94857859

Chevrolet Prizm Rack Part Number: 94852836
Chevrolet Prizm Rack And Pinion
Want to cut long-term maintenance and repair costs? Choose OEM Rack And Pinion. Those parts deliver top durability you can trust. On our site, you'll find a huge catalog of genuine Chevrolet Prizm parts. Prices are unbeatable, so you can keep more in your pocket. Every OEM Chevrolet Prizm Rack And Pinion includes a manufacturer's warranty. You can also get an easy return policy that keeps buying risk free. Fast delivery, get your car on the road quickly. It's simple to search, compare, and order. Stop guessing about quality or fit. Order today and save with parts that last.
The Chevrolet Prizm Rack And Pinion is a marvelous part of the car, which should be regarded as a crucial factor that directly influences the vehicle's efficiency. This steering mechanism helps in turning the steering wheel into finely actually moving the wheels sideways to enable more efficient handling. Chevrolet Prizm manufactured from 1989 to 2002 presents several models with cruising patterns that have both manual and power-assisted rack and pinion steering: while the contemporary cars predominantly exhibit hydraulic assistance for smoother steering. The Chevrolet Prizm Rack And Pinion is suitable for different Prizm generations, such as the first, second, and third, which are empowered by powerful engines and reliable transmissions that enrich the vehicle's steering features. This combination not only increases the drive efficiency but safety as well since the drivers of the cars gain centralized control. Specifically, the uniqueness of the Chevrolet Prizm Rack And Pinion in the automotive market depends on the differences in the geometry of the gears: straight and helical, which increase the working capacity and decrease the temperature at which it operates. This Chevrolet Prizm Rack And Pinion is accurate and resilient which is very important in supporting your requirement for an amusing and comfortable driving in your Chevrolet Prizm. All in all, the application of this sophisticated steering technology shows Chevrolet Prizm indeed offers flying-compass-like handling and quality performance, making it good choice for compact car lovers.
Chevrolet Prizm Rack And Pinion Parts and Q&A
- Q: What steps should be taken before disconnecting the steering column or intermediate shaft from the Rack and Pinion on Chevrolet Prizm?A:Steer your vehicle to a straight position while locking the Steering Column before starting the intermediate shaft or Steering Column disconnect from the Rack And Pinion to avoid damaging the coil assembly. Start by disassembling the 5 bolts that hold the Steering Column upper cover to the bulkhead then separate the upper cover from the bulkhead. Finish by removing the steering shaft lower coupling bolt. Remove the outlet pipe heat shield bolt followed by its heat shield from the steering system. To proceed further, remove the lh Rack And Pinion inlet and outlet pipe clip bolt together with the rh Rack And Pinion outlet pipe clip bolt and the lh Rack And Pinion inlet and outlet pipe clip. After placing a drain pan to catch power steering fluid, workers must disconnect the Rack And Pinion inlet pipe and front Rack And Pinion outlet pipe before removing the Oxygen Sensor connector and sensor with its gasket. Place the engine support fixture before using a vehicle lifter to elevate the car. The removal of six bolts from the rh lower engine splash shield requires attention followed by the removal of six bolts from the lh lower engine splash shield. First detach the heat shield of the Exhaust Manifold pipe Drive Shaft along with one nut and two bolts before removing the front tire assemblies from their mounting position. Start by taking off the front suspension brace then the front suspension crossmember and trans support along with Control Arms (8,9) and front stabilizer shaft if equipped. After that remove the two nuts (4,6) and tie rods. Begin by removing the through bolt from the rear transaxle mount and then the mount itself. Subsequently extract the 3 bolts securing the bracket and remove the bracket. The Exhaust Pipe removal from the Exhaust Manifold requires the removal of 2 bolts and 2 springs on both ends of the pipe. Start by disconnecting the following parts in sequence: Rack And Pinion boot shield bolt then Rack And Pinion boot heat shield nut and heat shield followed by 2 Rack And Pinion mounting clamp bolts, 2 Rack And Pinion clamp nuts and 2 Rack And Pinion clamps. Position the Rack And Pinion toward the right side of the vehicle before lowering it down from the left side. After that remove the 2 insulators from the Rack And Pinion. Mount 2 insulators onto the Rack And Pinion before you elevate the Rack And Pinion from left to right and back to the original starting point. Seam the 2 Rack And Pinion clamps into place then bolt them down using the 2 Rack And Pinion clamp nuts which should be tightened to 71 nm (52 ft. Lbs.). The Rack And Pinion boot heat shield requires one bolt and one nut that should be tightened to 5.4 nm (48 inch lbs.) before affixing the Exhaust Pipe to the Exhaust Manifold using a proper gasket followed by installation with 2 Exhaust Pipe springs and 2 Exhaust Pipe bolts tightened to 62 nm (46 ft. Lbs.). Add the rear transaxle mount bracket by tightening its 3 bolts to 77 nm (57 ft. Lbs.) and use the through bolt to secure the rear transaxle mount at 87 nm (64 ft. Lbs.). Reassemble the front suspension crossmember together with trans support and 2 control arms (8,9), stabilizer shaft followed by front suspension brace supported by 2 nuts (4,6) secured with 69 nm (51 ft. Lbs.) torque. Secure the outer tie rod and front wheel along with tire components and Exhaust Manifold pipe Drive Shaft heat shield with one nut together with two bolts that require 5.4 nm torque at 48 inch lbs. Torque the lh lower engine splash shield's 6 bolts to 10 nm (89 inch lbs.) and the rh lower engine splash shield's 6 bolts to 10 nm (89 inch lbs.). Drop the vehicle to the ground before removing the engine support fixture. Gas up the Oxygen Sensor with a gasket before securing the sensor while connecting its connector. Fix one Rack And Pinion inlet pipe and one Rack And Pinion outlet front pipe to the Rack And Pinion through one nut which requires a torque of 13 nm (108 inch lbs.). The lh Rack And Pinion inlet and outlet pipe clip requires installation alongside the rh Rack And Pinion outlet pipe clip bolt and lh Rack And Pinion inlet and outlet pipe clip bolt. Use 5.4 nm (48 inch lbs.) torque settings for attachment bolts. Place back the outlet pipe heat shield while mounting its heat shield bolt. Tighten the bolt to 5.4 nm (48 inch lbs.). Screw in the steering shaft lower coupling bolt until it reaches 35 nm torque (26 ft. Lbs.) and use 5 bolts to fasten the Steering Column upper cover at 4.9 nm torque (43 inch lbs.). Complete the power steering fluid reservoir filling while conducting a power steering system bleed then check and adjust wheel alignment if needed.
Related Chevrolet Prizm Parts
 Chevrolet Prizm Power Steering Hose
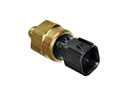 Chevrolet Prizm Power Steering Pressure Switch
 Chevrolet Prizm Power Steering Pump
 Chevrolet Prizm Power Steering Reservoir
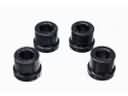 Chevrolet Prizm Rack & Pinion Bushing
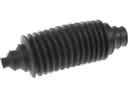 Chevrolet Prizm Rack and Pinion Boot
 Chevrolet Prizm Steering Column
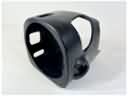 Chevrolet Prizm Steering Column Cover
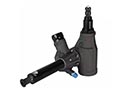 Chevrolet Prizm Steering Gearbox
 Chevrolet Prizm Steering Wheel
 Chevrolet Prizm Tie Rod
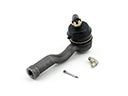 Chevrolet Prizm Tie Rod End