ChevyParts
My Garage
My Account
Cart
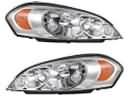
OEM 2002 Buick Rendezvous Headlight Bulb
Headlamp Bulb- Select Vehicle by Model
- Select Vehicle by VIN
Select Vehicle by Model
orMake
Model
Year
Select Vehicle by VIN
For the most accurate results, select vehicle by your VIN (Vehicle Identification Number).
2 Headlight Bulbs found


2002 Buick Rendezvous Bulb & Socket Part Number: 19257054
$14.11 MSRP: $25.22You Save: $11.11 (45%)Ships in 1-2 Business DaysProduct Specifications- Other Name: Bulb Assembly, Headlamp (Low Beam); Fog Light Bulbs; Headlight Bulbs; Car Bulbs; Headlight; Headlamp Bulb; Composite Assembly; Fog Lamp Bulb; Lower Beam Bulb; Bulb; Bulb, Capsule/Headlamp/Fog Lamp
- Replaces: 09441733, 12450177, 01999366, 9441733, 01999357, 1999366, 1999357
- Item Weight: 0.30 Pounds
- Item Dimensions: 4.2 x 2.1 x 2.2 inches
- Condition: New
- Fitment Type: Direct Replacement
- SKU: 19257054
- Warranty: This genuine part is guaranteed by GM's factory warranty.


2002 Buick Rendezvous Bulb & Socket, Green Line Part Number: 9441732
$13.16 MSRP: $23.52You Save: $10.36 (45%)Ships in 1-3 Business DaysProduct Specifications- Other Name: Bulb, Headlamp (High Beam); Headlight Bulbs; Car Bulbs; Headlight; Headlamp Bulb; High Beam; Composite Assembly; Fog Lamp/Turn Signal; Capsule Bulb
- Item Weight: 0.40 Pounds
- Item Dimensions: 4.2 x 2.2 x 2.1 inches
- Condition: New
- Fitment Type: Direct Replacement
- SKU: 9441732
- Warranty: This genuine part is guaranteed by GM's factory warranty.
2002 Buick Rendezvous Headlight Bulb
With a comprehensive array of OEM 2002 Buick Rendezvous Headlight Bulb, from fuel pumps to door handles, our website is a one-stop-shop for your needs. All our genuine 2002 Buick Rendezvous Headlight Bulb are backed by the manufacturer's warranty and are offered at competitive prices in the market. Rest assured, you can shop with complete confidence.
2002 Buick Rendezvous Headlight Bulb Parts Questions & Experts Answers
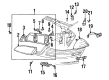
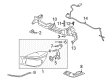
- Q: How to replace the front headlight bulb on 2002 Buick Rendezvous?A: You should start the bulb replacement procedure by taking away the hood then eliminating the thumb screw found on the rear of the headlamp. You should lift the retainer first before releasing it and then pull the headlamp straight forward to separate the ball stud from the grommet to remove the upper fascia support. The electrical connector should be disconnected from the headlamp while the bulbs need to be unscrewed counterclockwise. The next step requires freeing the headlamp trim tabs while pulling off the trim along with all adhesive tape. The remnant adhesive needs removal from both headlamp trim and headlamp by using 3m(TM) adhesive remover p/n 8984 or its equivalent alternative. To install the headlamp trim begin by attaching 3m(TM) p/n 6382 adhesive tape or equivalent to its surface if required before pressing the trim against the headlamp until end tabs reach full seating position. To install the new bulb follow the clockwise rotation while placing the electrical connector deep into the upper fascia support panel. Connect the electrical connector before putting the headlamp back onto the upper fascia support and push it until the ball stud reaches full seating. Reinstall the thumb screw at the rear of the headlamp by securing it on the ball stud and then activate the vertical retainer by moving it downwards to reach complete insertion. Before ending the repair process use the headlamp aim tester to verify the aim when installing a new headlamp or working on the front end area.
Related 2002 Buick Rendezvous Parts
 2002 Buick Rendezvous Headlight
 2002 Buick Rendezvous Tail Light
 2002 Buick Rendezvous Back Up Light
 2002 Buick Rendezvous Fog Light
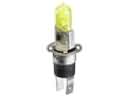 2002 Buick Rendezvous Fog Light Bulb