ChevyParts
My Garage
My Account
Cart
OEM 2002 Chevrolet Camaro Oil Pan
Oil Drain Pan- Select Vehicle by Model
- Select Vehicle by VIN
Select Vehicle by Model
orMake
Model
Year
Select Vehicle by VIN
For the most accurate results, select vehicle by your VIN (Vehicle Identification Number).
2 Oil Pans found


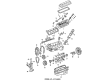
2002 Chevrolet Camaro Oil Pan Part Number: 12628771
$325.79 MSRP: $559.52You Save: $233.73 (42%)Ships in 1-2 Business DaysProduct Specifications- Other Name: Pan, Engine Oil
- Replaces: 12558762, 12598151
- Item Weight: 16.50 Pounds
- Item Dimensions: 7.9 x 24.4 x 17.1 inches
- Condition: New
- Fitment Type: Direct Replacement
- SKU: 12628771
- Warranty: This genuine part is guaranteed by GM's factory warranty.

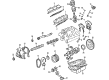
2002 Chevrolet Camaro Oil Pan Part Number: 12563241
Product Specifications- Other Name: Pan, Engine Oil; Engine Oil Pan
- Replaces: 24508693, 24503240
- Item Weight: 6.60 Pounds
- Item Dimensions: 19.1 x 9.5 x 6.4 inches
- Condition: New
- Fitment Type: Direct Replacement
- SKU: 12563241
- Warranty: This genuine part is guaranteed by GM's factory warranty.
2002 Chevrolet Camaro Oil Pan
With a comprehensive array of OEM 2002 Chevrolet Camaro Oil Pan, from fuel pumps to door handles, our website is a one-stop-shop for your needs. All our genuine 2002 Chevrolet Camaro Oil Pan are backed by the manufacturer's warranty and are offered at competitive prices in the market. Rest assured, you can shop with complete confidence.
2002 Chevrolet Camaro Oil Pan Parts Questions & Experts Answers
- Q: How to replace the oil pan on 2002 Chevrolet Camaro?A: The first step for Oil Pan replacement involves installing an engine support fixture to the motor then detaching the battery's negative cable. Support your vehicle while lifting it and remove engine oil from its reservoir. Detach the right side Engine Mount to cradle bolts while also removing the exhaust crossover as well as right side shock absorber lower mounting bolts and intermediate Steering Shaft bolt from the Rack And Pinion. The crossmember needs support before you disconnect the oil level sensor electrical connector. Start by disconnecting the oil level sensor which sits in the Oil Pan and then proceed to remove the Starter motor and finally detach the right front crossmember bolts. Begin by removing the through bolt from the left Engine Mount then loosen the left crossmember bolts 2 turns before using an engine support fixture to lift the engine while the vehicle is lower. The vehicle requires elevation for adjusting the crossmember to reach the Oil Pan. Cautiously unfasten the Oil Pan bolts so you can guide the engine block-facing side of the Oil Pan Gasket during the lowering procedure that yields Oil Pan removal. Scrape away the Oil Pan Gasket before you wipe clean the engine block surface. The installation process starts with laying the new Oil Pan Gasket into position while you install the Oil Pan bolts at 14 nm (10 ft. Lbs. Torque). Proceed with bolt installation by first tightening the upper right crossmember bolts to 125 nm (92 ft. Lbs.) then the lower right crossmember bolt to 145 nm (107 ft. Lbs.). After lowering the vehicle and engine with the engine support fixture, raise the vehicle up again. Perform first the left Engine Mount through bolt installation and then proceed with the Starter motor fitting. Tighten the oil level sensor at the Oil Pan which requires 20 nm torque (15 ft. Lbs.) before connecting its electrical connector. Remove the support from the crossmember first, after which the intermediate Steering Shaft must be installed from the Rack And Pinion before tightening the intermediate shaft bolt to 47 nm (35 ft. Lbs.). Fasten the right side shock absorber lower mounting bolts to 65 nm (48 ft. Lbs.) torque while equally securing right side Engine Mount to cradle bolts with 58 nm (43 ft. Lbs.). Continue with the following procedure: lower the vehicle and remove the engine support fixture and connect the negative Battery Cable, then perform an engine oil and filter change.
Related 2002 Chevrolet Camaro Parts
 2002 Chevrolet Camaro Camshaft Bearing
 2002 Chevrolet Camaro Crankshaft
 2002 Chevrolet Camaro Crankshaft Gear
 2002 Chevrolet Camaro Engine Mount
 2002 Chevrolet Camaro Engine Mount Bracket
 2002 Chevrolet Camaro Fuel Filter
 2002 Chevrolet Camaro Harmonic Balancer
 2002 Chevrolet Camaro Motor And Transmission Mount
 2002 Chevrolet Camaro Oil Pan Baffle
 2002 Chevrolet Camaro Piston
 2002 Chevrolet Camaro Rocker Shaft Spring Kit
 2002 Chevrolet Camaro Rod Bearing