ChevyParts
My Garage
My Account
Cart
OEM 2003 Chevrolet Corvette Drive Shaft
Axle Shaft- Select Vehicle by Model
- Select Vehicle by VIN
Select Vehicle by Model
orMake
Model
Year
Select Vehicle by VIN
For the most accurate results, select vehicle by your VIN (Vehicle Identification Number).
2 Drive Shafts found

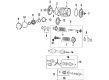
2003 Chevrolet Corvette Drive Shaft Part Number: 88894025
Product Specifications- Other Name: Shaft Assembly, Propeller; Driveshaft; Shaft, Propeller
- Item Weight: 23.50 Pounds
- Item Dimensions: 64.3 x 8.7 x 8.2 inches
- Condition: New
- Fitment Type: Direct Replacement
- SKU: 88894025
- Warranty: This genuine part is guaranteed by GM's factory warranty.

2003 Chevrolet Corvette Drive Shaft Part Number: 88894016
Product Specifications- Other Name: Shaft; Driveshaft; Shaft, Propeller
- Condition: New
- Fitment Type: Direct Replacement
- SKU: 88894016
- Warranty: This genuine part is guaranteed by GM's factory warranty.
2003 Chevrolet Corvette Drive Shaft
With a comprehensive array of OEM 2003 Chevrolet Corvette Drive Shaft, from fuel pumps to door handles, our website is a one-stop-shop for your needs. All our genuine 2003 Chevrolet Corvette Drive Shaft are backed by the manufacturer's warranty and are offered at competitive prices in the market. Rest assured, you can shop with complete confidence.
2003 Chevrolet Corvette Drive Shaft Parts and Q&A
- Q: How to Service and Repair the Drive Shaft on 2003 Chevrolet Corvette?A: The procedure for drive/propeller shaft service and repair starts with obtaining two essential components: hydraulic clutch separator (J 36221) along with transmission support fixture (J 42055). Start by disconnecting the negative Battery Cable then take off the console with shift control knob along with their associated components. Access the shift control boot by gentle prying and then take out the ip accessory trim plate. The service begins by disconnecting the pushrod of the clutch master cylinder from its position on the clutch pedal after removing both the left ip lower insulator panel and shift control assembly. During the hoisting process of the vehicle support the system before clipping the clutch actuator cylinder hose and protecting both hose ends. The next procedure requires the removal of rear tires and wheel assemblies and catalytic converters and driveline tunnel closeout panel. Do the following sequence of removal steps on both sides of the vehicle: first support the lower Control Arm then disconnect the outer Tie Rod End followed by removing the shock absorber lower mounting bolt and lower Ball Joint. The sequence should be replicated on both the vehicle's sides. And then install the transmission support fixture (J 42055) onto a transmission jack before disconnecting wiring harnesses and brake pipe clip retainers from the rear suspension crossmember. First detach the rear transaxle mount to Rear Crossmember nuts then proceed with lowering the rear suspension crossmember. Uninstall the transaxle mount bracket to Differential bolts along with the transaxle mount with bracket. Secure the Differential wheel drive shafts after safely releasing them and fasten them to the underbody structure. Remove all electrical connectors before inspecting that the wiring harness does not touch the driveline. The engine gets engine support from a straight jack and also the removal of bolts which connect the driveline support assembly to the engine flywheel housing. A helper should help you loosen the driveline from the engine before you lower it while guiding the tilt angle. A lifting device(props up the driveline to reduce transmission jack weight. After this the Transmission Support Fixture(J 42055) can be detached and the driveline placed on a workbench. Begin by removing the clutch actuator cylinder and rear exhaust hangers next to eliminating the transmission to driveline support assembly bolts/studs. Finally, use a pry tool to disconnect the driveline support assembly from the transmission but ensure to guide the transmission shift rod through the opening space.
Related 2003 Chevrolet Corvette Parts
 2003 Chevrolet Corvette Axle Shaft
 2003 Chevrolet Corvette CV Boot
 2003 Chevrolet Corvette CV Joint
 2003 Chevrolet Corvette Coil Spring Insulator
 2003 Chevrolet Corvette Coil Springs
 2003 Chevrolet Corvette Control Arm
 2003 Chevrolet Corvette Control Arm Bracket
 2003 Chevrolet Corvette Shock Absorber
 2003 Chevrolet Corvette Steering Knuckle
 2003 Chevrolet Corvette Sway Bar Bracket
 2003 Chevrolet Corvette Sway Bar Bushing
 2003 Chevrolet Corvette Sway Bar Kit