ChevyParts
My Garage
My Account
Cart
OEM 2003 Chevrolet Malibu CV Joint
CV Joint Axle- Select Vehicle by Model
- Select Vehicle by VIN
Select Vehicle by Model
orMake
Model
Year
Select Vehicle by VIN
For the most accurate results, select vehicle by your VIN (Vehicle Identification Number).
2 CV Joints found


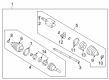
2003 Chevrolet Malibu C.V. Joint, Outer Part Number: 26059845
Product Specifications- Other Name: Outer CV Joint; Outer Joint; Outer Joint Assembly; Joint Kit, Front Wheel Drive Axle; CV Joint
- Position: Outer
- Item Weight: 6.90 Pounds
- Item Dimensions: 7.8 x 7.1 x 6.7 inches
- Condition: New
- Fitment Type: Direct Replacement
- Require Quantity: 2
- SKU: 26059845
- Warranty: This genuine part is guaranteed by GM's factory warranty.

2003 Chevrolet Malibu Inner CV Joint, Front Part Number: 26039289
Product Specifications- Other Name: Joint Kit, Front Wheel Drive Axle; CV Joint; Inner Joint; Inner Joint Assembly
- Position: Front
- Item Weight: 6.50 Pounds
- Item Dimensions: 7.8 x 7.2 x 6.6 inches
- Condition: New
- Fitment Type: Direct Replacement
- Require Quantity: 2
- SKU: 26039289
- Warranty: This genuine part is guaranteed by GM's factory warranty.
2003 Chevrolet Malibu CV Joint
With a comprehensive array of OEM 2003 Chevrolet Malibu CV Joint, from fuel pumps to door handles, our website is a one-stop-shop for your needs. All our genuine 2003 Chevrolet Malibu CV Joint are backed by the manufacturer's warranty and are offered at competitive prices in the market. Rest assured, you can shop with complete confidence.
2003 Chevrolet Malibu CV Joint Parts and Q&A
- Q: How to Service and Repair the CV Joint Boot on 2003 Chevrolet Malibu?A: Service and repair of the constant velocity joint boot requires j35910 drive axle seal clamp pliers and j8059 snap ring pliers as necessary tools. The toolset includes drive axle seal clamp pliers (J35910) together with snap ring pliers (J8059). You need side cutters to cut the large seal retaining clamp from the CV Joint before throwing it away and then proceed to remove the small clamp from the halfshaft bar . Gently pull away the seal by separating it from the CV Joint outer race through bar motion. The snap ring pliers (J8059) should spread the ears on the retaining ring after you wipe out grease from the CV Joint inner race. Then you can remove the CV Joint assembly from the bar . Take the bar seal aside then strike the CV Joint cage with a brass drift and hammer to eliminate all six chrome alloy balls . Place the CV Joint cage and inner race directly at right angles to the CV Joint outer race ensuring the cage windows match the outer race lands. Start by removing the cage along with the inner race and rotate the inner race by 90 degrees to match with the cage windows then you can easily remove it from the cage window. First clean all parts with cleaning solvent until all remaining grease and contaminants vanish while the parts become dry. The assembly process begins with placing a new uncrimped seal retaining clamp onto the seal neck followed by seal bar insertion to the seal groove. The drive axle seal clamp pliers (J35910) functions with a breaker bar and torque wrench to tighten the seal retaining clamp to 136 nm (100 ft. Lbs.) during the wrapping process to verify proper gap spacing. Install both races by applying a small amount of service kit grease to their ball grooves before placing the inner race at a right angle to the cage so you can guide it into position. The retaining ring portion on the inner race must face the halfshaft bar. Place the cage with inner race assembly inside the outer race. Start by inserting the first chrome ball and complete each insertion by tilting the cage to add the opposing ball until all six balls are properly placed in position. Apply grease to the CV Joint while pressing the CV Joint onto the bar while the retaining ring sets correctly. Drive the large-seal diameter through the seal retaining clamp until the seal seats properly onto the CV Joint outer race. Position the seal lip inside the groove. Tighten the seal retaining clamp with the drive axle seal clamp pliers (J35910) alongside the breaker bar and torque wrench to 176 nm (130 ft. Lbs.) while ensuring 1.90mm (1/16 inch) gap dimension.
Related 2003 Chevrolet Malibu Parts
 2003 Chevrolet Malibu Shock Absorber
 2003 Chevrolet Malibu Axle Beam Mount
 2003 Chevrolet Malibu Axle Shaft
 2003 Chevrolet Malibu Ball Joint
 2003 Chevrolet Malibu CV Boot
 2003 Chevrolet Malibu Coil Spring Insulator
 2003 Chevrolet Malibu Coil Springs
 2003 Chevrolet Malibu Shock And Strut Mount
 2003 Chevrolet Malibu Spare Wheel
 2003 Chevrolet Malibu Sway Bar Bushing
 2003 Chevrolet Malibu Sway Bar Kit
 2003 Chevrolet Malibu Trailing Arm Bushing