ChevyParts
My Garage
My Account
Cart
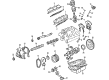
OEM 2004 Buick Regal Timing Cover
Engine Timing Cover- Select Vehicle by Model
- Select Vehicle by VIN
Select Vehicle by Model
orMake
Model
Year
Select Vehicle by VIN
For the most accurate results, select vehicle by your VIN (Vehicle Identification Number).
1 Timing Cover found


2004 Buick Regal Timing Cover Part Number: 12576033
Product Specifications- Other Name: Cover Assembly-Engine Front; Front Cover
- Position: Front
- Replaces: 24502241
- Item Weight: 5.30 Pounds
- Item Dimensions: 17.1 x 16.0 x 4.0 inches
- Condition: New
- SKU: 12576033
- Warranty: This genuine part is guaranteed by GM's factory warranty.
2004 Buick Regal Timing Cover
With a comprehensive array of OEM 2004 Buick Regal Timing Cover, from fuel pumps to door handles, our website is a one-stop-shop for your needs. All our genuine 2004 Buick Regal Timing Cover are backed by the manufacturer's warranty and are offered at competitive prices in the market. Rest assured, you can shop with complete confidence.
2004 Buick Regal Timing Cover Parts and Q&A
- Q: How to replace the engine front timing cover on 2004 Buick Regal?A: To remove and replace the engine front cover, do the following- first disconnect the negative Battery Cable, raise and support this vehicle, drain the engine oil and cooling system then lower down the vehicle. Loosen the bolts on the Water Pump Pulley, unplug the drive belt tensioner, and remove the Water Pump Pulley. Then pull out the bolts of the Power Steering Pump, reposition it and lift the vehicle to remove crankshaft balancer without harming the crankshaft. Relieve the crankshaft front oil seal by using a flat-bladed tool, disconnect the electrical connectors connected to the camshaft position (CMP) sensor, crankshaft position (CKP) sensor, and oil pressure sensor, after that remove the Crankshaft Position Sensor shield and out hose for radiator. Lower the vehicle, install the engine support fixture (j34742-B), and lift it again. The Oil Pan can be dropped just slightly for clearance when all pan bolts are taken off and there is also the oil level sensor. Unscrew the Oil Filter, engine mount bracket, oil level sensor, and Oil Pan-to-engine front cover bolts and partially unscrew the remaining Oil Pan bolts. Remove Crankshaft Position Sensor and engine front cover bolts, detach engine front cover by its Oil Filter adapter, and remove the engine front cover gasket. In case of changing the engine front cover, remove the Oil Filter adapter, pressure relief valve, water pump, and oil pump cover and gear set - inspection of the oil pump cover and gear set/timing chain/sprockets/oil pan gasket if necessary. Clean the mating surface for the engine front cover, then if fitted to replace the engine front cover then install the Camshaft Position Sensor to the engine front cover while tightening the bolt to 10 nm (89 inch lbs.). Replace the oil pump cover and gear set, together with Water Pump and the bolts, so the long bolts would be tightened to 34 nm (25 ft. Lbs.) and the short to 22 nm (16 ft. Lbs.). Mount the pressure relief valve, oil filter adapter, and bolts, tighten them to 15 nm (11 ft. Lbs.) + 50°. Reinforce with a new engine front cover gasket, apply the sealer gm p/n 12346004 (Canadian P/N 10953480) or equivalent to the bolt threads, line up the cogs on the crankshaft sprockets with the oil pump gear set, and connect the engine front cover with bolts and tighten 20 nm (15 ft. Lbs.) +40°. Mount and fasten the Crankshaft Position Sensor and its studs to 30 nm (22 ft. Lbs.), then do the Oil Pan-to-engine front cover bolts to 14 nm (125 inch lbs.). Fits the oil level sensor connecting it in at 20 nm (15 ft. Lbs.) in its electrical connector, and reassemble the engine mount bracket. Mount the Water Pump Pulley and bolts and tighten them to 13 nm (116 inch lbs), the stock tube of the radiator outlet hose, the Oil Filter, and the drain plug of the engine Oil Pan. Designate the new engine front cover seal, and tighten the bolt until mounting the crankshaft front oil seal for the j 35354 to install it and take it out. Fit the Crankshaft Position Sensor shield and reinstall the electrical connections to the oil pressure sensor, ckp sensor, and cmp sensor. Mount the crankshaft balancer, and have your vehicle lowering; power steering pump, and the bolts into place as well as tighten them, each to 34 nm (25 ft. Lbs.). Uninstall the engine support fixture, install drive belt tensioner, top up the cooling system and crankcase with engine engine oil, connect the negative Battery Cable, inspect for leakage, and complete the ckp system variation learn procedure.
Related 2004 Buick Regal Parts
 2004 Buick Regal Camshaft Bearing
 2004 Buick Regal Crankshaft Gear
 2004 Buick Regal Engine Mount Bracket
 2004 Buick Regal Exhaust Valve
 2004 Buick Regal Head Gasket
 2004 Buick Regal Lash Adjuster
 2004 Buick Regal Oil Filler Cap
 2004 Buick Regal Piston Ring
 2004 Buick Regal Pushrod
 2004 Buick Regal Timing Chain Tensioner
 2004 Buick Regal Valve Cover Gasket
 2004 Buick Regal Variable Timing Sprocket