Make sure this part fits

GM 12576033
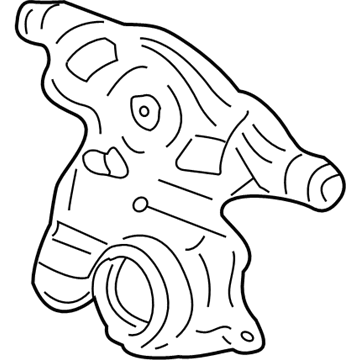
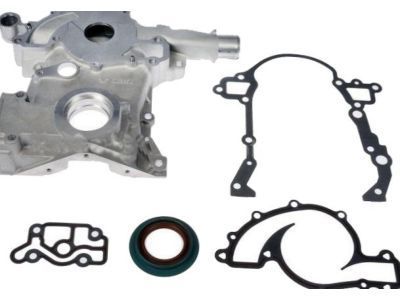
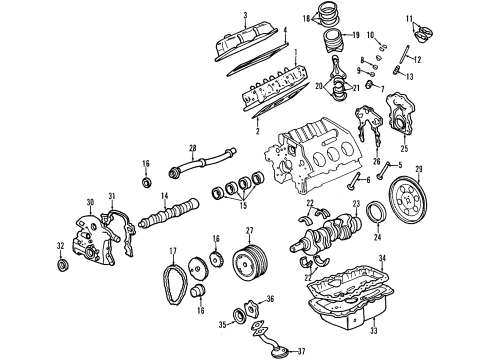
Timing Cover

1995-2009 GM

Customer Questions & Expert Answers (30)
GM 12576033 Timing Cover
  • Part Description
    Cover Assembly-Engine Front
  • Position
    Front
  • Replaces
    24502241
  • Manufacturer
    General Motors
  • Manufacturer's Notes
    This part is discontinued.
Make sure this part fits
  • Related Parts
  • Product Specifications
  • Vehicle Fitment
  • Customer Questions & Expert Answers
  • Product Specifications

    BrandGenuine GM
    Manufacturer Part Number12576033
    Part DescriptionCover Assembly-Engine Front
    Other NamesFront Cover
    Item Dimensions17.1 x 16.0 x 4.0 inches
    Item Weight5.30 Pounds
    PositionFront
    ConditionNew
    Replaces24502241
    ManufacturerGeneral Motors
    SKU12576033
    WarrantyThis genuine GM part is guaranteed by GM's factory warranty.
    Shipping & ReturnShipping Policy Return Policy
    Warning: California's Proposition 65
  • Vehicle Fitment

    Year Make Model Trim Engine
    2005-2009 Buick LaCrosseCX, CXL6 Cyl 3.8 L GAS
    1996-2005 Buick LeSabreCustom, Limited6 Cyl 3.8 L GAS
    2006-2008 Buick LucerneCX, CXL6 Cyl 3.8 L GAS
    1996-2005 Buick Park AvenueBase, Ultra6 Cyl 3.8 L GAS
    1996-2004 Buick Regal25th Anniversary Edition, Custom, Gran Sport, GS, GSE, Limited, LS, LSE, Olympic Gold Edition6 Cyl 3.8 L GAS
    1995-1999 Buick RivieraBase6 Cyl 3.8 L GAS
    1995-2002 Chevrolet CamaroBase, RS6 Cyl 3.8 L GAS
    2000-2005 Chevrolet ImpalaBase, LS, LS Sport, Police, SS6 Cyl 3.8 L GAS
    1998-1999 Chevrolet LuminaBase, LS, LTZ6 Cyl 3.8 L GAS
    1998-2005 Chevrolet Monte CarloLS, LT, SS, SS 35th Anniversary Edition, SS Dale Earnhardt Signature Edition, SS High Sport, SS Pace Car, Z346 Cyl 3.8 L GAS
    View More
  • Customer Questions & Expert Answers

    Q:
    Is this 12576033 designed for my car? Posted by ChevyPartsGiant Specialist
    A:
    Please Select Your Vehicle model to see if part number 12576033 is suitable before ordering.
    Posted by ChevyPartsGiant Specialist
    Q:
    What tools are required to service and repair the timing cover on Buick LeSabre? Posted by Customer
    A:
    To service and repair the Timing Cover, the following tools are required: torque angle meter (J 36660-A). Start the procedure by removing the right Engine Mount Bracket followed by the drive belt tensioner assembly and crankshaft balancer then crankshaft sensor shield and finally the crankshaft sensor. The service begins by taking off the engine front cover through a combination of Oil Pan to engine front cover bolt removal and engine front cover attaching bolt removal. Check the Timing Chain for overall movement which must stay within 25 mm (1 inch) and also evaluate the timing sprockets for wear. Address gasket mating surfaces present on the cylinder block before proceeding to change the Oil Pan Gasket only if it appears excessively damaged. Before installing the engine front cover gasket and the engine front cover technicians should review and clean both components. Apply sealant gm p/n 12346004 or equivalent to the bolt threads, then install the engine front cover attaching bolts, tightening them to 20 nm (15 ft. Lbs.) the torque angle meter (J 36660-A) served to complete a 40° rotation of the bolts. Install the Oil Pan to the engine front cover bolts, tightening them to 14 nm (125 inch lbs.)the drive belt tensioner assembly should be installed following the torque specifications and method. The crankshaft sensor adjustment should be left unchanged during installation by fitting the sensor and shield in place. Install the crankshaft balancer and bolt before reinstalling the right Engine Mount Bracket.
    Posted by ChevyPartsGiant Specialist
    Q:
    How to replace the engine front timing cover on Buick Park Avenue? Posted by Customer
    A:
    To replace the engine front cover, first gather the necessary tools: torque angle meter (J 36660-A). Start by taking out the right Engine Mount Bracket then move on to drive belt tensioner assembly followed by crankshaft balancer and crankshaft sensor shield before removing the crankshaft sensor. The process begins by eliminating the bolts of the Oil Pan to engine front cover followed by engine front cover attaching bolts before removing the engine front cover. Check for the Timing Chain's ability to move without surpassing 25mm (1 inch) and inspect the timing sprockets for wear. Clean the block surfaces where gaskets mate before deciding if you need to remove the Oil Pan for new gasket installation when swelling becomes excessive. Before moving forward with installation you must inspect and clean the engine front cover. Install the engine front cover gasket together with the engine front cover by applying gm p/n 12346004 (Canadian P/N 10953480) or equivalent sealant on the bolt threads. Tighten the engine front cover bolts to 20 nm (15 ft. Lbs.) use the torque angle meter (J 36660-A) to rotate each bolt by 40 degrees beyond its initial torque limit. Secure the Oil Pan onto the engine front cover with bolts at 14 nm torque value (125 inch lbs.). You must reassemble the drive belt tensioner assembly before installing both the crankshaft sensor and sensor shield and then add the crankshaft balancer and bolt together with the right Engine Mount Bracket.
    Posted by ChevyPartsGiant Specialist
    Q:
    How to service and repair the timing cover on Buick LeSabre? Posted by Customer
    A:
    In order to service and repair the Timing Cover, start by unboltching the torque axis mount and the torque axis mount bracket off. Then, remove the Drive Belt and Drive Belt tensioner assembly, then remove the crankshaft balancer. Unplug the crank sensor shield and the crank sensor then remove the Oil Pan to engine front cover bolts and the engine front cover attach bolts to remove the engine front cover. Check the movement by the Timing Chain for its excessive movement, which should not be more than 25mm (1-inch), as well as inspect the timing sprockets for wear. Clean the mating surface of the gasket on the Timing Chain cover and cylinder block, and if the Oil Pan Gasket is too swollen remove the Oil Pan and replace gasket. For installation, perform the installation of the engine front cover gasket as well as the engine front cover using the torque angle meter (J 36660-A) with sealant gm p/n 12346004 or equivalent applied to relationship of bolt threads. Tighten the engine front cover attaching bolts to 20 nm (15 ft. Lbs.) and then further turn them by 40° with the help of the torque angle meter (J 36660-A). Install Oil Pan to engine front cover bolts and pull them to 14n m (125 in lbf). Proceed to install the Drive Belt tensioner assembly, do not co a sensor crankshaft adjustment and crankshaft sensor and the cranks in balance with the bolt. Lastly, install the Drive Belt, the torque axis mount bracket, and the torque axis mount.
    Posted by ChevyPartsGiant Specialist
    Q:
    How to replace the engine front timing cover on Buick Regal? Posted by Customer
    A:
    To replace the engine front cover start by disconnecting the negative Battery Cable and lifting the vehicle. Drain the engine oil and cooling system before you lower the vehicle back. Now use loosening the bolts of Water Pump Pulley, remove the drive belt tensioner and also the Water Pump Pulley. Carefully take out the crankshaft balancer and make sure not to affect the crankshaft. Use an appropriate tool to pry out the crankshaft front oil seal ensuring that no damage is incurred on the seal bore as well as contact surfaces. Unplug the electric connectors of the camshaft position (CMP) and crankshaft position (CKP) sensor as well as the oil pressure sensor and pull away the Crankshaft Position Sensor shield and the radiator outlet hose at the Water Pump. Mount the supports fixture (J33634-B) and jack the vehicle up. It is necessary for one to remove the Oil Pan slightly for clearance, which requires one to loosen all the pan bolts and take off the oil level sensor. Once you've removed that filter and the engine mount bracket for Oil Pan access, disconnect and remove the oil level sensor. Loosen the Oil Pan bolts onto the engine front cover and do not remove them without taking off the Oil Pan-to-engine front cover bolts first. Next, pull the Crankshaft Position Sensor and the engine front cover bolts off then pull the engine front cover and Oil Filter adapter off as one assembly. Remove the engine front cover gasket, and if replacing, the Oil Filter adapter, pressure relief valve, water pump, and oil pump cover and gear set, checking as necessary. Clean prior to the mating surfaces of the engine front cover when mounting. In case of replacing the engine front cover, install the Camshaft Position Sensor, oil pump cover, gear set and Water Pump, locking the bolts with specified torque values. Replace the new engine front cover gasket, apply sealer gm p/n 12346004 (Canadian P/N 10953480) to the threads of the bolts, align the cogs on the crankshaft sprocket to the oil pump gear set and replace the engine front cover. At the specified torque, tighten the engine front cover bolts, and the Crankshaft Position Sensor studs. Apply the j 35354 seal installer (J 35354) when installing the new engine front cover seal, making sure that the seal is fully seated in place. Replace the Oil Pan-to-engine front cover bolts, oil level sensor, and its electrical connector. After that, you should reattach the engine mount bracket, water pump pulley and radiator outlet hose, install the Oil Filter and Crankshaft Position Sensor shield. Connect the electrical connectors for the oil pressure sensor, ckp sensor and cmp sensor, and the crankshaft balancer. Lower the vehicle, remove the engine support fixture, and fix the drive belt tensioner in place. Lastly, fill the cooling system and crankcase with engine oil, reattach the bad cable of the negative battery, inspect for leaks and perform the ckp system variation learn procedure.
    Posted by ChevyPartsGiant Specialist
    Q:
    How to Perform a Timing Cover Replacement on a Buick Regal? Posted by Customer
    A:
    If you want to replace the engine front cover, start with removing the negative Battery Cable and lifting the vehicle to get access to it. Take out the engine oil and the cooling system, and lower the vehicle. Loosen off the Water Pump Pulley bolts and remove the drive belt tensioner, and remove the Water Pump Pulley. Gently take out the crankshaft balancer without breaking the crankshaft. Pry the crankshaft front oil seal out using a suitable tool without damaging the seal bore or contact surface. Unplug the electrical connectors for the camshaft position (CMP) and the crankshaft position (CKP) sensors as well as the oil pressure sensor then you take out the Crankshaft Position Sensor shield and radiator outlet hose from the Water Pump. Mount the fixture to hold the engine (J32127-B) & lift the vehicle. If needed, drop the Oil Pan slightly for clearance by unscrewing all pan bolts and taking out the oil level sensor. Drop the Oil Filter and engine mount bracket for cleaner access and remove the oil level sensor thereafter. Remove the Oil Pan to engine front cover bolts but loosen rest of the Oil Pan bolts but do not remove them. Let go of the Crankshaft Position Sensor and tight the engine front cover bolts then pull off the engine front cover with the Oil Filter adapter as one unit. Loosen the engine front cover gasket and if you are replacing it remove the Oil Filter adapter, pressure relief valve, water pump, and oil pump cover and gear set from the engine front cover. Check the oil pump cover, gear set, timing chain, sprockets, and Oil Pan Gasket and change if necessary. The Camshaft Position Sensor (if replacing engine front cover) then install the sensor and tighten its bolts to 10 nm (89 inch lbs.); entail the installation process in your website, along with the other operations as well mentioned at the beginning for the user. Install the oil pump cover and gear set, then the Water Pump with its bolts, being tight to 20 nm (15 ft. Lbs.) for the long and 15 nm (11 ft. Lbs.) for the short bolts. Install the pressure relief valve, oil filter adapter, and bolts while torquing adapter bolts to 15 nm (11 ft. Lbs.) and using the electronic torque angle meter (J 36660-A) to rotate bolt an additional 50 degrees. Install a new engine front cover gasket, sealer gm p/n12346004 or previous to the bolt threads, aligning the cogs on the crankshaft sprocket with oil pump gear set. Mount the engine front cover and tighten bolts 20 nm (15 ft. Lbs) and use the electronic torque angle meter (J 36660-A) for rotation of an additional 40 degrees. Replace the Crankshaft Position Sensor with its studs tightened to 30 nm (22 ft. Lbs.), and install a new engine front cover seal with the seal installer (J 35354), ensuring it is flush. Reconnect the Oil Pan to the engine front handle bolts with a torque of 14 nm (125 inch lbs.), and put in the oil level sensor and torque it at 20 nm (15 ft. Lbs.). Install the engine mount bracket, reconnect the oil level sensor electrical connector, and the Water Pump Pulley, tightening the bolts up to 13 nm (116 inch lbs.). Reconnect the radiator outlet hose, the Oil Filter, and the engine Oil Pan drain plug. Now reconnect the Crankshaft Position Sensor shield, and plug in the electrical connectors to the oil pressure sensor, ckp sensor, and cmp sensor. Lastly, install the crankshaft balancer, lower the vehicle, uninstall the engine support fixture, install the drive belt tensioner, fill the cooling apparatus and crankcase using engine oil, connect the negative Battery Cable back, inspect for leaks, and execute the ckp system variation learn procedure.
    Posted by ChevyPartsGiant Specialist
    Q:
    How to service and repair the timing cover on Chevrolet Camaro? Posted by Customer
    A:
    Start servicing or repairing the Timing Cover by emptying engine oil and coolant before removing the intake air temperature (IAT) sensor connection cables and air intake pipe. First remove the drive belt tensioner along with the Power Steering Pump then loosen the coolant pump pulley bolts. First lift and securely stabilize the vehicle before removing the crankshaft balancer and disconnecting the Crankshaft Position Sensor electrical connector. First remove the Crankshaft Position Sensor shield then its studs along with the sensor. Following this remove all Oil Pan to front cover bolts. The installation of the front cover requires loose Oil Pan bolts for adequate clearance until you can lower the vehicle. Start by removing bolts from both the coolant pump pulley and the pulley itself then detach the radiator outlet hose from the front cover. To begin the front cover removal process you should first take out the engine front cover studs and bolts followed by extraction of the engine front cover with its gasket. Carefully remove the front cover's coolant pump bolts and coolant pump and frong cover gasket before removing the coolant pump . When changing the front cover you must separate the oil pump gear set , camshaft sensor , oil filter adapter along with its gasket and oil pressure relief valve along with its spring. Clean both block surfaces and front cover surfaces after you remove the crankshaft front oil seal. The j 36660-a torque angle meter and j 35354 seal installer tools are required during installation. Mount the oil pump gear set together with the camshaft sensor and new gasket and oil filter adapter to your assembly followed by the oil pressure relief valve with its spring in place. Install a new crankshaft front oil seal and the coolant pump gasket to the front cover after which install the coolant pump . The j36660-a torque angle meter helps tighten the coolant pump bolts to 15 nm (11 ft. Lbs.) while achieving an additional 80 degrees of torque. Install engine front cover gasket to engine block before installing the front engine cover. Use gm p/n 12346004 or equivalent sealant on engine front cover bolts and stud before installation. Torque these components to 20 nm (15 ft. Lbs.), while applying additional 40 degrees torque using the j 36660-a torque multiplier. Secure the radiator outlet hose after first installing the coolant pump pulley while tightening its bolts to 13 nm (115 inch lbs.). After raising the vehicle once more lift it to position both Oil Pan and front cover bolts in place before tightening them to 14 nm (10 ft. Lbs.). Apply gm p/n 12346004 or an equivalent sealant to Crankshaft Position Sensor studs before tightening them to 20 nm (15 ft. Lbs.) and completing an extra 40-degree torque application using the j 36660-a tool. Mount the Crankshaft Position Sensor shield afterward installing its electrical connector while also reinstalling the crankshaft balancer. After lowering the vehicle install the Power Steering Pump and drive belt tensioner and air intake duct and reconnect the iat sensor electrical connector. Releasing engine oil and coolant should be completed as the last step.
    Posted by ChevyPartsGiant Specialist
    Q:
    What should be inspected during the process for the 2008 Buick Lucerne? Posted by Customer
    A:
    Inspect the timing chain and sprockets for wear, and clean the water and oil pumps.
    Posted by ChevyPartsGiant Specialist
    See expert answers on similar Timing Cover
    Q:
    What is the first step in the installation process for the 2005 Buick LaCrosse? Posted by Customer
    A:
    Place the engine front cover.
    Posted by ChevyPartsGiant Specialist
    See expert answers on similar Timing Cover
    Q:
    What surfaces need to be cleaned and inspected for the 2007 Buick Lucerne? Posted by Customer
    A:
    Clean and inspect the water pump, oil pump, and engine front cover mating surfaces.
    Posted by ChevyPartsGiant Specialist
    See expert answers on similar Timing Cover
    Q:
    What sealer should be applied to the engine front cover bolts/stud threads for the 2006 Buick Lucerne? Posted by Customer
    A:
    Apply sealer GM P/N 12346004 (Canadian P/N 10953480) to the engine front cover bolts/stud threads.
    Posted by ChevyPartsGiant Specialist
    See expert answers on similar Timing Cover
    Q:
    What is the first step to replace the engine front cover for the 2007 Buick LaCrosse? Posted by Customer
    A:
    Disconnect the negative battery cable.
    Posted by ChevyPartsGiant Specialist
    See expert answers on similar Timing Cover
    Q:
    What should be done with the gasket mating surfaces for the 2001 Buick Park Avenue? Posted by Customer
    A:
    Clean the gasket mating surfaces at the cylinder block.
    Posted by ChevyPartsGiant Specialist
    See expert answers on similar Timing Cover
    Q:
    What components should be reinstalled after placing the engine front cover for the 2008 Buick LaCrosse? Posted by Customer
    A:
    Reinstall the water pump and camshaft covers, followed by the drive belt tensioner, crankshaft balancer, coolant overflow reservoir, power steering reservoir, radiator inlet hose, coolant outlet, generator assembly, engine splash shield, and finally the ECM module.
    Posted by ChevyPartsGiant Specialist
    See expert answers on similar Timing Cover
    Q:
    What is the torque specification for the oil pan to engine front cover bolts for the 2000 Buick Park Avenue? Posted by Customer
    A:
    Tighten them to 14 Nm (125 inch lbs.).
    Posted by ChevyPartsGiant Specialist
    See expert answers on similar Timing Cover
    Q:
    What should be done after removing the initial components for the 2004 Buick LeSabre? Posted by Customer
    A:
    Take out the oil pan to engine front cover bolts and the engine front cover attaching bolts, then remove the engine front cover.
    Posted by ChevyPartsGiant Specialist
    See expert answers on similar Timing Cover
    Q:
    What is the first step to replace the engine front cover for the 2005 Buick LeSabre? Posted by Customer
    A:
    Gather the necessary tools, including the Torque Angle Meter (J 45059).
    Posted by ChevyPartsGiant Specialist
    See expert answers on similar Timing Cover
    Q:
    How is the new engine front cover seal installed for the 2004 Buick Regal? Posted by Customer
    A:
    Use the J 35354 Seal Installer to install the new engine front cover seal, tightening the bolt until the crankshaft front oil seal is seated, then remove the J 35354.
    Posted by ChevyPartsGiant Specialist
    See expert answers on similar Timing Cover
    Q:
    What is the first step to replace the engine front cover for the 2006 Buick LaCrosse? Posted by Customer
    A:
    Disconnect the negative battery cable.
    Posted by ChevyPartsGiant Specialist
    See expert answers on similar Timing Cover
    Q:
    What should be done with the gasket mating surfaces for the 2005 Buick Park Avenue? Posted by Customer
    A:
    Clean the gasket mating surfaces at the cylinder block.
    Posted by ChevyPartsGiant Specialist
    See expert answers on similar Timing Cover
    Q:
    What should be disconnected after draining the fluids for the 2002 Chevrolet Camaro? Posted by Customer
    A:
    Disconnect the Intake Air Temperature (IAT) sensor electrical connector and remove the air intake duct.
    Posted by ChevyPartsGiant Specialist
    See expert answers on similar Timing Cover
    Q:
    What components should be removed next for the 2001 Chevrolet Impala? Posted by Customer
    A:
    Remove the coolant pump and the lower crankshaft position sensor wiring harness bracket.
    Posted by ChevyPartsGiant Specialist
    See expert answers on similar Timing Cover
    Q:
    If replacing the engine front cover, what additional components need to be removed for the 2003 Chevrolet Monte Carlo? Posted by Customer
    A:
    Remove the drive belt shield bolt and shield, as well as the water pump and 24X CKP sensor.
    Posted by ChevyPartsGiant Specialist
    See expert answers on similar Timing Cover
    Q:
    What should be done to the engine front cover before installation for the 2004 Chevrolet Monte Carlo? Posted by Customer
    A:
    Clean and inspect the engine front cover, and if replacing it, remove the drive belt shield bolt and the shield, as well as the water pump and the 24X CKP sensor.
    Posted by ChevyPartsGiant Specialist
    See expert answers on similar Timing Cover
    Q:
    What seal and gasket should be installed during reassembly for the 2000 Chevrolet Monte Carlo? Posted by Customer
    A:
    Install the new crankshaft front oil seal and engine front cover gasket, applying sealer GM P/N 1052080 or equivalent to the bolt threads.
    Posted by ChevyPartsGiant Specialist
    See expert answers on similar Timing Cover
    Q:
    What is the torque specification for the oil pan-to-engine front cover bolts for the 2004 Chevrolet Impala? Posted by Customer
    A:
    14 Nm (125 inch lbs.).
    Posted by ChevyPartsGiant Specialist
    See expert answers on similar Timing Cover
    Q:
    What should be done after installing the crankshaft position sensor for the 2002 Chevrolet Monte Carlo? Posted by Customer
    A:
    Install the drive belt shield and its bolt, tightening it to 10 Nm (89 inch lbs.).
    Posted by ChevyPartsGiant Specialist
    See expert answers on similar Timing Cover
    Q:
    What components are reattached after the engine front cover installation for the 2005 Chevrolet Monte Carlo? Posted by Customer
    A:
    Attach the radiator outlet hose and thermostat bypass pipe to the engine front cover, followed by the power steering pump and lines, crankshaft balancer, oil pan, and drive belt tensioner.
    Posted by ChevyPartsGiant Specialist
    See expert answers on similar Timing Cover
    Q:
    What should be drained before removing the timing cover for the 2000 Chevrolet Impala? Posted by Customer
    A:
    Drain the engine coolant from the cooling system and the engine oil.
    Posted by ChevyPartsGiant Specialist
    See expert answers on similar Timing Cover
    Q:
    What components should be installed after the crankshaft front oil seal for the 2001 Chevrolet Camaro? Posted by Customer
    A:
    Install the radiator outlet hose, coolant pump pulley, and its bolts, tightening them to 13 Nm (116 inch lbs.).
    Posted by ChevyPartsGiant Specialist
    See expert answers on similar Timing Cover
    If you have any questions about this product, please don't hesitate to ask us. We will be happy to help you!

OEM GM 12576033, Excellent Performance and Perfect Fitment

To ensure reliability, purchase GM part # 12576033 Timing Cover. It is sometimes referred to as GM Timing Cover. Choosing OEM parts is the optimal decision for guaranteeing superior quality and perfect performance. These components undergo stringent quality checks and are carefully constructed to comply with GM's factory specifications, ensuring a smooth installation process.

ChevyPartsGiant.com is a leading supplier of genuine GM parts such as GM 12576033 Timing Cover. Our website boasts an extensive inventory of OEM GM parts, available at highly competitive prices in the market. Should you require any new genuine GM parts, rest assured we will deliver them swiftly and efficiently to your doorstep. Furthermore, all our parts come with the assurance of a manufacturer's warranty. For detailed Chevy parts information, click here.
Choose ChevyPartsGiant for discounted prices, exceptional service and fast delivery