ChevyParts
My Garage
My Account
Cart
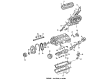
OEM Chevrolet Monte Carlo Timing Cover
Engine Timing Cover- Select Vehicle by Model
- Select Vehicle by VIN
Select Vehicle by Model
orMake
Model
Year
Select Vehicle by VIN
For the most accurate results, select vehicle by your VIN (Vehicle Identification Number).
9 Timing Covers found


Chevrolet Monte Carlo Timing Cover Part Number: 12633908
$23.60 MSRP: $36.96You Save: $13.36 (37%)Ships in 1-3 Business Days

Chevrolet Monte Carlo Timing Cover Part Number: 12576033


Chevrolet Monte Carlo Timing Cover, Front Part Number: 19209125


Chevrolet Monte Carlo Timing Cover, Front Part Number: 12568797


Chevrolet Monte Carlo Timing Cover, Front Part Number: 10228077


Chevrolet Monte Carlo Front Cover Part Number: 24504460

Chevrolet Monte Carlo Timing Cover Part Number: 12523974
Chevrolet Monte Carlo Timing Cover
Want to cut long-term maintenance and repair costs? Choose OEM Timing Cover. Those parts deliver top durability you can trust. On our site, you'll find a huge catalog of genuine Chevrolet Monte Carlo parts. Prices are unbeatable, so you can keep more in your pocket. Every OEM Chevrolet Monte Carlo Timing Cover includes a manufacturer's warranty. You can also get an easy return policy that keeps buying risk free. Fast delivery, get your car on the road quickly. It's simple to search, compare, and order. Stop guessing about quality or fit. Order today and save with parts that last.
Chevrolet Monte Carlo Timing Cover is one of the significant parts that whose functions represent dependability and power in the Chevrolet lineup. Used to shield the engine's timing mechanism, which can be a timing belt or a chain, a Timing Cover is manufactured using strong materials like ALuminum, Plastic or Steel to endure the strains involved in an engine. This essential part not only shields delicate components from debris but also frequently incorporates gaskets that increase the defense of the timing belt, which in turn optimizes the engine's economy and security. Various models of Chevrolet Monte Carlo were produced from 1969 to 2007, and all these models came with Timing Covers that depended on the varied engine designs; V6 and V8. Replacement and maintenance of the Timing Cover of the vehicle are very important to maintain the good condition of Monte Carlo because a faulty Timing Cover may result to severe problems on its engine. Chevrolet Monte Carlo Timing Cover has a very strong appearance in the market of automobiles due to its efficacy for different generations of Monte Carlo with satisfying the need of not only the car lovers but also the common users as well. The Chevrolet Monte Carlo Timing Cover continues to this day to play an important role of improving the efficiency and safety of these wonderful automobiles, thus asserting the company's dedication of providing only the premier for its Chevrolet automobiles.
Chevrolet Monte Carlo Timing Cover Parts and Q&A
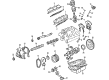
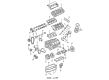
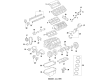
- Q: How to service and repair the timing cover on Chevrolet Monte Carlo?A:Start with coolant drainage from the cooling system to begin Timing Cover servicing and repairs. The first step is to remove the drive belt tensioner after which you should remove the crankshaft balancer. Distance the wiring harness connectors from the engine front cover to remove the Crankshaft Position Sensor shield. The engine support fixture (J 28467-B) must be installed to access the engine mount bracket before its removal. This procedure provides clearance for working on the Oil Pan. Engine front cover clearance becomes possible by slightly dropping the Oil Pan after all pan bolts get loosened and when the oil level sensor gets removed. Lower the Oil Pan while you remove the Oil Pan-to-engine front cover bolts and the Oil Filter assembly. Begin by removing the radiator outlet hose and Water Pump Pulley then continue with the Crankshaft Position Sensor removal. Begin by removing all engine front cover attaching bolts which allows you to remove the engine front cover with Oil Filter adapter assembly. Afterward remove the engine front cover gasket. Before engine front cover replacement you should detach the Oil Filter adapter and pressure relief valve and Water Pump and oil pump cover and gear set from the front cover. The inspection of oil pump components needs to be combined with a check of the Timing Chain's overall motion to ensure it stays below 25.4 mm (1 inch). Begin by degreasin' the mating surfaces combining front cover and cylinder block together with sealing surfaces before moving forward. To begin front cover installation replace all elements starting with the Camshaft Position Sensor followed by oil pump cover and gear set and finally Oil Filter adapter and pressure relief valve and Water Pump. Replace the crankshaft front oil seal and engine front cover gasket following bolt thread application of gm p/n 1052080 sealer or equivalent material. Position the sprocket cogs from the crankshaft with those facing the oil pump gear set before attaching the engine front cover with the Crankshaft Position Sensor. Following engine front cover bolt tightening to 20 nm (15 ft. Lbs.), utilize the torque angle meter (J 36660-A) to perform a 40-degree bolt rotation. Follow inspection of the Oil Pan Gasket by replacing it if required before tightening the Oil Pan-to-engine front cover bolts and all Oil Pan bolts using 14 nm (125 inch lbs.). Place the engine mount bracket and lower the engine while fastening the engine mount bracket bolts. After removing the engine support fixture j 28467-b you should install the Water Pump Pulley and connect the radiator outlet hose while installing the Oil Filter. Reinstall the shield on the Crankshaft Position Sensor followed by attaching wiring harness connectors to the engine front cover. The last steps involve mounting the crankshaft balancer alongside the drive belt tensioner then you need to complete the cooling system with engine coolant and add clean engine oil to the crankcase and perform fluid level inspections.
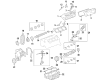
- Q: How to replace the engine front timing cover on Chevrolet Monte Carlo?A:Starting the engine front cover replacement requires users to disconnect the negative Battery Cable and drain the cooling system first. Start by removing the drive belt tensioner along with the coolant recovery reservoir then drain the engine oil. Remove the Oil Pan, crankshaft balancer and Power Steering Pump with its lines before repositioning the Power Steering Pump. Detach the thermostat bypass pipe followed by disconnection of the radiator outlet hose from the engine front cover then take out the Water Pump. Start by removing the bolts holding the wiring harness bracket to the ckp sensor and separating the bracket from the assembly. Proceed to uninstall bolts 1, 2, and 3 of the engine front cover and remove both the cover itself and its gasket. Clean and inspect the engine front cover before installing a replacement while also taking off the drive belt shield bolt and shield and Water Pump and 24x ckp sensor. Begin installation by mounting the 24x ckp sensor followed by the Water Pump. Afterward install the drive belt shield with its bolt while torquing it to 10 nm (89 inch lbs.). Install the engine front cover gasket after applying gm p/n 12346004 (Canadian P/N 10953480) equivalent sealant to its both sides. Replace the gasket with the front cover before securing bolts 1, 2, and 3. Secure the engine front cover bolts (1, 2, and 3) by tightening the small bolts to 27 nm (20 ft. Lbs.) secure the large bolts (2, 3) to 55 nm (41 ft. Lbs.) while using the small bolts (1, 2, and 3 to 27 Nm (20 ft. Lbs.). Screw in the ckp sensor wiring harness bracket by applying 27 nm (20 ft. Lbs.) torque to its bolt. Begin installation by connecting the radiator outlet hose and thermostat bypass pipe to the engine front cover and then proceed with attaching the Power Steering Pump and crankshaft balancer and Oil Pan and drive belt tensioner. You must reinstall the coolant recovery reservoir after filling both the crankcase with new engine oil and the cooling system while reconnecting the negative Battery Cable and executing the ckp system variation learn procedure.


Related Chevrolet Monte Carlo Parts
 Chevrolet Monte Carlo Balance Shaft Gear
 Chevrolet Monte Carlo Camshaft
 Chevrolet Monte Carlo Crankshaft Pulley
 Chevrolet Monte Carlo Dipstick Tube
 Chevrolet Monte Carlo Intake Valve
 Chevrolet Monte Carlo Oil Filler Cap
 Chevrolet Monte Carlo Oil Filter
 Chevrolet Monte Carlo Piston
 Chevrolet Monte Carlo Rocker Arm
 Chevrolet Monte Carlo Rod Bearing
 Chevrolet Monte Carlo Timing Belt
 Chevrolet Monte Carlo Valve Cover Grommet