ChevyParts
My Garage
My Account
Cart
OEM Chevrolet Monte Carlo Rod Bearing
Engine Connecting Rod Bearing- Select Vehicle by Model
- Select Vehicle by VIN
Select Vehicle by Model
orMake
Model
Year
Select Vehicle by VIN
For the most accurate results, select vehicle by your VIN (Vehicle Identification Number).
5 Rod Bearings found


Chevrolet Monte Carlo Bearing Part Number: 89017573
$15.26 MSRP: $25.14You Save: $9.88 (40%)Ships in 1-3 Business Days
Chevrolet Monte Carlo Connecting Rod Bearing Part Number: 12480255
$0.38 MSRP: $0.59You Save: $0.21 (36%)Ships in 1-2 Business Days
Chevrolet Monte Carlo Rod Bearings Part Number: 89017700
$16.09 MSRP: $25.21You Save: $9.12 (37%)Ships in 1-2 Business Days

Chevrolet Monte Carlo Bearings Part Number: 89060553
$6.22 MSRP: $9.74You Save: $3.52 (37%)
Chevrolet Monte Carlo Bearings Part Number: 18008494
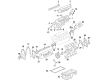
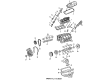
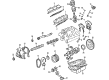
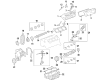
Chevrolet Monte Carlo Rod Bearing
Want to cut long-term maintenance and repair costs? Choose OEM Rod Bearing. Those parts deliver top durability you can trust. On our site, you'll find a huge catalog of genuine Chevrolet Monte Carlo parts. Prices are unbeatable, so you can keep more in your pocket. Every OEM Chevrolet Monte Carlo Rod Bearing includes a manufacturer's warranty. You can also get an easy return policy that keeps buying risk free. Fast delivery, get your car on the road quickly. It's simple to search, compare, and order. Stop guessing about quality or fit. Order today and save with parts that last.
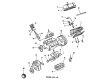
The Chevrolet Monte Carlo Rod Bearing can be described as a unique and essential part that has a positive impact on Chevrolet Monte Carlo cars. Featuring the function of bearing the crankshaft and connecting rods, the Rod Bearing enables the rotating movement to run smoothly and rid it of excessive friction which is contributory to the optimal efficiency of an engine. These Rod Bearings come in two types, bi-metal and tri-metal; capable of handling multiple kinds of driving, perfect for vehicle Monte Carlo models from 1969 up to 2007. This bi-metal design is coupled with an aluminum alloy lining; a tri-metal design comes with copper alloy, which results in increased strength and the ability to withstand fatiguing loads. This adaptability makes it possible for the Chevrolet Monte Carlo Rod Bearing to meet the criteria of basic and advanced high-performance vehicles while increasing safety and performance. For instance, the performance versions of the Rod Bearing feature enhanced materials and, particularly, improvements of the dry film coatings that enhance the oil clearance and the durability under increased levels of power. The Chevrolet Monte Carlo as a model of a luxurious and at the same time sporty coupe, also has its reliable components, one of which is the Rod Bearings that have a significant impact on the stability of the engine. Thus, the Chevrolet Monte Carlo Rod Bearing attracts car aficionados and users and performs outstandingly in the automotive industry, providing both speed and a long-lasting engine with strengthened protection.
Chevrolet Monte Carlo Rod Bearing Parts and Q&A
- Q: How to replace the connecting rod bearing on Chevrolet Monte Carlo?A:In order to replace the connecting Rod Bearing, first, remove the Oil Pan and the sparking plugs from the serviced cylinders. Position the connecting rod to be serviced at bottom dead center (BDC) through rotating the Crankshaft, then remove the bolt for Oil Pump, the Oil Pump and Oil Pump driveshaft. Now unfasten the Crankshaft oil deflector nuts and Crankshaft oil deflector, after which remove the connecting rod cap nuts, connecting rod cap and the lower connecting Rod Bearing while retaining the original bearings with the original connecting rod and cap for reassembly. Now pull out the lower connecting Rod Bearing from the connecting rod cap; then insert the connecting rod bolt guide set (J5239) to the connecting rod and turn it while pushing up to locate the upper connecting Rod Bearing which also needs to be removed. Discharge the oil from the bearings and look for its condition, and check the bearing clearance. Use clean engine oil to lubricate the bearing surface before you install the upper, connecting Rod Bearing. Pull down the Piston along with connecting rod and upper connecting Rod Bearing with the help of connecting rod bolt guide set (J 5239) then remove it and fit lower connecting Rod Bearing to connecting rod cap. Mount the connecting rod cap which also has the connecting rod cap nuts are mounted and an additional 20 nm (15 ft. Lbs.) of torque is applied before using the torque angle meter (J 45059) to turn the nuts by 75 degrees. Check binding by separating the connecting rod, use the prying joint right and left frequently sprucing up the connecting rod cap nuts as required, measure connecting rod side clearance. Mount the Crankshaft oil deflector and the nuts, tighten to 25 nm (18 ft. Lbs.), after that there is the Oil Pump driveshaft and the Oil Pump, and finally the Oil Pump bolt which will tighten to 25 nm (30 ft. Lbs.). Lastly, re-install and check for Spark Plugs and the Oil Pan with oil pressure and leaks.
- Q: What additional engine repair information can be found for the service and repair of the connecting rod bearing on Chevrolet Monte Carlo?A:For information on repairing and servicing bearing on connecting rods, additional engine repair directions are available elsewhere. When an internal engine component is not given a special service procedure, it shows that the manufacturer has not prepared one. To do engine overhaul, important steps in unit repair include service operations, machining, cleaning, inspection and fitting, including boring and honing the cylinder, fitting connecting rod with bearings, Crankshaft with bearings and camshaft bearings, disassembling the connecting rod and Piston, cylinder head, valve-related components and Oil Pump, fitting in Piston and rings and fixing thread damage, as well as valve and seat grinding tasks found during Cylinder Head assembly. Chain, belt and gears are the main parts in timing components service.


Related Chevrolet Monte Carlo Parts
 Chevrolet Monte Carlo Camshaft Bearing
 Chevrolet Monte Carlo Crankshaft Gear
 Chevrolet Monte Carlo Engine Mount
 Chevrolet Monte Carlo Engine Mount Bracket
 Chevrolet Monte Carlo Exhaust Valve
 Chevrolet Monte Carlo Oil Pan Gasket
 Chevrolet Monte Carlo Oil Pump
 Chevrolet Monte Carlo Rocker Shaft Spring Kit
 Chevrolet Monte Carlo Timing Belt Idler Pulley
 Chevrolet Monte Carlo Timing Chain
 Chevrolet Monte Carlo Timing Chain Tensioner
 Chevrolet Monte Carlo Timing Cover