Make sure this part fits

GM 12480255
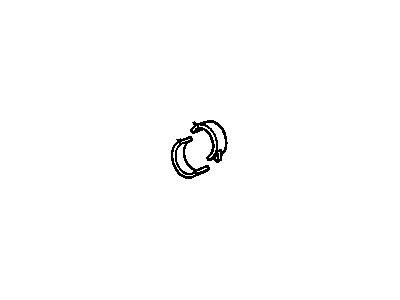
Connecting Rod Bearing

1984-2009 GM

Customer Questions & Expert Answers (12)
GM 12480255 Connecting Rod Bearing
  • Part Description
    Bearing Kit, Connecting Rod; Rod Bearing
  • Replaces
    12518302
  • Manufacturer
    General Motors
Make sure this part fits
$0.38 MSRP: $0.59
You Save: $0.21 (36%)
Ships in 1-2 Business Days
1
ADD TO CART
  • Related Parts
  • Product Specifications
  • Vehicle Fitment
  • Customer Questions & Expert Answers
  • Product Specifications

    BrandGenuine GM
    Manufacturer Part Number12480255
    Part DescriptionBearing Kit, Connecting Rod; Rod Bearing
    Other NamesBearings; Bearing Kit, Engine Connecting Rod
    Item Dimensions4.2 x 4.2 x 2.1 inches
    Item Weight0.40 Pounds
    ConditionNew
    Fitment TypeDirect Replacement
    Replaces12518302
    Require Quantity6
    ManufacturerGeneral Motors
    SKU12480255
    WarrantyThis genuine GM part is guaranteed by GM's factory warranty.
    Shipping & ReturnShipping Policy Return Policy
    Warning: California's Proposition 65
  • Vehicle Fitment

    Year Make Model Trim Engine
    1994-2005 Buick CenturyCustom, Limited, Special, Special Edition6 Cyl 3.1 L GAS
    1992-1996 Buick RegalCustom, Limited6 Cyl 3.1 L GAS
    2002-2005 Buick RendezvousCX, CX Plus, CXL, CXL Plus6 Cyl 3.4 L GAS
    1994-1998 Buick SkylarkCustom, Gran Sport, Limited, Olympic Gold Edition6 Cyl 3.1 L GAS
    1992-1996 Chevrolet BerettaBase, GT, GTZ, Z266 Cyl 3.1 L GAS
    1984-1995 Chevrolet CamaroBase, Berlinetta, LT, RS, RS Heritage Edition, Sport6 Cyl 2.8 L GAS, 6 Cyl 3.1 L GAS, 6 Cyl 3.4 L GAS
    1992-1994 Chevrolet CavalierRS, Z246 Cyl 3.1 L GAS
    1992-1996 Chevrolet CorsicaBase, LT, LTZ6 Cyl 3.1 L GAS
    2005-2009 Chevrolet EquinoxLS, LT, LTZ6 Cyl 3.4 L GAS
    2000-2005 Chevrolet ImpalaBase6 Cyl 3.4 L GAS
    View More
  • Customer Questions & Expert Answers

    Q:
    Is this 12480255 designed for my car? Posted by ChevyPartsGiant Specialist
    A:
    Please Select Your Vehicle model to see if part number 12480255 is suitable before ordering.
    Posted by ChevyPartsGiant Specialist
    Q:
    How to Service a Rod Bearing on Buick Century? Posted by Customer
    A:
    To replace the connecting Rod Bearing, the Oil Pan, Oil Pump and the Crankshaft oil deflector are removed in the first place. Rotate the Crankshaft until the Piston and rod assembly to be maintained is at bottom dead center (BDC), making sure you mark the connecting rod and its cap with matchmarks or numbers for accuracy of reassembly. Take off the connecting rod nuts, the connecting rod cap, the lower connecting Rod Bearing, and do not forget to apply a thread protector to protect the Crankshaft journal. Next, install the connecting rod bolt guide set (J5239) allowing the Piston and connecting rod to be raised up the cylinder so to get to the upper connecting rod that is to be taken out next. Cleaning oil off the connecting rod bearings and Crankshaft connecting rod journal, inspect the connecting rod bearings, connecting rod cap, connecting rod and Crankshaft connecting rod journal. For installation, meet the connecting Rod Bearing's upper part, install the connecting rod and apply its inside surfaces with the new engine oil. By using the connecting rod bolt guide set (J5239), pull the Piston and rod assembly down to the Crankshaft and remove the guide set after which install the lower connecting Rod Bearing in the connecting rod cap, lubricate their inside surfaces with new engine oil as well. I would recheck the angle with electronic torque angle meter (J36660-A) hooked to the connecting rods and turn the nuts an additional 75 degrees while tightening to 20 nm (15 ft. Lbs.) on the lower connecting rod nut and bearing. Measure the connecting rod clearance by loading all the connecting rod bearings into the engine, and tapping each of the connecting rods parallel to the crankpin to decay clearance, follow by measuring the side clearance between the connecting rod caps with the feeler gauge or dial indicator. Lastly, fit the Crankshaft oil deflector, Oil Pump, and Oil Pan.
    Posted by ChevyPartsGiant Specialist
    Q:
    How to replace the connecting rod bearing on Buick Century? Posted by Customer
    A:
    To remove the connecting Rod Bearing first, retrieve the following tools: bolt guide set (J 5239) and electronic torque angle meter (J 36660-A). Start by removing the Oil Pan and the spark plugs from the serviced cylinders. Place the connecting rod to be worked on at bottom dead center (BDC) by turning the crank shaft, then one must extract the Oil Pump bolt, the Oil Pump, and the Oil Pump driveshaft. Then remove the Crankshaft oil deflector nuts and a Crankshaft oil deflector. Pull out the connecting rod cap nuts, remove the connecting rod cap and the lower connecting Rod Bearing making sure that the bearings are taken off intact with their original connecting rod and cap for reassembly. Unscrew the lower connecting Rod Bearing from the connecting rod cap and install the connecting rod bolt guide set (J 5239) to the connecting rod. Reference the guide to push up the connecting rod and piston in order to access upper connecting Rod Bearing that should be removed. Clean any oil off the bearings and test them out by measuring the bearing clearance. For installation, apply clean engine oil to the bearing surface, install the upper connecting Rod Bearing and pull down the piston,connecting rod and upper connecting Rod Bearing using the connecting rod bolt guide set (J 5239) and then remove the guide. Attach the lower connecting Rod Bearing to the connecting rod cap, followed by inserting the connecting rod cap and nuts then torque to 20 nm (15 ft. Lbs.) and with an additional 75° rotation using electronic torque angle meter (J 36660-A) with the nuts. Check binding here and pry back and forth, skewing the cap nuts if it is necessary. Take a measurement of the connecting rod side clearance and then fit, the Crankshaft oil deflector with nuts with 25 nm (18 ft. Lbs.). Spool the Oil Pump driveshaft and Oil Pump, and the Oil Pump bolt should be tightened with 41 nm (30 ft. Lbs.). Lastly, replace the spark plugs and Oil Pan, and check the oil pressure and leakages.
    Posted by ChevyPartsGiant Specialist
    Q:
    How to replace the connecting rod bearing on Chevrolet Impala? Posted by Customer
    A:
    Begin the connecting Rod Bearing replacement by removing both the Oil Pan and all spark plugs from the cylinders that will receive service. Service the connecting rod while it sits at bottom dead center (BDC) position through Crankshaft rotation before removing connecting rod cap screws to take out connecting rod parts and lower connecting Rod Bearing but maintain bearing relationship for future installation. Take out the lower connecting Rod Bearing from the connecting rod cap assembly. Place the installing guide (J 41507) onto the connecting rod before using it to push the rod upward until you can reach the upper connecting Rod Bearing. Remove this bearing afterward. Measure the bearing clearance while inspecting the wiped-down bearings. During installation refrain from using tools to scrape, shim or file the bearing inserts and maintain clean and dry conditions for connecting rod cap bolt holes as well as mating surfaces. Dip connecting rod cap bolts into engine oil and apply clean engine oil to the bearing surface before installing the upper connecting Rod Bearing. Pull down Piston and connecting rod using the connecting rod assembly guide (J 41507) to remove upper connecting Rod Bearing and guide. Fit the lower connecting Rod Bearing to the connecting rod cap prior to setting the connecting rod cap into place. Fott the connecting rod cap bolts to 27 nm (20 ft. Lbs.) torque then apply the torque angle meter (J 45059) for an additional 50-degree bolt rotation. To check for binding use a prying motion to move the connecting rod while inspecting for necessary connecting rod cap bolt retightening. Check the connecting rod side clearance after which reinsert the spark plugs and Oil Pan before conducting tests for oil pressure and leak detection.
    Posted by ChevyPartsGiant Specialist
    Q:
    How to replace the piston and rod bearing in an engine on Chevrolet Malibu? Posted by Customer
    A:
    Alternatively the replacement process begins with unscrewing the Battery Cable and fuel system depressurization followed by cooling system draining. Before reassembly always note the cylinder numbers on both the piston and connecting rod and rod cap to facilitate assembly. Use the Crankshaft crank to position it at bottom dead center before cleaning carbon from the cylinder top and taking out the connecting rod cap. Install the lower connecting rod end using j 8037 universal Piston Ring compressor (J 8037) which provides clean engine oil for lubricating cylinder wall and piston rings before guiding the end carefully through the Crankshaft journal to prevent damage. Use the assembly tools to install the rod bearing into its place while tapping the bearing cap with proper instruments to set it without utilizing bolts or nuts for the installation process. Connect the rod bearing caps afterward by applying torque to 20 nm (15 ft. Lbs.) on the nuts followed by additional 75-degree nut tightening using tools j 36660-a and j 36660-a. Check for any connecting rod binding by adjusting the bearing cap when necessary before you can install the Oil Pan followed by the Cylinder Head. Before finalization install the required fluid and link up the black cable terminal.
    Posted by ChevyPartsGiant Specialist
    Q:
    How to replace the connecting rod bearing on Chevrolet Lumina? Posted by Customer
    A:
    The first step for connecting Rod Bearing replacement begins by taking out the Oil Pan alongside the Oil Pump and Crankshaft oil deflector. Position the Crankshaft at bottom dead center (BDC) where the Piston and rod assembly will receive service. Use matchmarks and numbers on the connecting rod caps and rod to keep track of correct reassembly. The first step to replace the connecting Rod Bearing requires removing the connecting rod nuts after which you should remove the connecting rod cap and lower connecting Rod Bearing. Install a thread protector while following all steps to protect the Crankshaft journal from damage. With the connecting rod bolt guide set (J5239) implement the Piston and rod assembly to move the rod higher within the cylinder for upper connecting Rod Bearing removal. Afterward remove the upper connecting Rod Bearing. Disassemble the engine by removing oil from the connecting rod bearings and Crankshaft connecting rod journal and check the connecting rod bearings and rod cap and rod and crank rod journal. Put the upper connecting Rod Bearing inside the connecting rod before applying fresh engine oil to its interior surfaces. Lower the Piston and rod combination into place using the connecting rod bolt guide set (J5239) before removing it and placing the lower connecting Rod Bearing into the connecting rod cap, applying new engine oil over its inner surfaces. Fit the connecting rod cap onto the lower connecting Rod Bearing while installing connecting rod nuts and torque them to 20 nm (15 ft. Lbs.) before using electronic torque angle meter (J36660-A) to evenly turn the nuts by 75 degrees. Use a feeler gauge or dial indicator to check connecting rod clearance after gently tapping each connecting rod parallel to the crankpin with all rounds bearing installed. Install the Crankshaft oil deflector and Oil Pump followed by the Oil Pan.
    Posted by ChevyPartsGiant Specialist
    Q:
    How to replace the connecting rod bearing on Chevrolet Venture? Posted by Customer
    A:
    In order to replace the connecting Rod Bearing one must first remove the Oil Pan, Oil Pump, and Crankshaft oil deflector. Put the Piston and rod set to be worked on at the bottom dead center (BDC) and put marks on connecting rods and their matching caps. Rivet off the connecting rod nuts so you can disassemble the connecting rod cap and the lower connecting Rod Bearing while ensuring to install a thread protector against journal damage on the Crankshaft journal. Push up the Piston and the connecting rod with the help of the j5239 (Connecting Rod Bolt Guide Set) to gain access to the upper connecting Rod Bearing that should be removed. Clean the surface of connecting rod bearings and Crankshaft connecting rod journal from oil and inspect connecting Rod Bearing, connecting rod cap, connecting rod, crankshaft connecting rod journal. For installation, position the upper connecting Rod Bearing onto the connecting rod and coat its inside with new engine oil and pull the Piston and rod assembly down to the Crankshaft using the j5239 before removing it. Put the lower connecting Rod Bearing in the connecting rod cap. Coat it with fresh oil in the engine and put in the connecting rod cap with the lower bearing. Tighten the connecting rod nuts to 20 nm (15 ft. Lbs.) and then retighten the nuts 75 degrees using the j 36660-a (Torque Angle Meter) in a straight-on direction to prevent title-angle variations. Check the connecting rods by researching the component and apply all the bearings on them. Lightly tap each connecting to line with the crankpin approximately between the caps, and use a calculus with a feeler gauge or dial indicator to check side clearance, then using a dial indicator. Finally, place the Crankshaft oil deflector, Oil Pump, and Oil Pan.
    Posted by ChevyPartsGiant Specialist
    Q:
    What is the procedure for piston replacement for the 2000 Chevrolet Impala? Posted by Customer
    A:
    Coat the piston, rings, cylinder bore, and bearing surfaces with new engine oil, compress the piston rings using the Piston Ring Compressor (J 8037), and install the piston into its original bore.
    Posted by ChevyPartsGiant Specialist
    See expert answers on similar Rod Bearing
    Q:
    How do you position the connecting rod for servicing for the 2004 Chevrolet Monte Carlo? Posted by Customer
    A:
    Position the connecting rod to be serviced at Bottom Dead Center (BDC) by rotating the crankshaft.
    Posted by ChevyPartsGiant Specialist
    See expert answers on similar Rod Bearing
    Q:
    What is the procedure for installing the upper connecting rod bearing for the 2003 Chevrolet Impala? Posted by Customer
    A:
    Lubricate the bearing surface with clean engine oil, install the upper connecting rod bearing, and use the guide to pull down the piston and connecting rod.
    Posted by ChevyPartsGiant Specialist
    See expert answers on similar Rod Bearing
    Q:
    What is the first step to replace the connecting rod bearing for the 2000 Chevrolet Monte Carlo? Posted by Customer
    A:
    First, remove the oil pan and position the connecting rod to be serviced at Bottom Dead Center (BDC) by rotating the crankshaft.
    Posted by ChevyPartsGiant Specialist
    See expert answers on similar Rod Bearing
    Q:
    How should the crankshaft be positioned for the 2005 Chevrolet Monte Carlo? Posted by Customer
    A:
    Rotate the crankshaft to position the connecting rod at Bottom Dead Center (BDC).
    Posted by ChevyPartsGiant Specialist
    See expert answers on similar Rod Bearing
    If you have any questions about this product, please don't hesitate to ask us. We will be happy to help you!

OEM GM 12480255, Excellent Performance and Perfect Fitment

To ensure reliability, purchase GM part # 12480255 Connecting Rod Bearing. It is sometimes referred to as GM Rod Bearing. Choosing OEM parts is the optimal decision for guaranteeing superior quality and perfect performance. These components undergo stringent quality checks and are carefully constructed to comply with GM's factory specifications, ensuring a smooth installation process.

ChevyPartsGiant.com is a leading supplier of genuine GM parts such as GM 12480255 Connecting Rod Bearing. Our website boasts an extensive inventory of OEM GM parts, available at highly competitive prices in the market. Should you require any new genuine GM parts, rest assured we will deliver them swiftly and efficiently to your doorstep. Furthermore, all our parts come with the assurance of a manufacturer's warranty. For detailed Chevy parts information, click here.
Choose ChevyPartsGiant for discounted prices, exceptional service and fast delivery