ChevyParts
My Garage
My Account
Cart
OEM 2002 Chevrolet Camaro Timing Cover
Engine Timing Cover- Select Vehicle by Model
- Select Vehicle by VIN
Select Vehicle by Model
orMake
Model
Year
Select Vehicle by VIN
For the most accurate results, select vehicle by your VIN (Vehicle Identification Number).
2 Timing Covers found


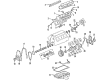
2002 Chevrolet Camaro Timing Cover Part Number: 12633906
$110.64 MSRP: $188.36You Save: $77.72 (42%)Product Specifications- Other Name: Cover Assembly-Engine Front; Front Cover; Cover, Engine Front Cover
- Position: Front
- Replaces: 12561243
- Item Weight: 1.80 Pounds
- Item Dimensions: 3.6 x 15.2 x 15.1 inches
- Condition: New
- SKU: 12633906
- Warranty: This genuine part is guaranteed by GM's factory warranty.


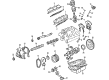
2002 Chevrolet Camaro Timing Cover Part Number: 12576033
Product Specifications- Other Name: Cover Assembly-Engine Front; Front Cover
- Position: Front
- Replaces: 24502241
- Item Weight: 5.30 Pounds
- Item Dimensions: 17.1 x 16.0 x 4.0 inches
- Condition: New
- SKU: 12576033
- Warranty: This genuine part is guaranteed by GM's factory warranty.
2002 Chevrolet Camaro Timing Cover
With a comprehensive array of OEM 2002 Chevrolet Camaro Timing Cover, from fuel pumps to door handles, our website is a one-stop-shop for your needs. All our genuine 2002 Chevrolet Camaro Timing Cover are backed by the manufacturer's warranty and are offered at competitive prices in the market. Rest assured, you can shop with complete confidence.
2002 Chevrolet Camaro Timing Cover Parts and Q&A
- Q: How to replace the engine front timing cover on 2002 Chevrolet Camaro?A: If you want to replace the engine front cover, first, run the engine oil and the coolant, followed by removal of intake air temperature (IAT) sensor electrical connector and removal of air intake duct. Loosen the coolant pump pulley bolts, take out the drive belt tensioner, and the Power Steering Pump. Lift and support the vehicle, remove crankshaft balancer, oil pressure electrical connector, crankshaft position sensor electrical connector, and the Crankshaft Position Sensor shield and studs and sensor. Loosened the Oil Pan bolts to provide clearance for the front cover installation, lowered the vehicle, and removed the coolant pump pulley bolts and the pulley itself. Remove the radiator outlet hose and carefully pry out the crankshaft front oil seal. Removal of the engine front cover studs and bolts, removal of the engine front cover and gasket respectively. When extracting the front cover, it is also necessary to remove the bolts of the coolant pump, coolant pump, coolant pump gaskets, oil filter adapter, camshaft position sensor and oil pump gear set. Clean the engine front cover and block surfaces, and if front cover was removed, install the oil pump gear set, camshaft position sensor, and oil filter adapter. Fit the coolant pump gasket to the front cover , and fit the coolant pump, using the j 36660-a torque angle meter to torque the coolant pump bolts to 15nm (11 ft lbf) and an additional 80°. Put a new engine front cover gasket to the engine block, install engine cover front, and apply sealant gm p/n 12346004, canada p/n 10953480, or equal engine front cover bolts and stud . Install the front cover bolts and stud to 20 nm (15 ft. Lbs.) and angle an additional 40° with the j 36660-a. Replace the crankshaft front oil seal with the j 35354 seal installer, reinstall the radiator outlet hose, then the coolant pump pulley and bolt it to 13 nm (116 inch lbs.). Lift the vehicle once more to install the Oil Pan to front cover bolts and tighten them to 14 nm (124 inch lbs.). Install the Crankshaft Position Sensor, using threadlock gm p/n 12345382, canada p/n 10953489, or equivalent on the sensor studs and tighten them to 30 nm (22 ft. Lbs.). Reinstall the Crankshaft Position Sensor shield, crankshaft position sensor electrical connecter, and the crankshaft balancer. Connect the oil pressure sensor's electrical connector, lower the vehicle and reinstall the Power Steering Pump and drive belt tensioner. Finally, reconnect the air intake duct, connect the iat sensor electrical connector, fill the crankcase with engine oil, and fill the engine coolant.
Related 2002 Chevrolet Camaro Parts
 2002 Chevrolet Camaro Camshaft Bearing
 2002 Chevrolet Camaro Crankshaft
 2002 Chevrolet Camaro Crankshaft Gear
 2002 Chevrolet Camaro Cylinder Head
 2002 Chevrolet Camaro Dipstick
 2002 Chevrolet Camaro Oil Pan
 2002 Chevrolet Camaro Oil Pan Gasket
 2002 Chevrolet Camaro Piston Ring
 2002 Chevrolet Camaro Pushrod
 2002 Chevrolet Camaro Rocker Arm
 2002 Chevrolet Camaro Timing Belt Tensioner
 2002 Chevrolet Camaro Timing Cover Gasket