Make sure this part fits

GM 12633906
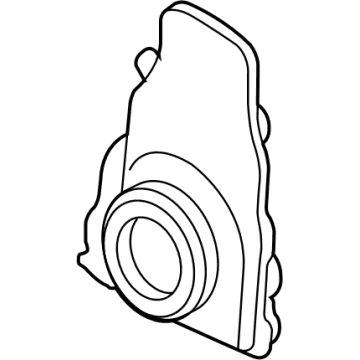
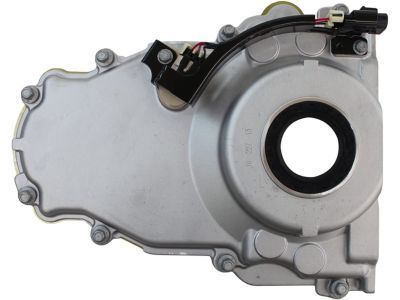
Timing Cover

1997-2007 GM

Customer Questions & Expert Answers (38)
GM 12633906 Timing Cover
  • Part Description
    Cover Assembly-Engine Front
  • Position
    Front
  • Replaces
    12561243
  • Manufacturer
    General Motors
Make sure this part fits
$106.10 MSRP: $180.62
You Save: $74.52 (42%)
1
ADD TO CART
  • Related Parts
  • Product Specifications
  • Vehicle Fitment
  • Customer Questions & Expert Answers
  • Product Specifications

    BrandGenuine GM
    Manufacturer Part Number12633906
    Part DescriptionCover Assembly-Engine Front
    Other NamesFront Cover; Cover, Engine Front Cover
    Item Dimensions3.6 x 15.2 x 15.1 inches
    Item Weight1.80 Pounds
    PositionFront
    ConditionNew
    Replaces12561243
    ManufacturerGeneral Motors
    SKU12633906
    WarrantyThis genuine GM part is guaranteed by GM's factory warranty.
    Shipping & ReturnShipping Policy Return Policy
    Warning: California's Proposition 65
  • Vehicle Fitment

    Year Make Model Trim Engine
    2004 Buick RainierCXL, CXL Plus8 Cyl 5.3 L GAS
    2004-2005 Cadillac CTSV8 Cyl 5.7 L GAS
    2002-2006 Cadillac EscaladeBase8 Cyl 5.3 L GAS, 8 Cyl 6.0 L GAS
    2003-2006 Cadillac Escalade ESVBase8 Cyl 6.0 L GAS
    2002-2006 Cadillac Escalade EXTBase8 Cyl 6.0 L GAS
    2002-2006 Chevrolet Avalanche 1500Base, LS, LT, North Face, On Road Edition, WBH, Z66, Z718 Cyl 5.3 L FLEX, 8 Cyl 5.3 L GAS
    2002-2006 Chevrolet Avalanche 2500Base, LS, LT8 Cyl 8.1 L GAS
    1998-2002 Chevrolet CamaroZ28, Z28 SS8 Cyl 5.7 L GAS
    1997-2004 Chevrolet Corvette50th Anniversary Edition, 50th Anniversary Edition Pace Car, Base, Indianapolis 500 Pace Car, Z068 Cyl 5.7 L GAS
    2003-2007 Chevrolet Express 1500Base, LS, LT8 Cyl 5.3 L FLEX, 8 Cyl 5.3 L GAS
    View More
  • Customer Questions & Expert Answers

    Q:
    Is this 12633906 designed for my car? Posted by ChevyPartsGiant Specialist
    A:
    Please Select Your Vehicle model to see if part number 12633906 is suitable before ordering.
    Posted by ChevyPartsGiant Specialist
    Q:
    How to replace the engine front timing cover on Cadillac Escalade EXT? Posted by Customer
    A:
    To replace the Timing Cover, first gather the necessary tools: front and rear cover alignment tool (J 41476). The initial steps involve removing the Water Pump then proceeding with the crankshaft balancer removal. Remove the front cover bolts and the Oil Pan-to-Timing Cover bolts. Extract the Timing Cover together with the gasket before discarding the current gasket material. Thoroughly examine the Timing Cover after cleaning it if required. You must replace the crankshaft oil seal and the Timing Cover gasket with new parts and refrain from using any gasket sealant until specified by the instructions. When assembling replace the crankshaft front oil seal properly against the crankshaft to stop premature wear and leaking. All surfaces of the gasket must be clean from oil or foreign materials. Attach a 5 mm (0.20 inch) long bead of gm p/n 12378190 sealant or equivalent material that measures 20 mm (0.80 inch) in total length to the junction between the engine block and Oil Pan. Start by mounting the new Timing Cover gasket and cover before tightening the Timing Cover and Oil Pan-to-Timing Cover bolts with caution against over-torque. Align the tapered legs of the front and rear cover alignment tool (J41476) with the machined surfaces on the Timing Cover. Tighten the Oil Pan to Timing Cover bolts to 25 nm (18 ft. Lbs.) apply 25 nm of torque (18 ft. Lbs.) when installing the Timing Cover bolts as well as the Oil Pan-to-Timing Cover bolts. Add the new crankshaft front oil seal before reinstalling the Water Pump.
    Posted by ChevyPartsGiant Specialist
    Q:
    How to replace the engine front timing cover on Cadillac Escalade? Posted by Customer
    A:
    Start the engine front cover replacement process by obtaining the front and rear cover alignment tool (J 41476) alongside other required instruments. Start your work by taking out the Water Pump followed by the crankshaft balancer before moving to the Oil Pan-to-front cover bolt removal. Start by uninstalling the front cover bolts before you take off the front cover and its gasket which must be discarded. Follow these steps when cleaning and inspecting the engine front cover: discard both the crankshaft oil seal and front cover gasket and do not use any sealant on the front cover gasket unless mandated. Watco gm U.S. P/N 12378190 or equivalent sealant should be applied as a 5 mm (0.20 inch) bead along the Oil Pan to engine block junction before adding the new front cover gasket and cover. Torque the front cover bolts as well as the Oil Pan-to-front cover bolts until they feel snug without exceeding the torque limits. Use the front and rear cover alignment tool (J 41476) to guide the tapered legs that match the machined alignment surfaces found on the front cover. Use the crankshaft balancer bolt as the starting point to perform final tightening of Oil Pan to front cover bolts alongside engine front cover bolts with a torque of 25 nm (18 ft. Lbs.). Reinstall the Water Pump after installing a fresh crankshaft front oil seal through the removal of the front cover alignment tool (J 41476).
    Posted by ChevyPartsGiant Specialist
    Q:
    How to service the timing cover on Chevrolet Corvette? Posted by Customer
    A:
    The servicing process of a Timing Cover starts with air intake duct removal and air cleaner assembly and then moves to crankshaft balancer removal. The service begins by emptying the cooling system followed by heater and Radiator hose removal from the Water Pump. Start by taking out the Water Pump combined with its bolts and gaskets. Avoiding damage to the Oil Pan Gasket is essential when you glide the front cover/gasket across it. After removing the front cover-to-engine block and front cover-to-oil pan bolts you should separate the front cover from the Oil Pan while discarding the gasket. Clear the front oil seal from the crankshaft that resides inside the cover. Then dispose of both parts. To achieve correct crankshaft front oil seal positioning during installation you must use the front/rear cover alignment tool (J 41476) to position the seal squarely with the crankshaft. Seal the engine block to Oil Pan interface with gm p/n 12378190 sealer to a 5 mm (0.20 inch) thickness before securing the new front cover along with its gasket and bolts while leaving them finger-tight. Use the j 41476 tool's tapered legs to place them onto the machined alignment surfaces on the front cover. First position the cover at the pan rail by tightening the Oil Pan-to-cover bolts then install the crankshaft balancer bolt until it meets initial resistance. Tighten Oil Pan-to-front cover bolts to 25 nm (18 ft. Lbs.) while the front cover bolts require a torque of 25 nm (118 ft. Lbs.). After extracting the j 41476 from the front cover's surface position the front crankshaft oil seal in its place. You should install the crankshaft balancer followed by a Water Pump assembly along with gaskets and bolts. After connecting hoses to the Water Pump you should reinstall the air intake duct and air cleaner assembly followed by filling and inspecting the cooling system for any leakage.
    Posted by ChevyPartsGiant Specialist
    Q:
    How to replace the engine front timing cover on Chevrolet Silverado 2500? Posted by Customer
    A:
    The engine front cover replacement process begins by removing the Water Pump followed by the crankshaft balancer and Oil Pan-to-front cover bolts and front cover bolts. After that detach the front cover with its gasket which needs to be discarded. Thorough cleaning followed by a detailed inspection must be performed on the engine front cover. Do not use a medicine crankshaft oil seal or front cover gasket again and avoid using sealants on the front cover gasket without explicit instructions. You need to check every gasket surface for oil or foreign matter before setting the crankshaft front oil seal correctly on the crankshaft to stop early wear and oil leakage. Sealant gm p/n 12378190 (equivalent option) should be applied as a 5 mm (0.20 inch) bead extending 20 mm (0.80 inch) along the Oil Pan to engine block junction before installing the front cover gasket and cover. Apply gentle torque to the front cover bolts along with Oil Pan-to-front cover bolts while avoiding excessive tightening. Use the j 41476 front and rear cover alignment tool (J 41476) to correctly position the front cover with its tapered legs matching the machined surfaces. Apply 25 nm torque (18 ft. Lbs.) to Oil Pan to front cover bolts and engine front cover bolts before removing the j 41476 alignment tool. Put new crankshaft front oil seal and Water Pump as the final steps.
    Posted by ChevyPartsGiant Specialist
    Q:
    What tools are required to service and repair the timing cover on Chevrolet Suburban 1500? Posted by Customer
    A:
    The tools required to service and repair the Timing Cover includes: front and rear cover alignment (J41476). The main gas engine acknowledges such along with beginning by removing the Water Pump and followed it by a Crankshaft balancer from the Crankshaft and engine front cover. Clean all parts and inspect them all. It is worth noting that reinforcement oil seal or front cover gasket is not to be reused, also avoid sliding the front cover/gasket across the Oil Pan Gasket. Apply a 5 mm (0.20 inch) bead of gm p/n 12378190 at the corner the oil pan meets the engine block. Mount the front cover, gasket and bolts onto the engine by tighting the cover bolts fringer tightly without excessive tightenning. Mount the j41476 tool onto the machined alignment surfaces on the front cover to center the Crankshaft front oil seal with respect to the Crankshaft to prevent early oil seal wear and engine assembly oil leaks due to inadequate alignment. Install the Crankshaft balancer bolt, torquing it hand until tight before hand-tightening the oil pan-to-cover bolts to align the cover on the pan rail. Perform oil pan-to-front cover bolt and front cover bolt torque sequence to 25 n.m (18 lb ft). Having removed the j41476 for the front cover, place the front Crankshaft oil seal into place, attach the Crankshaft balancer to the Crankshaft, followed by reinstallation of the Water Pump.
    Posted by ChevyPartsGiant Specialist
    Q:
    How to replace the engine front timing cover on Chevrolet Avalanche 1500? Posted by Customer
    A:
    To replace the engine front cover, first, consult the tools you will need (J41476) front and rear cover alignment tool). Start by taking out the Water Pump then do the crankshaft balancer. Next, remove the oil pan-to-front cover bolts and the front cover bobs then take out the front cover and gasket, throwing away the old gasket. If necessary, clean and check the engine front cover. When installing the new cover, do not reuse the crankshafts oil seal or front cover gasket and do not seal the gasket by using any kind of sealant unless it is instructed. Apply a 5 mm (0.20 inch) length of gm p/n 12378190, or equivalent, 20 mm (0.80 inch) long sealant to the oil pan to the engine block juncture and then place the front cover gasket and cover. Ensure the front cover bolts are tightened snug without over-tightening oil pan-to-front cover bolts until snug. By using a j41476, you should center the crankshaft front oil seal, bring the tapered legs in line with the machined surfaces of the front cover. Mount the crankshaft balancer bolt until it is snug, tighten oil pan to front cover bolts to 25 nm (18 ft. Lbs.), and the engine front cover bolts to 25 nm (18 ft. Lbs.). Following the removal of the j41476, put in a new crankshaft front oil seal and now, re-attach the Water Pump.
    Posted by ChevyPartsGiant Specialist
    Q:
    How to replace the engine front timing cover on Chevrolet Tahoe? Posted by Customer
    A:
    First, to replace the engine front cover, remove the Water Pump and the crankshaft balancer, then the bolts in the front cover. Next, remove the front cover and gasket, and throw away the used one. In case needed, clean and inspect the engine front cover. Reusing crankshaft oil seal or front cover gasket is important and no sealant is to be applied to the front cover gasket unless instructed. Check that the crankshaft front oil seal is properly centered against the crankshaft because an improperly aligned front cover will cause premature front oil seal wear and increase engine oil leaks. I apply a 5mm (0.20 in) long line 20mm (0.80 in) long sealant gm p/n behind 12378190 or equivalent at the Oil Pan junction to engine block. Place the front cover gasket and cover and tighten the front cover bolts and Oil Pan-to-front cover bolts without over-tightening. Assist with aligning the tapered legs on the machined alignment surfaces on the front cover by using the front and rear cover alignment tool j- 41476. Secure the Oil Pan to front cover bolts and the engine front cover bolts with a torque of 25 nm (18 ft. Lbs.). .removefrom your engine, you need to strip off, andalement a new crankshaft front oil seal, then reinstall the Water Pump.
    Posted by ChevyPartsGiant Specialist
    Q:
    How to replace the engine front timing cover on GMC Yukon XL 1500? Posted by Customer
    A:
    To replace the engine front cover, first, you need to gather the necessary tools: front and rear cover alignment (J 41476). Start by detaching the Water Pump, followed by crankshaft balancer and then, the Oil Pan-to-front cover bolts. Next, unscrew the bolts on the front cover and remove the front cover with the gasket, discarding the old one. Clean and inspect the engine front cover, always take away the crankshaft oil seal and front cover gasket never reuse, take away any sealant away from the front cover gasket unless shown. You must apply a 5mm (0.2 inch) long beeaded seala nt gm p/n 12378290 or equivalent at the Oil Pan to engine block junction 20mm (0.8 inch) long. Mount a new front cover gasket and cover, fastening the front cover bolts and Oil Pan-to-front cover screws lightly without over-tightening. Use front and rear cover alignment (J 41476) to insert the crankshaft front oil seal, aligning it with the tapered legs to the machined surfaces on the front cover. Retighten Oil Pan to front cover bolts and engine front cover bolts to 25 nm 18 ft. Lbs. Next uncredited protection tool. Lastly, install a new crankshaft front oil seal and a Water Pump.
    Posted by ChevyPartsGiant Specialist
    Q:
    What components need to be removed after the intake plenum for the 2004 Cadillac CTS? Posted by Customer
    A:
    Remove the drive belt tensioner and the water pump pulley bolts, then take off the water pump pulley.
    Posted by ChevyPartsGiant Specialist
    See expert answers on similar Timing Cover
    Q:
    What should be disconnected from the water outlet for the 2005 Cadillac CTS? Posted by Customer
    A:
    Disconnect the purge vent hose.
    Posted by ChevyPartsGiant Specialist
    See expert answers on similar Timing Cover
    Q:
    What components need to be removed to take off the engine front cover for the 2002 Chevrolet Camaro? Posted by Customer
    A:
    Remove the engine front cover studs and bolts, followed by the engine front cover and gasket.
    Posted by ChevyPartsGiant Specialist
    See expert answers on similar Timing Cover
    Q:
    What is the first step to replace the engine front cover for the 2001 Chevrolet Camaro? Posted by Customer
    A:
    Begin by draining the engine oil and coolant.
    Posted by ChevyPartsGiant Specialist
    See expert answers on similar Timing Cover
    Q:
    What is the next step after removing the CMP sensor for the 2006 Chevrolet Avalanche 2500? Posted by Customer
    A:
    Take out the battery cable channel bolt and reposition the battery cable channel.
    Posted by ChevyPartsGiant Specialist
    See expert answers on similar Timing Cover
    Q:
    How should the coolant pump bolts be tightened for the 2000 Chevrolet Camaro? Posted by Customer
    A:
    Tighten the coolant pump bolts to 15 Nm (11 ft. lbs.) and use the J 36660-A to torque them an additional 80 degrees.
    Posted by ChevyPartsGiant Specialist
    See expert answers on similar Timing Cover
    Q:
    What is the torque specification for tightening the oil pan to front cover bolts and engine front cover bolts for the 2004 Chevrolet Express 1500? Posted by Customer
    A:
    Tighten them to 25 Nm (18 ft. lbs.).
    Posted by ChevyPartsGiant Specialist
    See expert answers on similar Timing Cover
    Q:
    What is the first step in the replacement process for the 2001 Chevrolet Corvette? Posted by Customer
    A:
    Remove the crankshaft balancer and the water pump.
    Posted by ChevyPartsGiant Specialist
    See expert answers on similar Timing Cover
    Q:
    How should the front cover bolts and oil pan-to-front cover bolts be tightened for the 2003 Chevrolet Corvette? Posted by Customer
    A:
    Tighten until snug, ensuring not to overtighten.
    Posted by ChevyPartsGiant Specialist
    See expert answers on similar Timing Cover
    Q:
    How is the front cover aligned for the 2004 Chevrolet Corvette? Posted by Customer
    A:
    Use the J41476 to align the front cover, ensuring the tapered legs align with the machined surfaces.
    Posted by ChevyPartsGiant Specialist
    See expert answers on similar Timing Cover
    Q:
    What should be ensured regarding the crankshaft position sensor during installation for the 2005 Chevrolet Express 2500? Posted by Customer
    A:
    Ensure the crankshaft position sensor is fully seated in the engine front cover crankshaft position sensor bore to prevent erratic engine operation.
    Posted by ChevyPartsGiant Specialist
    See expert answers on similar Timing Cover
    Q:
    How should the front cover bolts and oil pan-to-front cover bolts be tightened for the 2003 Chevrolet SSR? Posted by Customer
    A:
    Tighten them until snug, ensuring not to overtighten.
    Posted by ChevyPartsGiant Specialist
    See expert answers on similar Timing Cover
    Q:
    How should sealant be applied for the 2003 Chevrolet Express 3500? Posted by Customer
    A:
    Apply a 5 mm (0.20 inch) bead of sealant GM U.S. P/N 12378190, or equivalent, 20 mm (0.80 inch) long to the oil pan to engine block junction.
    Posted by ChevyPartsGiant Specialist
    See expert answers on similar Timing Cover
    Q:
    What should be done after lowering the cover for the 2002 Chevrolet Suburban 2500? Posted by Customer
    A:
    Lower the cover over the dowel pin to rest on the sealant.
    Posted by ChevyPartsGiant Specialist
    See expert answers on similar Timing Cover
    Q:
    What should be done after removing the water pump and crankshaft balancer for the 2007 Chevrolet Silverado 1500? Posted by Customer
    A:
    Remove the oil pan-to-front cover bolts and the front cover bolts, then take off the front cover and gasket, discarding the old gasket.
    Posted by ChevyPartsGiant Specialist
    See expert answers on similar Timing Cover
    Q:
    What is the next step after reconnecting the CKP sensor electrical connector for the 2007 Chevrolet Silverado 1500 Classic? Posted by Customer
    A:
    Install the engine shield and bolts, tightening them to 20 Nm (15 ft. lbs.).
    Posted by ChevyPartsGiant Specialist
    See expert answers on similar Timing Cover
    Q:
    What should be ensured while using the alignment tool for the 2007 Chevrolet Silverado 3500 Classic? Posted by Customer
    A:
    The tapered legs must align with the machined surfaces.
    Posted by ChevyPartsGiant Specialist
    See expert answers on similar Timing Cover
    Q:
    How should the front cover bolts be secured for the 2006 Chevrolet Silverado 3500? Posted by Customer
    A:
    Until snug without overtightening.
    Posted by ChevyPartsGiant Specialist
    See expert answers on similar Timing Cover
    Q:
    What is the next step after disconnecting the CKP sensor for the 2004 Chevrolet Silverado 1500? Posted by Customer
    A:
    Remove the CKP sensor bolt and sensor, and discard the CKP sensor O-ring seal.
    Posted by ChevyPartsGiant Specialist
    See expert answers on similar Timing Cover
    Q:
    What is the torque specification for the bolts for the 2004 Chevrolet SSR? Posted by Customer
    A:
    Tighten the oil pan to front cover bolts and engine front cover bolts to 25 Nm (18 ft. lbs.).
    Posted by ChevyPartsGiant Specialist
    See expert answers on similar Timing Cover
    Q:
    What should be done after tightening the engine front cover bolts for the 2006 GMC Sierra 3500? Posted by Customer
    A:
    Reposition the battery cable channel and tighten the battery cable channel bolt to 9 Nm (80 inch lbs.).
    Posted by ChevyPartsGiant Specialist
    See expert answers on similar Timing Cover
    Q:
    How should the Front and Rear Cover Alignment Tool be used for the 2007 GMC Sierra 3500 Classic? Posted by Customer
    A:
    Install the Front and Rear Cover Alignment Tool (J 41476) to the front cover, aligning its tapered legs with the machined surfaces.
    Posted by ChevyPartsGiant Specialist
    See expert answers on similar Timing Cover
    Q:
    Is sealant required for the front cover gasket for the 2003 GMC Savana 2500? Posted by Customer
    A:
    Avoid applying any sealant to the front cover gasket unless specified.
    Posted by ChevyPartsGiant Specialist
    See expert answers on similar Timing Cover
    Q:
    What is the final step in the process for the 2005 GMC Savana 2500? Posted by Customer
    A:
    Reinstall the water pump.
    Posted by ChevyPartsGiant Specialist
    See expert answers on similar Timing Cover
    Q:
    How should the crankshaft front oil seal be positioned for the 2005 GMC Sierra 1500? Posted by Customer
    A:
    Center it in relation to the crankshaft to prevent premature wear and oil leaks.
    Posted by ChevyPartsGiant Specialist
    See expert answers on similar Timing Cover
    Q:
    What should be done with the front cover for the 2007 GMC Sierra 1500? Posted by Customer
    A:
    Remove the front cover bolts and discard the front cover, ensuring to clean all sealing surfaces before installing a NEW front cover.
    Posted by ChevyPartsGiant Specialist
    See expert answers on similar Timing Cover
    Q:
    What is the final step in the process for the 2007 GMC Sierra 1500 Classic? Posted by Customer
    A:
    Reinstall the oil pan, crankshaft balancer, and water pump.
    Posted by ChevyPartsGiant Specialist
    See expert answers on similar Timing Cover
    Q:
    What should be done to the engine front cover before installation for the 2007 GMC Savana 2500? Posted by Customer
    A:
    Clean and inspect the engine front cover, ensuring all gasket surfaces are free of oil or foreign material.
    Posted by ChevyPartsGiant Specialist
    See expert answers on similar Timing Cover
    Q:
    What tool is used to center the crankshaft front oil seal for the 2006 GMC Savana 3500? Posted by Customer
    A:
    Use the Front and Rear Cover Alignment tool (J41476).
    Posted by ChevyPartsGiant Specialist
    See expert answers on similar Timing Cover
    If you have any questions about this product, please don't hesitate to ask us. We will be happy to help you!

OEM GM 12633906, Excellent Performance and Perfect Fitment

To ensure reliability, purchase GM part # 12633906 Timing Cover. It is sometimes referred to as GM Timing Cover. Choosing OEM parts is the optimal decision for guaranteeing superior quality and perfect performance. These components undergo stringent quality checks and are carefully constructed to comply with GM's factory specifications, ensuring a smooth installation process.

ChevyPartsGiant.com is a leading supplier of genuine GM parts such as GM 12633906 Timing Cover. Our website boasts an extensive inventory of OEM GM parts, available at highly competitive prices in the market. Should you require any new genuine GM parts, rest assured we will deliver them swiftly and efficiently to your doorstep. Furthermore, all our parts come with the assurance of a manufacturer's warranty. For detailed Chevy parts information, click here.
Choose ChevyPartsGiant for discounted prices, exceptional service and fast delivery