ChevyParts
My Garage
My Account
Cart
OEM 2004 Chevrolet Venture A/C Condenser
Air Conditioning Condenser- Select Vehicle by Model
- Select Vehicle by VIN
Select Vehicle by Model
orMake
Model
Year
Select Vehicle by VIN
For the most accurate results, select vehicle by your VIN (Vehicle Identification Number).
1 A/C Condenser found

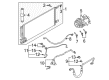
2004 Chevrolet Venture Condenser Part Number: 10339103
Product Specifications- Other Name: Condenser, A/C; A/C Condenser; Condenser A/C; Condenser, A/C Condenser
- Replaces: 10430003, 10315135, 10326292, 10420262, 10331989
- Item Weight: 13.70 Pounds
- Item Dimensions: 41.3 x 10.5 x 19.3 inches
- Condition: New
- Fitment Type: Direct Replacement
- SKU: 10339103
- Warranty: This genuine part is guaranteed by GM's factory warranty.
2004 Chevrolet Venture A/C Condenser
With a comprehensive array of OEM 2004 Chevrolet Venture A/C Condenser, from fuel pumps to door handles, our website is a one-stop-shop for your needs. All our genuine 2004 Chevrolet Venture A/C Condenser are backed by the manufacturer's warranty and are offered at competitive prices in the market. Rest assured, you can shop with complete confidence.
2004 Chevrolet Venture A/C Condenser Parts and Q&A
- Q: How to replace the A/C Condenser in a system on 2004 Chevrolet Venture?A: In order to substitute the condenser, evacuate the refrigerant and empty the cooling system. Dislodge the cooling fans and re-fit hose clamps in order to free the radiator lower hose. Dislodge different lines and eliminate the radiator and condenser assembly. Install the new condenser and fit it with mounting bolts and reconnect everything. Lastly, fill up the cooling and check the leaks.
Related 2004 Chevrolet Venture Parts
 2004 Chevrolet Venture Cabin Air Filter
 2004 Chevrolet Venture A/C Accumulator
 2004 Chevrolet Venture A/C Compressor
 2004 Chevrolet Venture A/C Compressor Cut-Out Switches
 2004 Chevrolet Venture A/C Expansion Valve
 2004 Chevrolet Venture A/C Hose
 2004 Chevrolet Venture A/C Orifice Tube
 2004 Chevrolet Venture A/C Service Cap
 2004 Chevrolet Venture A/C System Valve Core
 2004 Chevrolet Venture Blower Motor Resistor
 2004 Chevrolet Venture Evaporator
 2004 Chevrolet Venture HVAC Pressure Switch