ChevyParts
My Garage
My Account
Cart
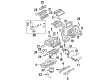
OEM 2004 Chevrolet Venture A/C Expansion Valve
Air Conditioning Expansion Valve- Select Vehicle by Model
- Select Vehicle by VIN
Select Vehicle by Model
orMake
Model
Year
Select Vehicle by VIN
For the most accurate results, select vehicle by your VIN (Vehicle Identification Number).
1 A/C Expansion Valve found

2004 Chevrolet Venture Expansion Valve Part Number: 10318613
Product Specifications- Other Name: Valve Kit, Air Conditioner Expansion Refrigerant; A/C Expansion Valve; Valve Kit, A/C Expansion Refrigerant
- Replaces: 10306781, 10430164
- Item Weight: 1.60 Pounds
- Item Dimensions: 6.5 x 3.3 x 3.1 inches
- Condition: New
- Fitment Type: Direct Replacement
- SKU: 10318613
- Warranty: This genuine part is guaranteed by GM's factory warranty.
2004 Chevrolet Venture A/C Expansion Valve
With a comprehensive array of OEM 2004 Chevrolet Venture A/C Expansion Valve, from fuel pumps to door handles, our website is a one-stop-shop for your needs. All our genuine 2004 Chevrolet Venture A/C Expansion Valve are backed by the manufacturer's warranty and are offered at competitive prices in the market. Rest assured, you can shop with complete confidence.
2004 Chevrolet Venture A/C Expansion Valve Parts Questions & Experts Answers
- Q: How to replace the A/C Expansion Valve in a system on 2004 Chevrolet Venture?A: Recovering the refrigerant from the a/c system represents the first step for replacing the A/C Expansion Valve (TXV). First untighten both wiper arm linkage nuts from the left side before moving this linkage out of the way. Clear the heater hoses first and after that disconnect the vacuum hose from the Brake Booster before moving it aside. First detach the Evaporator outlet tube to A/C Expansion Valve nut then disconnect the Evaporator outlet and inlet tubes from the A/C Expansion Valve. First detach the Evaporator outlet tube from the Evaporator tube line before you take out and discard the sealing washers. The refrigerant system remains protected from contamination through immediate tube covering of both the Evaporator inlet and outlet. After breaking the A/C Expansion Valve to Evaporator bolts users should extract the A/C Expansion Valve from the Evaporator core and discard both sealing washers. Use new sealing washers to install the A/C Expansion Valve on the Evaporator core while securing its position using A/C Expansion Valve to Evaporator bolts until they reach 3.2 n.m (28 lb in). To proceed with installation, first remove the protective caps from Evaporator tubes and then add new sealing washers to these tubes. Attach the Evaporator outlet tube to the inlet tube following their connection to the A/C Expansion Valve before torquing the outlet tube nut to 16 n.m (12 lb ft). You should first secure the vacuum hose to the Brake Booster before repositioning heater hoses and reconnecting the left wiper arm linkage and its nuts which require 5 n.m (44 lb in) torque. Before system completion the technician must evacuate and recharge the a/c system followed by testing fittings with a halogen leak detector (J 39400-A).
Related 2004 Chevrolet Venture Parts
 2004 Chevrolet Venture Cabin Air Filter
 2004 Chevrolet Venture Heater Core
 2004 Chevrolet Venture A/C Accumulator
 2004 Chevrolet Venture A/C Compressor Cut-Out Switches
 2004 Chevrolet Venture A/C Hose
 2004 Chevrolet Venture A/C Service Cap
 2004 Chevrolet Venture A/C System Valve Core
 2004 Chevrolet Venture Ambient Temperature Sensor
 2004 Chevrolet Venture Blend Door Actuator
 2004 Chevrolet Venture Blower Motor Resistor
 2004 Chevrolet Venture Evaporator
 2004 Chevrolet Venture HVAC Pressure Switch