ChevyParts
My Garage
My Account
Cart
OEM 2005 Buick Century Headlight Bulb
Headlamp Bulb- Select Vehicle by Model
- Select Vehicle by VIN
Select Vehicle by Model
orMake
Model
Year
Select Vehicle by VIN
For the most accurate results, select vehicle by your VIN (Vehicle Identification Number).
3 Headlight Bulbs found


2005 Buick Century Bulb & Socket Part Number: 19257054
$14.11 MSRP: $25.22You Save: $11.11 (45%)Ships in 1-2 Business DaysProduct Specifications- Other Name: Bulb Assembly, Headlamp (Low Beam); Fog Light Bulbs; Headlight Bulbs; Car Bulbs; Headlight; Headlamp Bulb; Composite Assembly; Fog Lamp Bulb; Lower Beam Bulb; Bulb; Bulb, Capsule/Headlamp/Fog Lamp
- Replaces: 09441733, 12450177, 01999366, 9441733, 01999357, 1999366, 1999357
- Item Weight: 0.30 Pounds
- Item Dimensions: 4.2 x 2.1 x 2.2 inches
- Condition: New
- Fitment Type: Direct Replacement
- SKU: 19257054
- Warranty: This genuine part is guaranteed by GM's factory warranty.


2005 Buick Century Bulb & Socket, Green Line Part Number: 9441732
$13.16 MSRP: $23.52You Save: $10.36 (45%)Ships in 1-3 Business DaysProduct Specifications- Other Name: Bulb, Headlamp (High Beam); Headlight Bulbs; Car Bulbs; Headlight; Headlamp Bulb; High Beam; Composite Assembly; Fog Lamp/Turn Signal; Capsule Bulb
- Item Weight: 0.40 Pounds
- Item Dimensions: 4.2 x 2.2 x 2.1 inches
- Condition: New
- Fitment Type: Direct Replacement
- SKU: 9441732
- Warranty: This genuine part is guaranteed by GM's factory warranty.


2005 Buick Century Turn Signal Bulb, Amber; Clear Part Number: 15828918
$5.50 MSRP: $9.83You Save: $4.33 (45%)Ships in 1-3 Business DaysProduct Specifications- Other Name: Bulb, Daytime Running Lamp; Back Up Light; Turn Signal; Tail Light; Headlight Bulbs.; Tail Lamp Bulb; Backup, Signal, Parking, Marker, Run Lamp Bulbs; Exterior Bulbs; Standard Parts.
- Replaces: 01999368, 09442486, 12450053, 1999368, 12450182, 9442486
- Item Weight: 0.30 Pounds
- Item Dimensions: 3.3 x 2.2 x 2.1 inches
- Condition: New
- Fitment Type: Direct Replacement
- SKU: 15828918
- Warranty: This genuine part is guaranteed by GM's factory warranty.
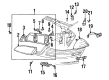
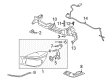
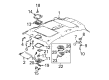
2005 Buick Century Headlight Bulb
With a comprehensive array of OEM 2005 Buick Century Headlight Bulb, from fuel pumps to door handles, our website is a one-stop-shop for your needs. All our genuine 2005 Buick Century Headlight Bulb are backed by the manufacturer's warranty and are offered at competitive prices in the market. Rest assured, you can shop with complete confidence.
2005 Buick Century Headlight Bulb Parts Questions & Experts Answers
- Q: How to Replace the Headlight Bulb or Cornering, Sidemarker, Park, or Turn Signal Bulb on 2005 Buick Century?A: The procedure for changing headlamp bulbs or cornering, sidemarker, park or turn signal bulbs starts with hood opening followed by application of fingers to stabilize the headlamp lens and subsequent retainer removal. The first step consists of releasing and removing the headlamp retainers after which the headlamp mounting tabs must be removed from the slots found on the upper fascia support along with fender reinforcement. Unplug the electrical link from the headlamp and extract the headlamp unit from its position. Open the rubber access covers from behind the headlamp bulb and socket area and then rotate the bulb and socket counterclockwise to release them with caution toward the Halogen Bulb warning. First disconnect the electrical connector from the headlamp then remove the headlamp bulb/socket together with the headlamp from its mounting location. Connect the electrical connector to the new headlamp bulb/socket before mounting it into the headlamp while rotating it clockwise until complete insertion. Remount the rubber access covers then link the electrical connector to the headlamp unit. Begin by inserting the mounting tabs of the headlamp into their designated spaces in the upper fascia support joint with the fender reinforcement while you apply a light pressure point to the headlamp lens to secure the retainers. Master the retaining mechanism by pressing it over the mounting tabs in the headlamp position until the seating point reaches complete installation. A proper fit test should be performed on the headlamp before conducting a headlamp aim evaluation if fresh installation happened or if front-end maintenance affected the mounting brackets. Finally, close the hood.
Related 2005 Buick Century Parts
 2005 Buick Century Back Up Light
 2005 Buick Century Dome Light Connector
 2005 Buick Century Fog Light
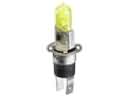 2005 Buick Century Fog Light Bulb
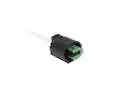 2005 Buick Century Forward Light Harness Connector
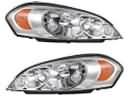 2005 Buick Century Headlight
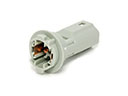 2005 Buick Century Light Socket
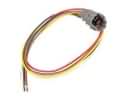 2005 Buick Century Rear Light Harness Connector
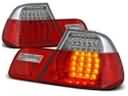 2005 Buick Century Tail Light
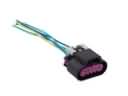 2005 Buick Century Tail Light Connector