ChevyParts
My Garage
My Account
Cart
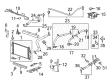
OEM 2007 Chevrolet HHR Thermostat Housing
Engine Coolant Thermostat Housing- Select Vehicle by Model
- Select Vehicle by VIN
Select Vehicle by Model
orMake
Model
Year
Select Vehicle by VIN
For the most accurate results, select vehicle by your VIN (Vehicle Identification Number).
1 Thermostat Housing found


2007 Chevrolet HHR Thermostat Housing, Green Line Part Number: 12597172
$98.01 MSRP: $201.41You Save: $103.40 (52%)Ships in 1-2 Business DaysProduct Specifications- Other Name: Housing, Engine Coolant Temperature; Engine Coolant Thermostat Housing; Thermostat Housing Cover; Water Manifold; Housing, Engine Coolant Thermostat
- Item Weight: 1.50 Pounds
- Item Dimensions: 9.8 x 9.4 x 4.4 inches
- Condition: New
- Fitment Type: Direct Replacement
- SKU: 12597172
- Warranty: This genuine part is guaranteed by GM's factory warranty.
2007 Chevrolet HHR Thermostat Housing
With a comprehensive array of OEM 2007 Chevrolet HHR Thermostat Housing, from fuel pumps to door handles, our website is a one-stop-shop for your needs. All our genuine 2007 Chevrolet HHR Thermostat Housing are backed by the manufacturer's warranty and are offered at competitive prices in the market. Rest assured, you can shop with complete confidence.
2007 Chevrolet HHR Thermostat Housing Parts Questions & Experts Answers
- Q: How to replace the engine coolant thermostat housing on 2007 Chevrolet HHR?A: Begin the process of replacing the engine coolant Thermostat housing by draining the cooling system then uninstalling both the air cleaner assembly and bracket along with its nuts. Start by removing the Exhaust Heat Shield using stud removal. Remove the coolant from the engine block while using the water pump drain and secure the draining bolt tightly. Disconnect the engine coolant temperature (ECT) sensor electrical connector when working on vehicles with automatic transaxles. The procedure for a manual transaxle includes disconnecting both the ect sensor electrical connector and removing the ect sensor itself. Begin by loosening the outlet hose clamp then remove the radiator outlet hose and use tools to disconnect heater inlet and outlet hoses connecting to Thermostat housing pipes. Using a jack support the vehicle while you remove the bolts from the Thermostat housing and twist the water transfer pipe to separate it from the water pump. Start by taking off the Thermostat housing after which you need to remove the water transfer pipe when necessary with o-ring seals and Thermostat housing cover and Thermostat too. Remove any remaining debris and thread sealant from the engine Coolant Temperature Sensor and bolt holes when you reuse the housing. Insert a new Thermostat housing cover o-ring seal into the recess groove before fitting the Thermostat when needed then tighten the cover bolts to 10 n.m (89 lb in). The new Thermostat housing requires attachment to the engine gasket. Also apply slight coolant lubrication to the water feed pipe seals before installing new o-ring seals on the pipe. Put the water feed pipe into the Thermostat housing while aligning it with the water pump until the o-ring seal makes contact. Fasten the Thermostat housing to the engine through position it correctly then torques the bolts to 10 n.m (89 lb in). Lower the vehicle then seal the outlet and inlet hoses of the heater by tightening the clamps. Attach the radiator outlet hose to its clamp but put the ect sensor in place first and tighten it to 20 n.m (15 lb ft). Connect the ect sensor electrical connector based on the transaxle type then fix the ho2s electrical connector clip to the Thermostat housing. Start by checking vehicle level status and confirm drain valve closure before system filling and vehicle lowering. Reinstallation of the Exhaust Heat Shield requires studs to be tightened to 22 n.m (16 lb ft) and the completion of air cleaner bracket tightness to 10 n.m (89 lb in), and finally installation of the air cleaner assembly while confirming the repair and conducting leak tests.