ChevyParts
My Garage
My Account
Cart
OEM 2008 Cadillac XLR CV Boot
Axle Boot- Select Vehicle by Model
- Select Vehicle by VIN
Select Vehicle by Model
orMake
Model
Year
Select Vehicle by VIN
For the most accurate results, select vehicle by your VIN (Vehicle Identification Number).
2 CV Boots found

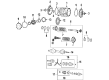
2008 Cadillac XLR Inner Boot Part Number: 89047795
Product Specifications- Other Name: Boot Kit, Rear Axle Universal Joint; CV Boot
- Position: Rear Inner
- Item Weight: 1.10 Pounds
- Item Dimensions: 8.7 x 5.1 x 4.7 inches
- Condition: New
- Fitment Type: Direct Replacement
- Require Quantity: 2
- SKU: 89047795
- Warranty: This genuine part is guaranteed by GM's factory warranty.

2008 Cadillac XLR Outer Boot Part Number: 88955486
Product Specifications- Other Name: Boot Kit, Rear Axle Universal Joint; CV Boot
- Position: Rear Outer
- Item Weight: 3.30 Pounds
- Item Dimensions: 7.4 x 5.3 x 10.4 inches
- Condition: New
- Fitment Type: Direct Replacement
- Require Quantity: 2
- SKU: 88955486
- Warranty: This genuine part is guaranteed by GM's factory warranty.
2008 Cadillac XLR CV Boot
With a comprehensive array of OEM 2008 Cadillac XLR CV Boot, from fuel pumps to door handles, our website is a one-stop-shop for your needs. All our genuine 2008 Cadillac XLR CV Boot are backed by the manufacturer's warranty and are offered at competitive prices in the market. Rest assured, you can shop with complete confidence.
2008 Cadillac XLR CV Boot Parts and Q&A
- Q: How to replace the outer CV Boot and CV Joint on 2008 Cadillac XLR?A: To replace wheel drive shaft outer joint and boot, you will need to pick up some tools which include. Pliers for drive axle seal clamp, (J42572) and axle seal crimp tool (J46588). Start by wrapping a shop towel around the Axle Shaft and fix the wheel drive shaft on a horizontal position in a bench vise. Dislodge the large retaining clamp for the seal from the cv joint seal using the axle seal crimp tool (J 46588), followed by the small retaining clamp which can be cut off with a side cutter. Dissassemble the seal from the outer race of the joint and wipe away the grease from the pieces of the joint and separate the outer joint from the Axle Shaft by applicating the retaining clip of the Axle Shaft by means of wood block and hammer. After removing the Axle Shaft retaining ring and seal, make sure you to clean every component with solvent and leave them in air till they dried out. In case of installation, align the cage and the inner race accurately, install the inner race in the cage with the grooved surface facing up. Align the cage and inner to outer race and install the balls sequentially without any gaps. The new small seal retaining clamp should then be installed onto the Axle Shaft followed by installation of the seal and Axle Shaft retaining ring by using grease from the service kit. Push the inner race splines onto the Axle Shaft and compress the retaining ring, drive the outer joint on to the shaft using a wood block and hammer. Finally, crimp the small seal retain clamp using drive axle seal clamp pliers (J 42572) and latch the large clamp using axle seal crimp tool (J 46588) with the appropriate alignment of all parts and inspected for damages prior to reinstallation.
Related 2008 Cadillac XLR Parts
 2008 Cadillac XLR Axle Shaft
 2008 Cadillac XLR Differential
 2008 Cadillac XLR Differential Bearing
 2008 Cadillac XLR Differential Cover
 2008 Cadillac XLR Drive Shaft
 2008 Cadillac XLR Pinion Bearing
 2008 Cadillac XLR Wheel Seal