ChevyParts
My Garage
My Account
Cart
OEM Cadillac XLR CV Boot
Axle Boot- Select Vehicle by Model
- Select Vehicle by VIN
Select Vehicle by Model
orMake
Model
Year
Select Vehicle by VIN
For the most accurate results, select vehicle by your VIN (Vehicle Identification Number).
2 CV Boots found

Cadillac XLR Inner Boot Part Number: 89047795

Cadillac XLR Outer Boot Part Number: 88955486
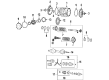
Cadillac XLR CV Boot
Want to cut long-term maintenance and repair costs? Choose OEM CV Boot. Those parts deliver top durability you can trust. On our site, you'll find a huge catalog of genuine Cadillac XLR parts. Prices are unbeatable, so you can keep more in your pocket. Every OEM Cadillac XLR CV Boot includes a manufacturer's warranty. You can also get an easy return policy that keeps buying risk free. Fast delivery, get your car on the road quickly. It's simple to search, compare, and order. Stop guessing about quality or fit. Order today and save with parts that last.
The CV Boot is an important part that shows that the Cadillac XLR a luxury roadster manufactured between 2003 and 2009 is a reliable car that comes from the Caddy. This flexible rubber or plastic component is very important in offering cover to the constant velocity (CV) joints which are important in transmitting power from the transaxle to the wheels. Holding the required lubricant and eliminating grime and dust from reaching the CV joints, the CV Boot prolongs the life of the joints as well as supports their work. Compatibility with different XLR models increases its relevance, since Cadillac's audience entails a range of demands. The boot must be very strong so that the CV joint does not get damaged easily; it must be checked frequently for any signs of weakness that could cause the CV joint to fail. The Cadillac XLR has some modern features such as electrically folding roof and Magnetic Ride Control adaptive suspension and accompanied by the durability of CV Boot. In the framework of the CV Boot particular distinguishing characteristics can be named: enhanced shock resistance and the inclination towards the use of extreme angle designs. In conclusion, the CV Boot improves the driving experience additionally, making it safer and improving the legendary Cadillac legacy making every drive with the XLR enjoyable and safe.
Cadillac XLR CV Boot Parts and Q&A
- Q: What tools are needed to service and repair the CV Boot and CV Joint for the wheel drive shaft inner joint and boot replacement on Cadillac XLR?A:For equipment and repair of the constant velocity joint boot, to be used for wheel driver shaft inner joint and boot replacement, the following tools are necessary to have: drive axle seal clamp pliers (J 42572), axle seal crimp tool (J 46588). Wrap a shop towel around the Axle Shaft and suspend the wheel drive shaft, horizontally, in a bench vise. Disassemble the large seal retaining clamp of the cv joint, using the axle seal crimp tool (J 46588) and discard the small seal retaining clamp with a side cutter. Seperate the seal from the joint outside and pull the outside race retaining ring and remove the outside race from the Axle Shaft picking up any loose balls. Wash all components with solvent and allowing them to dry in air. To install, wrap another shop towel on the Axle Shaft, slide on a new small seal retaining clamp, and then the seal onto the Axle Shaft. To ensure the axle spline relief faces away from the Axle Shaft end, engage the inner race splines and drive it on to the Axle Shaft by using a wood block and hammer. Fit the snap ring, cage, and lubricate the components as indicated. Lastly, lock the large seal retaining clamp in place with the drive axle seal clamp pliers (J 42572), making sure the connection is proper and dispense the grease inside the inner cv joint which is then followed by checking for the smooth operation.


