ChevyParts
My Garage
My Account
Cart
OEM 2009 Buick Lucerne Fuel Tank
Gas Tank- Select Vehicle by Model
- Select Vehicle by VIN
Select Vehicle by Model
orMake
Model
Year
Select Vehicle by VIN
For the most accurate results, select vehicle by your VIN (Vehicle Identification Number).
2 Fuel Tanks found

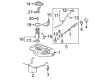
2009 Buick Lucerne Fuel Tank Part Number: 20887143
Product Specifications- Other Name: Tank, Fuel
- Replaces: 25795343
- Item Weight: 23.80 Pounds
- Item Dimensions: 38.3 x 22.7 x 15.5 inches
- Condition: New
- Fitment Type: Direct Replacement
- SKU: 20887143
- Warranty: This genuine part is guaranteed by GM's factory warranty.

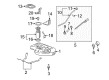
2009 Buick Lucerne Fuel Tank Part Number: 25795345
Product Specifications- Other Name: Tank, Fuel
- Item Weight: 48.70 Pounds
- Item Dimensions: 34.7 x 23.4 x 13.3 inches
- Condition: New
- Fitment Type: Direct Replacement
- SKU: 25795345
- Warranty: This genuine part is guaranteed by GM's factory warranty.
2009 Buick Lucerne Fuel Tank
With a comprehensive array of OEM 2009 Buick Lucerne Fuel Tank, from fuel pumps to door handles, our website is a one-stop-shop for your needs. All our genuine 2009 Buick Lucerne Fuel Tank are backed by the manufacturer's warranty and are offered at competitive prices in the market. Rest assured, you can shop with complete confidence.
2009 Buick Lucerne Fuel Tank Parts Questions & Experts Answers
- Q: How to replace the fuel tank module (NU6) on 2009 Buick Lucerne?A: The first responsibility when replacing the Fuel Tank module (NU6) is to drain the fuel system. Start by removing the rear compartments liner along with bolts from the fuel sender opening cover before taking off the cover. You should first remove the fuel feed rear pipe quick connect fitting and evaporative emission (EVAP) pipe quick connect fitting from the sender and then disconnect the fuel level sensor wiring harness electrical connectors . The technician needs to relocate both the fuel feed pipe and the evap pipe and the harness connector to maintain proper access. The j 45722 (Fuel Sender Lock Ring Wrench) helps unlock the fuel sender lock ring through counterclockwise rotation before removing the lock ring. The sender must be slightly raised up while the operator disconnects the vent line quick connect fitting. Lower the assembly while observing the vapor line quick connect fittings so you can secure the interior vent lines using a string that will keep them out of the fuel stream. Remove the fuel from the sender reservoir bucket into an approved container after disconnecting the vapor line quick connect fittings (1 and 2) from the module flange by carefully tilting the sender. Dispose of the old fuel pump sender o-ring seal after examining both the lock ring for any damage and checking for warpage. Replace the lock ring if needed. Start by applying a new fuel pump sender o-ring seal onto the Fuel Tank. Then tilt the sender unit toward the tank opening until it clears and lower it into its position. Connect both interiors of the vent line quick connectors (1 and 2) while detaching the keeping string. The j 45722 tool allows you to turn the lock ring clockwise for full reverse rotation until a secure position is achieved. Reconnect the fuel feed pipe along with the harness connector then proceed to join the evap line quick connect fitting followed by the fuel feed rear pipe quick connect fitting to the sender before connecting the fuel level sensor wiring harness electrical connector . Complete the leak inspection by turning the ignition on and off as directed and then connect the negative Battery Cable. The repair ends with fuel sender access hole cover attachment using bolts tightened to 2 nm (18 lb in). Then reinstall both the rear compartment liner and intake manifold cover.
Related 2009 Buick Lucerne Parts
 2009 Buick Lucerne Fuel Pump
 2009 Buick Lucerne Fuel Filler Hose
 2009 Buick Lucerne Fuel Pressure Sensor
 2009 Buick Lucerne Fuel Pump Gasket
 2009 Buick Lucerne Fuel Pump Seal
 2009 Buick Lucerne Fuel Pump Wiring Harness
 2009 Buick Lucerne Fuel Tank Filler Neck
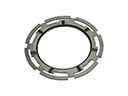 2009 Buick Lucerne Fuel Tank Lock Ring
 2009 Buick Lucerne Fuel Tank Sending Unit
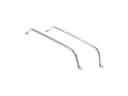 2009 Buick Lucerne Fuel Tank Strap
 2009 Buick Lucerne Gas Cap
 2009 Buick Lucerne Intake Manifold Gasket