ChevyParts
My Garage
My Account
Cart
OEM 2010 Cadillac DTS Fan Shroud
Radiator Fan Shroud- Select Vehicle by Model
- Select Vehicle by VIN
Select Vehicle by Model
orMake
Model
Year
Select Vehicle by VIN
For the most accurate results, select vehicle by your VIN (Vehicle Identification Number).
1 Fan Shroud found


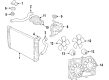
2010 Cadillac DTS Fan Shroud Part Number: 21999691
Product Specifications- Other Name: Shroud Assembly-Engine Coolant Fan; Dual Radiator and Condenser Fan Assembly; Cooling Fan Assembly; Shroud, Engine Air Cooling(Electrical); Shroud, Radiator Fan Shroud
- Item Weight: 2.60 Pounds
- Item Dimensions: 36.2 x 20.7 x 10.0 inches
- Condition: New
- Fitment Type: Direct Replacement
- SKU: 21999691
- Warranty: This genuine part is guaranteed by GM's factory warranty.
2010 Cadillac DTS Fan Shroud
With a comprehensive array of OEM 2010 Cadillac DTS Fan Shroud, from fuel pumps to door handles, our website is a one-stop-shop for your needs. All our genuine 2010 Cadillac DTS Fan Shroud are backed by the manufacturer's warranty and are offered at competitive prices in the market. Rest assured, you can shop with complete confidence.
2010 Cadillac DTS Fan Shroud Parts and Q&A
- Q: How to replace the engine coolant fan shroud on 2010 Cadillac DTS?A: Users should disconnect the battery negative cable as the first step for Fan Shroud engine coolant replacement. Open the cooling system by removing the condenser together with the upper tie bar. Start by disconnecting the front air deflector as well as engine oil cooler pipe retaining bolts which secure the Fan Shroud if installed. J 38185 should be used to reposition the Radiator inlet hose clamp while the vehicle rests at its lowest position before removing the inlet hose. The cooling Fan Shroud must be disconnected by removing the bolts retaining the transmission oil cooler pipe before removing transmission lines from the Radiator. Detach all electrical connectors from the cooling fan motors prior to removing the harness retainers that mount to the Fan Shroud. The cooling fan assembly can be removed after removing all electric mounting bolts while moving it left then pulling the upper right for clearance before pulling it fully out to the right side. After the Radiator the cooling fan assembly needs placement to match its mounting tabs and users should employ special length bolts as these will protect the Radiator end tanks from harm. Secure the electric cooling fan mounting bolts at 6 nm (53 lb in) torque while reconnecting wiring harness electrical connectors as well as attaching wiring harness retaining clips. After you push the uplevel transaxle oil cooler pipe into the Radiator quick connect fitting it will click into place so check the retention by gently tugging and then cover the joint with a plastic cap. The Fan Shroud receives transmission oil cooler pipe retaining bolts which require 6 nm (53 lb in) torque and the Radiator inlet hose should be reattached. The technician should utilize j 38185 to place the Radiator inlet hose clamp into position before raising the vehicle while installing engine oil cooler pipe retaining bolts at a torque level of 6 nm (53 lb in). First install the front air deflector while lowering the vehicle before putting in the condenser and upper tie bar. The last step involves filling the cooling system and reconnecting the negative Battery Cable while performing a check of engine oil level.
Related 2010 Cadillac DTS Parts
 2010 Cadillac DTS Radiator
 2010 Cadillac DTS Thermostat
 2010 Cadillac DTS Water Pump
 2010 Cadillac DTS A/C Condenser Fan
 2010 Cadillac DTS Coolant Reservoir
 2010 Cadillac DTS Coolant Reservoir Cap
 2010 Cadillac DTS Fan Blade
 2010 Cadillac DTS Fan Motor
 2010 Cadillac DTS Radiator Hose
 2010 Cadillac DTS Thermostat Gasket
 2010 Cadillac DTS Thermostat Housing
 2010 Cadillac DTS Water Pump Gasket