Make sure this part fits

GM 21999691
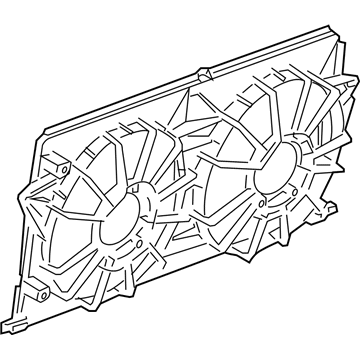
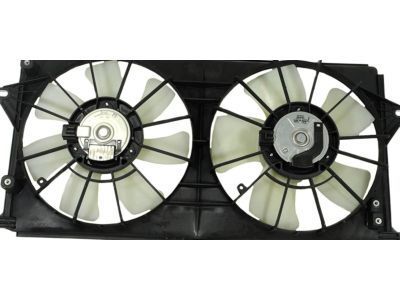
Fan Shroud

2006-2011 GM

Customer Questions & Expert Answers (11)
GM 21999691 Fan Shroud
  • Part Description
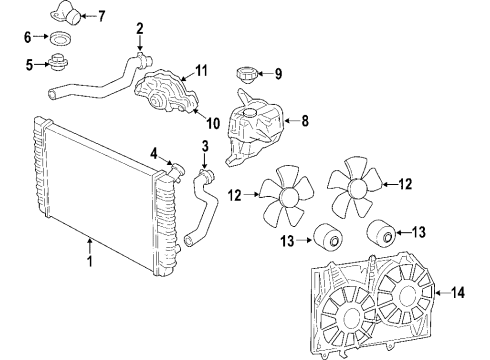
    Shroud Assembly-Engine Coolant Fan; Dual Radiator and Condenser Fan Assembly; Cooling Fan Assembly
  • Manufacturer
    General Motors
  • Manufacturer's Notes
    This part is discontinued.
Make sure this part fits
  • Related Parts
  • Product Specifications
  • Vehicle Fitment
  • Customer Questions & Expert Answers
  • Product Specifications

    BrandGenuine GM
    Manufacturer Part Number21999691
    Part DescriptionShroud Assembly-Engine Coolant Fan; Dual Radiator and Condenser Fan Assembly; Cooling Fan Assembly
    Other NamesShroud, Engine Air Cooling(Electrical); Shroud, Radiator Fan Shroud
    Item Dimensions36.2 x 20.7 x 10.0 inches
    Item Weight2.60 Pounds
    ConditionNew
    Fitment TypeDirect Replacement
    ManufacturerGeneral Motors
    SKU21999691
    WarrantyThis genuine GM part is guaranteed by GM's factory warranty.
    Shipping & ReturnShipping Policy Return Policy
    Warning: California's Proposition 65
  • Vehicle Fitment

    Year Make Model Trim Engine
    2006-2011 Buick LucerneCX, CXL, CXL Special Edition, CXS, Super6 Cyl 3.8 L GAS, 6 Cyl 3.9 L FLEX, 6 Cyl 3.9 L GAS, 8 Cyl 4.6 L GAS
    2006-2011 Cadillac DTSBase, Livery, Luxury, Platinum, Premium8 Cyl 4.6 L GAS
  • Customer Questions & Expert Answers

    Q:
    Can you help me check if this 21999691 is the right part for my car? Posted by ChevyPartsGiant Specialist
    A:
    Please Select Your Vehicle model to see if part number 21999691 is suitable before ordering.
    Posted by ChevyPartsGiant Specialist
    Q:
    How to replace the fan shroud (L26) on Buick Lucerne? Posted by Customer
    A:
    The procedure for Fan Shroud installation (L26) begins with disconnecting the negative Battery Cable and taking off both the condenser and upper tie bar. Start by draining the cooling system before removing both the transmission heater pipe bolts and front air deflector from the Fan Shroud. Use the hose clamp plier (J 38185) to relocate the Radiator inlet hose clamp after which you should disconnect the hose from the Radiator. To reach the transmission oil cooler lines one should move the caps rearward before removing those lines which extend from the Radiator. The wiring harness electrical connectors need removal from cooling fan motors before unclipping their harness attachment points on the Fan Shroud. Open the Fan Shroud mounting bolts with caution to protect both the Fan Shroud attachment points at the bottom and the Radiator. Position the Fan Shroud assembly toward the left vehicle side before lifting it upward from the right side until complete removal. Start installation of the new Fan Shroud assembly by inserting the cooling fan motors first and be cautious to protect its lower mounting points. Use only the special length bolts during reinstallation of the Fan Shroud assembly to keep the Radiator end tanks safe from damage while you align the lower feet with the mounting tabs behind the Radiator assembly. The Fan Shroud mounting bolts need to be tightened at 6 n.m (53 lb in). Connect all wiring harness electrical connectors to both cooling fan motors before fastening wiring harness retaining clips to the Fan Shroud. Insert the transmission oil cooler pipe into the Radiator quick connect fitting until it creates an audible click followed by installing the plastic cap on the joint. The hose clamp plier (J 38185) will reinstall the Radiator inlet hose clamp after fitting the hose into place. After raising and supporting the vehicle you must install the transmission oil cooler pipe retaining bolts to the Fan Shroud and tighten them to 6 n.m (53 lb in). The hose clamp plier (J 38185) provides assistance for relocating the Radiator outlet hose clamp while installing the hose. Installation of the front air deflector should be followed by lowering the vehicle and installing both the upper tie bar and condenser before cooling system filling and reconnecting the negative Battery Cable while inspecting transmission oil levels.
    Posted by ChevyPartsGiant Specialist
    Q:
    How to replace the engine coolant fan shroud (LGD, LZ9) (3.9L) on Buick Lucerne? Posted by Customer
    A:
    Connect to the replacement process of the engine coolant Fan Shroud (LGD, LZ9) (3.9L) you need first to disconnect the battery negative cable. Start the replacement process by taking out the condenser together with the upper tie bar and draining the entire cooling system. Proceed by lifting the vehicle before taking out the front air deflector. The hose clamp plier (J 38185) allows repositioning the outlet hose clamp before removing the Radiator outlet hose. Start by unbolting the transmission oil cooler pipe retention points on the Fan Shroud while simultaneously lowering the vehicle. Using hose clamp plier (J 38185) the operator should reposition the Radiator inlet hose clamp before disconnecting the Radiator inlet hose. The caps on the transmission oil cooler lines must slide to the back before removing the lines from the Radiator. Proceed with disconnecting the electrical connectors from fan motors as well as remove clips that attach the wiring harness to the Fan Shroud while also removing all mounting bolts. Keep the Fan Shroud assembly to the left while using an upward motion on the right side to extract it from the vehicle. The first step in Fan Shroud assembly installation should be to mount the cooling fan motors. The Fan Shroud assembly must receive positioning behind the Radiator while keeping the mounting tabs aligned and using Fan Shroud mounting bolts which need tightening to 6 nm (53 lb in). Predetermine the electrical connectors for the wiring harness to plug into the cooling fan motors before securing the wiring harness retaining clips onto the Fan Shroud. To install the transmission oil cooler pipe properly thread the pipe into the Radiator quick connect fitting until it clicks into place then add the plastic cap. Secure the Radiator inlet hose through using hose clamp plier (J 38185) to put a new clamp position on the hose. Raise and support the vehicle while installing transmission oil cooler pipe retaining bolts to the Fan Shroud and tightening them to 6 nm (53 lb in). Afterward install the Radiator outlet hose and reposition the Radiator outlet hose clamp using hose clamp plier (J 38185). Conclude the installation process with the front air deflector and a vehicle lower operation followed by upper tie bar and condenser installation then cooling system filling up followed by negative Battery Cable reconnection and transmission oil level inspection.
    Posted by ChevyPartsGiant Specialist
    Q:
    How to Service and Repair the Fan Shroud on Cadillac DTS? Posted by Customer
    A:
    Before bringing down the Fan Shroud you must disconnect the battery negative cable and eliminate the condenser and upper tie bar. Then drain the cooling system and detach the front air deflector. You should remove the engine oil cooler pipe retaining bolts (1, 2) from the Fan Shroud when equipped. Then lower the vehicle before using the hose clamp plier (J 38185) to reposition the Radiator inlet hose clamp prior to disconnecting the Radiator inlet hose from the Radiator. The next procedure involves eliminating the transmission oil cooler pipe retaining bolts that secure the Fan Shroud as well as disconnecting transmission lines from the Radiator and disconnecting the wiring harness electrical connectors that connect to the cooling fan motors. Detach both harness clips which connect to the Fan Shroud as well as the electric cooling fan mounting bolts. Take out the electric cooling fan assembly while moving it left across the vehicle with upward right-side pulling followed by right-side movement and final upward removal. Position the cooling fan assembly behind the Radiator before moving it to the right side followed by downward pressure on the right side until the lower feet align with the mounting tabs of the Radiator while using only specific-length bolts for retention. Secure the electric cooling fan mounting bolts at 6 n.m (53 lb in) and sequence the wiring harness electrical connectors to the cooling fan motors before you fasten the wiring harness retaining clips onto the Fan Shroud. Position the upper transaxle oil cooler pipe into the Radiator quick connect fitting until you hear a "click" noise before gently pulling to verify proper connection and then apply the plastic cap to the fitting. Connect the transmission oil cooler pipe retaining bolts to the Fan Shroud while tightening each bolt to 6 n.m (53 lb in). Next, install the Radiator inlet hose to the Radiator before positioning the clamp with the hose clamp plier (J 38185). Install the engine oil cooler pipe retaining bolts (1, 2) to the Fan Shroud at 6 n.m (53 lb in) torque then add the front air deflector and the condenser and the upper tie bar after vehicle lowering. Complete the filling of the cooling system then connect the battery negative cable before checking the engine oil level.
    Posted by ChevyPartsGiant Specialist
    Q:
    How to replace the fan shroud on Cadillac DTS? Posted by Customer
    A:
    The first step to perform Fan Shroud replacement is disconnecting the battery negative cable. First disconnect the condenser together with the upper tie bar and empty the liquid from the cooling system. The Fan Shroud replacement starts with removing front air deflector bolts and engine oil cooler pipe retaining bolts from the Fan Shroud whenever present. You must lower the vehicle and use j 38185 hose clamp plier (J 38185) to adjust the radiator inlet hose clamp positioning before removing the inlet hose. The transmission lines must be detached from the radiator before removing the transmission oil cooler pipe retaining bolts from the Fan Shroud. Take out the wiring harness electrical connectors of the cooling fan motors before you disconnect the clips that secure the harness to the Fan Shroud. Remove the electric cooling fan mounting bolts after which you should take out the cooling fan assembly with care. Install the cooling fan assembly by placing it behind the radiator allowing the lower feet to match radiator mounting tabs and tightening the electric cooling fan mounting bolts to 6 n.m (53 lb in). Install the wiring harness electrical connectors onto cooling fan motors while fixing the wiring harness retaining clips to the Fan Shroud. Position the upper transaxle oil cooler pipe through the radiator quick connect fitting until it clicks before applying the plastic cap to the joint. Fasten the transmission oil cooler pipe bolts to the Fan Shroud while tightening them to 6 n.m (53 lb in). Then attach the radiator inlet hose. The j 38185 hose clamp plier (J 38185) should be used to relocate the radiator inlet hose clamp. The technicians should raise the vehicle then add the engine oil cooler pipe retaining bolts to the Fan Shroud until torque reaches 6 n.m (53 lb in). Reinstall the front air deflector and the condenser as well as the upper tie bar before filling the cooling system and reconnecting the battery negative cable to check engine oil level.
    Posted by ChevyPartsGiant Specialist
    Q:
    What needs to be disconnected from the cooling fan motors for the 2008 Buick Lucerne? Posted by Customer
    A:
    Disconnect the wiring harness electrical connectors and remove the clips attaching the harness to the fan shroud.
    Posted by ChevyPartsGiant Specialist
    See expert answers on similar Fan Shroud
    Q:
    How do you reconnect the transmission oil cooler pipe for the 2006 Buick Lucerne? Posted by Customer
    A:
    Push the transmission oil cooler pipe into the radiator quick connect fitting until a "click" is heard, then slide the plastic cap over the quick connect joint.
    Posted by ChevyPartsGiant Specialist
    See expert answers on similar Fan Shroud
    Q:
    What should be done after securing the fan shroud assembly for the 2010 Buick Lucerne? Posted by Customer
    A:
    Connect the wiring harness electrical connectors to the cooling fan motors and attach the wiring harness retaining clips.
    Posted by ChevyPartsGiant Specialist
    See expert answers on similar Fan Shroud
    Q:
    What is the first step to replace the fan shroud for the 2006 Cadillac DTS? Posted by Customer
    A:
    Disconnect the battery negative cable.
    Posted by ChevyPartsGiant Specialist
    See expert answers on similar Fan Shroud
    Q:
    What are the final steps to complete the process for the 2009 Cadillac DTS? Posted by Customer
    A:
    Install the front air deflector, lower the vehicle, install the condenser, and the upper tie bar. Fill the cooling system and connect the battery negative cable, then inspect the engine oil level.
    Posted by ChevyPartsGiant Specialist
    See expert answers on similar Fan Shroud
    Q:
    How do you remove the cooling fan assembly for the 2010 Cadillac DTS? Posted by Customer
    A:
    Take out the electric cooling fan mounting bolts, position it towards the left side, pull upward on the right side, then move it towards the right side and pull upward to remove it completely.
    Posted by ChevyPartsGiant Specialist
    See expert answers on similar Fan Shroud
    If you have any questions about this product, please don't hesitate to ask us. We will be happy to help you!

OEM GM 21999691, Excellent Performance and Perfect Fitment

To ensure reliability, purchase GM part # 21999691 Fan Shroud. It is sometimes referred to as GM Fan Shroud. Choosing OEM parts is the optimal decision for guaranteeing superior quality and perfect performance. These components undergo stringent quality checks and are carefully constructed to comply with GM's factory specifications, ensuring a smooth installation process.

ChevyPartsGiant.com is a leading supplier of genuine GM parts such as GM 21999691 Fan Shroud. Our website boasts an extensive inventory of OEM GM parts, available at highly competitive prices in the market. Should you require any new genuine GM parts, rest assured we will deliver them swiftly and efficiently to your doorstep. Furthermore, all our parts come with the assurance of a manufacturer's warranty. For detailed Cadillac parts information, click here.
Choose ChevyPartsGiant for discounted prices, exceptional service and fast delivery