ChevyParts
My Garage
My Account
Cart
OEM 2010 Cadillac STS Evaporator
A/C Evaporator Core- Select Vehicle by Model
- Select Vehicle by VIN
Select Vehicle by Model
orMake
Model
Year
Select Vehicle by VIN
For the most accurate results, select vehicle by your VIN (Vehicle Identification Number).
1 Evaporator found

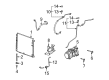
2010 Cadillac STS Evaporator Core Part Number: 89022546
$123.80 MSRP: $232.48You Save: $108.68 (47%)Ships in 1-2 Business DaysProduct Specifications- Other Name: Evaporator Kit, Air Conditioner Evaporator; A/C Evaporator Core Repair Kit; A/C Evaporator Core; A/C Evaporator; Evaporator; Evaporator Kit, A/C Evaporator
- Item Weight: 5.50 Pounds
- Item Dimensions: 16.5 x 13.8 x 12.6 inches
- Condition: New
- Fitment Type: Direct Replacement
- SKU: 89022546
- Warranty: This genuine part is guaranteed by GM's factory warranty.
2010 Cadillac STS Evaporator
With a comprehensive array of OEM 2010 Cadillac STS Evaporator, from fuel pumps to door handles, our website is a one-stop-shop for your needs. All our genuine 2010 Cadillac STS Evaporator are backed by the manufacturer's warranty and are offered at competitive prices in the market. Rest assured, you can shop with complete confidence.
2010 Cadillac STS Evaporator Parts and Q&A
- Q: How to replace the air conditioning evaporator core on 2010 Cadillac STS?A: To replace the air conditioning evaporator core; remove the HVAC module assembly and dispose of insulation from the TXV. Pull out TXV and discard O-rings. Disconnect electrical connectors, remove the front duct and remove evaporator core. Install new seals, making sure to align it correctly and then securing all components before reinstalling the HVAC module.
Related 2010 Cadillac STS Parts
 2010 Cadillac STS Cabin Air Filter
 2010 Cadillac STS A/C Accumulator
 2010 Cadillac STS A/C Compressor
 2010 Cadillac STS A/C Compressor Cut-Out Switches
 2010 Cadillac STS A/C Expansion Valve
 2010 Cadillac STS A/C Hose
 2010 Cadillac STS A/C Orifice Tube
 2010 Cadillac STS A/C System Valve Core
 2010 Cadillac STS Bed Mounting Hardware
 2010 Cadillac STS Blend Door Actuator
 2010 Cadillac STS HVAC Pressure Switch
 2010 Cadillac STS Heater Core