ChevyParts
My Garage
My Account
Cart
OEM 2010 Chevrolet Express 2500 Brake Pad
Disc Brake Pad Set- Select Vehicle by Model
- Select Vehicle by VIN
Select Vehicle by Model
orMake
Model
Year
Select Vehicle by VIN
For the most accurate results, select vehicle by your VIN (Vehicle Identification Number).
3 Brake Pads found


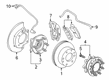
2010 Chevrolet Express 2500 Brake Pads Part Number: 84265875
$111.37 MSRP: $226.68You Save: $115.31 (51%)Ships in 1-2 Business DaysProduct Specifications- Other Name: Pad Kit, Brake; Disc Brake Hardware Kit; Rear Pads
- Position: Rear
- Replaces: 88983902
- Item Weight: 5.20 Pounds
- Item Dimensions: 9.1 x 4.2 x 4.2 inches
- Condition: New
- Fitment Type: Direct Replacement
- SKU: 84265875
- Warranty: This genuine part is guaranteed by GM's factory warranty.

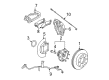
2010 Chevrolet Express 2500 Brake Pads, Front Part Number: 19432941
$131.12 MSRP: $271.71You Save: $140.59 (52%)Product Specifications- Other Name: Pad Kit, Front Disc Brake; Front Pads; Pad Kit, Brake
- Position: Front
- Replaces: 15886468, 18048600, 18044594, 88950732, 18026219, 19210706, 25924485, 88964201, 84292732
- Item Weight: 15.20 Pounds
- Condition: New
- SKU: 19432941
- Warranty: This genuine part is guaranteed by GM's factory warranty.


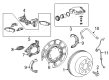
2010 Chevrolet Express 2500 Brake Pads Part Number: 22742382
Product Specifications- Other Name: Pad Kit, Brake; Disc Brake Hardware Kit; Front Pads
- Position: Front
- Replaces: 25918342
- Item Weight: 5.60 Pounds
- Item Dimensions: 8.7 x 4.1 x 3.7 inches
- Condition: New
- SKU: 22742382
- Warranty: This genuine part is guaranteed by GM's factory warranty.
2010 Chevrolet Express 2500 Brake Pad
With a comprehensive array of OEM 2010 Chevrolet Express 2500 Brake Pad, from fuel pumps to door handles, our website is a one-stop-shop for your needs. All our genuine 2010 Chevrolet Express 2500 Brake Pad are backed by the manufacturer's warranty and are offered at competitive prices in the market. Rest assured, you can shop with complete confidence.
2010 Chevrolet Express 2500 Brake Pad Parts and Q&A
- Q: How to replace the front disc brake pads (JH5) on 2010 Chevrolet Express 2500?A: In order to change the front disc braking pads, check the level of the brake fluid and refill it in case of need. Lift the vehicle, take the tire and squeeze the brake caliper pistons. Take off the caliper and pads, clean surfaces and put on lubricant. Install caliper and pads and bleed the brakes until a firm pedal is attained.
Related 2010 Chevrolet Express 2500 Parts
 2010 Chevrolet Express 2500 ABS Sensor
 2010 Chevrolet Express 2500 Brake Backing Plate
 2010 Chevrolet Express 2500 Brake Caliper Piston
 2010 Chevrolet Express 2500 Brake Calipers
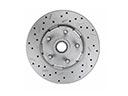 2010 Chevrolet Express 2500 Brake Disc
 2010 Chevrolet Express 2500 Brake Dust Shields
 2010 Chevrolet Express 2500 Brake Line
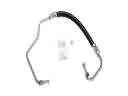 2010 Chevrolet Express 2500 Hydraulic Hose
 2010 Chevrolet Express 2500 Wheel Bearing
 2010 Chevrolet Express 2500 Wheel Hub
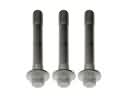 2010 Chevrolet Express 2500 Wheel Hub Bolt
 2010 Chevrolet Express 2500 Wheel Speed Sensor