ChevyParts
My Garage
My Account
Cart
OEM 2010 Chevrolet Impala Intake Manifold
Engine Intake Manifold- Select Vehicle by Model
- Select Vehicle by VIN
Select Vehicle by Model
orMake
Model
Year
Select Vehicle by VIN
For the most accurate results, select vehicle by your VIN (Vehicle Identification Number).
2 Intake Manifolds found

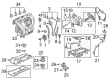
2010 Chevrolet Impala Intake Manifold Part Number: 12611485
$1265.71 MSRP: $1628.97You Save: $363.26 (23%)Ships in 1-3 Business DaysProduct Specifications- Other Name: Manifold, Engine Fuel Intake Manifold; Intake Plenum
- Position: Upper
- Replaces: 12626550
- Item Weight: 12.20 Pounds
- Item Dimensions: 20.1 x 14.7 x 10.1 inches
- Condition: New
- Fitment Type: Direct Replacement
- SKU: 12611485
- Warranty: This genuine part is guaranteed by GM's factory warranty.


2010 Chevrolet Impala Intake Manifold Part Number: 89017809
Product Specifications- Other Name: Manifold, Engine Fuel Intake Manifold; Intake Plenum
- Position: Lower
- Item Weight: 10.30 Pounds
- Item Dimensions: 21.2 x 14.6 x 9.2 inches
- Condition: New
- Fitment Type: Direct Replacement
- SKU: 89017809
- Warranty: This genuine part is guaranteed by GM's factory warranty.
2010 Chevrolet Impala Intake Manifold
With a comprehensive array of OEM 2010 Chevrolet Impala Intake Manifold, from fuel pumps to door handles, our website is a one-stop-shop for your needs. All our genuine 2010 Chevrolet Impala Intake Manifold are backed by the manufacturer's warranty and are offered at competitive prices in the market. Rest assured, you can shop with complete confidence.
2010 Chevrolet Impala Intake Manifold Parts and Q&A
- Q: How to replace the upper intake manifold on 2010 Chevrolet Impala?A: In order to change the upper Intake Manifold, proceed to disconnect the negative cable on the battery. Unscrew the cover of the Intake Manifold and drain the cooling system. Next, pull out the positive crankcase ventilation (PCV) fresh air tube and the pcv fouls air tube, last but not least remove the vacuum hose from the Intake Manifold. Reposition heater inlet and outlet hose/pipe clamps from the engine pipes, remove heater inlet and outlet hoses/pipe from the engine pipes and Throttle Body studs. Unplug the manifold absolute pressure (MAP) sensor electric connection, the ejector gasoline (EVAP) canister purge solenoid electrical connector, the chassis evap line quick connect port from the purge solenoid. Turn the ignition off, disconnect the electronic throttle control (ETC) electrical connector, remove the air cleaner outlet duct, and disconnect the left side Spark Plug Wires from the sparks and the Ignition Coil. Disconnect the spark plug wire retainer clips, remove the left side Spark Plug Wires, then remove the Throttle Body bolts and nuts, throttle body and gasket. Slack the bolt and the valve of the evap canister purge solenoid valve, remove the MAP Sensor bracket bolts and the bracket with the sensor. Unscrew the Ignition Coil bracket bolts, the Intake Manifold cover ball stud nut, and the upper Intake Manifold bolts and stud. Take apart and withdraw the upper Intake Manifold from lower Intake Manifold and replace the upper to the lower Intake Manifold gaskets while cleaning intake surfaces. For installation, install new upper to lower Intake Manifold gaskets, install the upper Intake Manifold to lower Intake Manifold, and apply thread lock of upper Intake Manifold bolts/stud threads. Put the upper Intake Manifold bolts and stud on and tighten it to 25 nm(18 lb ft),then install the Intake Manifold cover ball stud nut and tighten it at 5 nm (44 lb in). Mount the Ignition Coil bracket bolts, making sure to tighten them to 25 nm(18 lb ft), subsequently the MAP Sensor and bracket and bolts, which should also be at 25 nm (18 lb ft). Mount the evap canister purge solenoid valve and the bolt, apply 16 nm (12 lb ft) of torque. Check the Throttle Body seal for damage and repair if needed and then apply thread lock to the Throttle Body bolts/studs union. Place the Throttle Body Gasket and Throttle Body into the intake and set the Throttle Body bolts and nuts with 10 nm (89 lb in). The left side Spark Plug Wires should be reinstalled, the Spark Plug Wires retainer clips should be engaged and the wires should be connected to the Ignition Coil and the spark plugs. Mount the air cleaner outlet duct, wire the evap canister purge solenoid electrical connector, and wire the chassis evap line quick connect fitting to the purge solenoid. Join the etc electrical connecter and the MAP Sensor electrical connecter and set the hoses/pipes. Mounting heater inlet and outlet hoses/pipes to the engine pipes and Throttle Body studs and compression with clamp nuts 10 nm (89 lb in). Reposition the heater inlet and outlet hose/pipe clamps, install the vacuum hose to the Intake Manifold, and then install the pcv foul air tube and the pcv fresh air tube. Fill the cooling system and ultimately connect the negative Battery Cable and finally install its Intake Manifold cover.
Related 2010 Chevrolet Impala Parts
 2010 Chevrolet Impala Gas Cap
 2010 Chevrolet Impala Air Filter
 2010 Chevrolet Impala Air Charge Temperature Sensor
 2010 Chevrolet Impala Air Filter Box
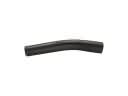 2010 Chevrolet Impala Fuel Filler Hose
 2010 Chevrolet Impala Fuel Pressure Sensor
 2010 Chevrolet Impala Fuel Pump Gasket
 2010 Chevrolet Impala Fuel Pump Seal
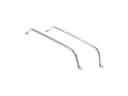 2010 Chevrolet Impala Fuel Tank Strap
 2010 Chevrolet Impala Intake Manifold Gasket
 2010 Chevrolet Impala Mass Air Flow Sensor
 2010 Chevrolet Impala Vapor Pressure Sensor