ChevyParts
My Garage
My Account
Cart
OEM Buick Century Headlight
Headlamp- Select Vehicle by Model
- Select Vehicle by VIN
Select Vehicle by Model
orMake
Model
Year
Select Vehicle by VIN
For the most accurate results, select vehicle by your VIN (Vehicle Identification Number).
18 Headlights found


Buick Century Headlamp Assembly, Driver Side Part Number: 16503162
$77.60 MSRP: $150.23You Save: $72.63 (49%)Ships in 1-2 Business Days
Buick Century Headlamp Assembly, Driver Side Part Number: 16503161
$109.69 MSRP: $145.28You Save: $35.59 (25%)Ships in 1-2 Business Days
Buick Century Headlamp Assembly Part Number: 5973932
$130.71 MSRP: $187.04You Save: $56.33 (31%)
Buick Century Combination Lamp Assy, Driver Side Part Number: 16522267
$153.61 MSRP: $176.78You Save: $23.17 (14%)Ships in 1-2 Business Days
Buick Century Headlamp Assembly, Driver Side Part Number: 16505647
$57.49 MSRP: $77.05You Save: $19.56 (26%)Ships in 1-2 Business Days
Buick Century Headlamp Assembly Part Number: 16501996
$33.81 MSRP: $43.98You Save: $10.17 (24%)


Buick Century Headlamp Assembly, Passenger Side Part Number: 19244638


Buick Century Headlamp Assembly, Passenger Side Part Number: 16503171


Buick Century Headlamp Assembly, Passenger Side Part Number: 15194307

Buick Century Headlamp Assembly, Driver Side Part Number: 15194306


Buick Century Headlamp Assembly Part Number: 5973931
$180.47 MSRP: $269.82You Save: $89.35 (34%)Buick Century Headlamp Assembly, Driver Side Part Number: 19244639
Buick Century Headlamp Assembly, Passenger Side Part Number: 16505648
Buick Century Headlamp Assembly, Passenger Side Part Number: 16503172

Buick Century Headlamp Assembly Part Number: 16502326
Buick Century Headlamp Assembly Part Number: 16502325
Buick Century Headlamp Assembly Part Number: 16501995
Buick Century Headlight
Want to cut long-term maintenance and repair costs? Choose OEM Headlight. Those parts deliver top durability you can trust. On our site, you'll find a huge catalog of genuine Buick Century parts. Prices are unbeatable, so you can keep more in your pocket. Every OEM Buick Century Headlight includes a manufacturer's warranty. You can also get an easy return policy that keeps buying risk free. Fast delivery, get your car on the road quickly. It's simple to search, compare, and order. Stop guessing about quality or fit. Order today and save with parts that last.
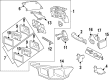
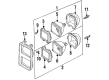
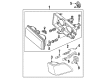
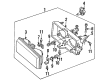
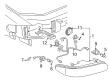
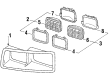
The Headlight of Buick Century cars is vital parts that provides extra light to assist the driver in seeing well at night or when there is poor visibility due to bad weather. These custom headlight replacements not only give a new aesthetic to ones vehicle, but also enlightens other drivers that the car is approaching, thus improving the safety of the trip. The duration of a given headlight also depends on the automobile usage, installation being a critical determinant. Measures that should be taken before the replacement of the lights include; The light should be allowed to cool for some time after switching off before attempting the replacement and another measure is to disconnect the battery terminal. Also, it is recommended to consult the automobile's manual or the part of the original halogen headlight to guarantee that the optimal product for the car is chosen and will allow giving maximum performance.
Buick Century Headlight Parts Questions & Experts Answers
- Q: How to Replace a Headlight Bulb and Ensure Proper Installation on Buick Century?A:To change the headlamp assembly or headlamp bulb and or cornering, sidemarker, park and turn signal bulb, first open the hood. When you will remove the retainers apply the light pressure on the head lamp lens to grip it appropriately, then have removal of the retainers accomplished by lifting the retainers outward to free and remove. Next, remove the headlamp mounting tabs out of the slots in the upper fascia support and the fender reinforcement and then the electrical connector of the headlamp before removing the headlamp itself. Take out the rubber access covers from behind the headlamp bulb/sockets to be replaced while observing the Halogen Bulb Caution. Turn the headlamp bulb/socket counterclockwise and remove it, disconnect the electrical connector to the bulb/socket. For installation, you can plug in the electrical connector to the new headlamp bulb/socket and install it into the headlamp but rotate it clockwise till it is seated. Replace the rubber access covers, plug into the electronic connector the head lamp, and locate the slots for the head lamp mounting tabs. Gently press on the headlamp lens during fitting of the retainers when placing them on top of the mounting tabs and pressing down until they are fully seated. Check the fit of the headlamp and test the aim if the headlamp was replaced because there is a new one or if something during service or repairs could have shifted the mounting brackets. Finally, close the hood.

Related Buick Century Parts
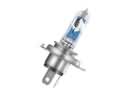 Buick Century Headlight Bulb
 Buick Century Back Up Light
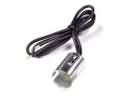 Buick Century Dome Light Connector
 Buick Century Fog Light
 Buick Century Fog Light Bulb
 Buick Century Forward Light Harness Connector
 Buick Century Light Control Module
 Buick Century Light Socket
 Buick Century Rear Light Harness Connector
 Buick Century Tail Light
 Buick Century Tail Light Connector
 Buick Century Turn Signal Light Connector