ChevyParts
My Garage
My Account
Cart
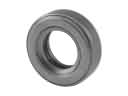
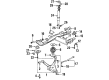
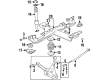
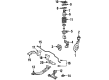
OEM Buick Control Arm Bracket
Suspension Arm Bracket- Select Vehicle by Model
- Select Vehicle by VIN
Select Vehicle by Model
orMake
Model
Year
Select Vehicle by VIN
For the most accurate results, select vehicle by your VIN (Vehicle Identification Number).
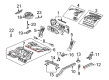
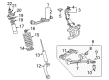
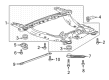
30 Control Arm Brackets found


Buick Mount Bracket, Rear Part Number: 10262701
$12.07 MSRP: $19.87You Save: $7.80 (40%)Ships in 1-3 Business DaysProduct Specifications- Other Name: Bracket, Rear Axle Control Arm; Trailing Arm Bracket
- Position: Rear


Buick Mount Bracket, Driver Side Part Number: 25918964
$142.40 MSRP: $242.43You Save: $100.03 (42%)Ships in 1-2 Business DaysProduct Specifications- Other Name: Bracket, Shock Absorber/Strut; Suspension Control Arm Bracket; Control Arm Bracket; Link; Bracket, Steering Knuckle Upper And Lower Control Arm
- Position: Driver Side
- Replaces: 15198624, 25786779, 15091391, 15280281


Buick Mount Bracket, Passenger Side Part Number: 25918965
$160.63 MSRP: $273.48You Save: $112.85 (42%)Ships in 1-2 Business DaysProduct Specifications- Other Name: Bracket, Shock Absorber/Strut; Suspension Control Arm Bracket; Control Arm Bracket; Bracket, Steering Knuckle Upper And Lower Control Arm
- Position: Passenger Side
- Replaces: 15091392, 15280282, 15198625, 25786780

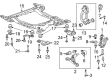
Buick Front Bracket, Passenger Side Part Number: 84389634
$13.91 MSRP: $20.70You Save: $6.79 (33%)Ships in 1-3 Business DaysProduct Specifications- Other Name: Bracket-Front Cradle Mount Bolt
- Position: Front Passenger Side
- Replaced by: 84024071


Buick Front Bracket, Driver Side Part Number: 84389633
$25.18 MSRP: $37.47You Save: $12.29 (33%)Ships in 1-3 Business DaysProduct Specifications- Other Name: Bracket-Front Cradle Mount Bolt
- Position: Front Driver Side
- Replaced by: 84024070

Buick Mount Bracket, Rear Passenger Side Part Number: 13262433
$10.94 MSRP: $17.37You Save: $6.43 (38%)Product Specifications- Other Name: Bracket, Rear Axle Control Arm; Strut Mount Rear
- Position: Rear Passenger Side

Buick Mount Bracket, Rear Passenger Side Part Number: 22947238
$34.79 MSRP: $84.89You Save: $50.10 (60%)Ships in 1-2 Business DaysProduct Specifications- Other Name: Bracket, Rear Axle Control Arm; Strut Mount Rear
- Position: Rear Passenger Side
Buick Mount Bracket, Rear Driver Side Part Number: 22947237
$48.96 MSRP: $84.07You Save: $35.11 (42%)Ships in 1-2 Business DaysProduct Specifications- Other Name: Bracket, Rear Axle Control Arm; Strut Mount Rear
- Position: Rear Driver Side

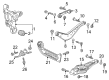
Buick Bracket, Rear Driver Side Part Number: 13377309
$81.82 MSRP: $134.79You Save: $52.97 (40%)Ships in 1-2 Business DaysProduct Specifications- Other Name: Support, Rear Axle Control Arm
- Position: Rear Driver Side
Buick Bracket, Rear Passenger Side Part Number: 13377310
$85.70 MSRP: $136.08You Save: $50.38 (38%)Ships in 1-2 Business DaysProduct Specifications- Other Name: Support, Rear Axle Control Arm
- Position: Rear Passenger Side
Buick Mount Bracket, Rear Driver Side Part Number: 13262432
$9.85 MSRP: $16.24You Save: $6.39 (40%)Product Specifications- Other Name: Bracket, Rear Axle Control Arm; Strut Mount Rear
- Position: Rear Driver Side

Buick Front Bracket, Driver Side Part Number: 22927785
$8.88 MSRP: $13.40You Save: $4.52 (34%)Ships in 1-2 Business DaysProduct Specifications- Other Name: Bracket-Front Cradle Mount Bolt; Bracket, Rear Axle Control Arm
- Position: Front Driver Side


Buick Lower Bracket, Rear Passenger Side Part Number: 25650403
Product Specifications- Other Name: Bracket, Rear Axle Control Arm; Suspension Crossmember Front Bracket; Front Insulator Bracket; Bracket
- Position: Rear Passenger Side


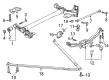
Buick Suspension Crossmember, Rear Part Number: 10062854
Product Specifications- Other Name: Support, Rear Axle Control Arm; Suspension Support; Support
- Position: Rear
Buick Mount Bracket Part Number: 25624376
Product Specifications- Other Name: Bracket-Exhaust Pipe Hanger; Strut Mount Rear
Buick Lower Bracket, Rear Driver Side Part Number: 25624372
Product Specifications- Other Name: Bracket, Rear Axle Control Arm
- Position: Rear Driver Side
Buick Lower Bracket, Rear Driver Side Part Number: 15887238
Product Specifications- Other Name: Bracket, Rear Axle Control Arm; Suspension Crossmember Front Bracket; Front Insulator Bracket; Bracket
- Position: Rear Driver Side
- Replaces: 25650402

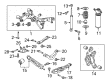
Buick Suspension Crossmember Part Number: 22591922
Product Specifications- Other Name: Bracket, Steering Knuckle Control Arm; Control Arm Bracket; Suspension Support; Mount Support; Support; Mount
- Position: Front Upper Passenger Side

Buick Support, Front Driver Side Part Number: 20697962
Product Specifications- Other Name: Support, Frame Front Side And Engine Compartment; Mount; Bracket, Steering Knuckle Control Arm; Bracket, Engine Mounting
- Position: Front Driver Side

Buick Suspension Crossmember, Driver Side Part Number: 22546891
Product Specifications- Other Name: Bracket, Shock Absorber/Strut; Control Arm Bracket; Suspension Support; Mount; Frame Front Side & Engine Compartment; Steering Knuckle Control Arm Bracket.
- Position: Driver Side
| Page 1 of 2 |Next >
1-20 of 30 Results
Buick Control Arm Bracket
Choose OEM Control Arm Bracket, you're making the optimal decision for superior quality and perfect performance. You can feel confident because each component goes through stringent quality checks. Every part is carefully built to comply with Buick's factory specifications. You'll enjoy a smooth, worry-free installation that fits just right. At ChevyPartsGiant.com, you'll find it easy to get top-quality OEM Buick Control Arm Bracket. You can shop at highly competitive prices and protect your budget. All our genuine Buick parts include a dependable manufacturer's warranty. You'll also appreciate our straightforward return policy and swift delivery services for extra convenience.
Buick Control Arm Bracket Parts and Q&A
- Q: How to replace the lower control arm bracket on Buick Rainier?A:To remove the bracket of the lower Control Arm, you have to perform the following procedures: raise and support the vehicle. Take off the tire and wheel, remove stabilizer shaft link and washer, and lower stabilizer shaft link nut, and disconnect the lower stabilizer shaft link from the lower Control Arm. Next, you have to remove the lower Control Arm lower Control Arm Bracket mounting nuts, paying attention to the direction of the bolt for re-installation and then the lower Control Arm to lower Control Arm Bracket mounting bolts with keeping the Axle Shaft engaged with the transmission. Tilt the lower Control Arm out and downward to gain the entrance to the lower Control Arm Bracket while taking into consideration the position of the spacer to the front bushing. Unbolt the lower Control Arm Bracket mounting bolts from the frame and then the lower Control Arm Bracket from vehicle. During installation; ensure the spacer is properly slotted to the front bushing before the lower Control Arm Bracket is mounted to the car. Mount the lower Control Arm Bracket mounting bolts on the frame with the tightening of the front part at 265 n.m (195 lb ft) and the rear part at 240 n.m (177 lb ft). Mount the bottom Control Arm on the bottom Control Arm mount and ensure parallel through installation and tightening the bottom Control Arm mounting bolts and nut for the correct alignment of the bottom Control Arm bushings. Secure the lower Control Arm to the lower Control Arm Bracket mounting nuts by tightening 130 n.m (96 lb ft). Mount the lower Control Arm stab shaft link washer and lower Control Arm stabilizer shaft link to the lower Control Arm, and now install the stabilizer shaft link retaining nut which should be tightened to 155 n.m (114 lb ft). Lastly, reinstall the tire and wheel, bring the vehicle down, and check the front wheel alignment.