ChevyParts
My Garage
My Account
Cart
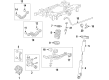
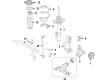
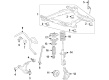
OEM Buick Coil Spring Insulator
Coil Spring Noise Insulator- Select Vehicle by Model
- Select Vehicle by VIN
Select Vehicle by Model
orMake
Model
Year
Select Vehicle by VIN
For the most accurate results, select vehicle by your VIN (Vehicle Identification Number).
93 Coil Spring Insulators found


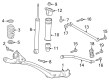
Buick Lower Spring Insulator, Rear Part Number: 13322648
$16.88 MSRP: $30.15You Save: $13.27 (45%)Product Specifications- Other Name: Insulator, Rear Spring; Coil Spring Insulator; Lower Insulator
- Position: Rear


Buick Spring Insulator, Rear Part Number: 84126267
$5.25 MSRP: $9.87You Save: $4.62 (47%)Ships in 1-2 Business DaysProduct Specifications- Other Name: Insulator, Rear Spring; Coil Spring Insulator; Lower Spring Insulator; Lower Insulator
- Position: Rear
- Replaced by: 42842336


Buick Spring Insulator, Rear Part Number: 84449219
$11.21 MSRP: $20.01You Save: $8.80 (44%)Ships in 1-3 Business DaysProduct Specifications- Other Name: Insulator, Rear Spring; Coil Spring Insulator; Upper Insulator; Upper Spring Insulator; Insulator
- Position: Rear
- Replaced by: 85614775


Buick Spring Insulator, Rear Part Number: 42582759
$10.53 MSRP: $18.80You Save: $8.27 (44%)Product Specifications- Other Name: Insulator, Rear Spring; Coil Spring Insulator; Insulator
- Position: Rear


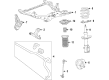
Buick Spring Insulator, Front Part Number: 23284102
$7.84 MSRP: $12.29You Save: $4.45 (37%)Ships in 1-2 Business DaysProduct Specifications- Other Name: Insulator, Front Spring; Coil Spring Insulator; Lower Spring Insulator; Lower Insulator
- Position: Front


Buick Spring Insulator, Front Part Number: 84100436
$4.75 MSRP: $7.84You Save: $3.09 (40%)Product Specifications- Other Name: Insulator, Front Spring; Coil Spring Insulator; Lower Insulator; Upper Spring Insulator
- Position: Front
- Replaced by: 26444167

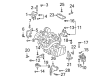
Buick Spring Seat, Rear Passenger Side Part Number: 15905024
$28.20 MSRP: $50.36You Save: $22.16 (44%)Ships in 1-3 Business DaysProduct Specifications- Other Name: Seat, Rear Spring
- Position: Rear Passenger Side

Buick Spring Insulator, Rear Part Number: 13389959
$17.28 MSRP: $30.86You Save: $13.58 (45%)Ships in 1-3 Business DaysProduct Specifications- Other Name: Insulator, Rear Spring; Coil Spring Insulator; Upper Insulator; Upper Spring Insulator
- Position: Rear

Buick Spring Insulator, Rear Part Number: 84094298
$11.17 MSRP: $19.95You Save: $8.78 (45%)Ships in 1-3 Business DaysProduct Specifications- Other Name: Insulator, Rear Spring; Coil Spring Insulator; Upper Insulator; Upper Spring Insulator
- Position: Rear
Buick Spring Insulator, Rear Part Number: 84953055
$18.89 MSRP: $33.74You Save: $14.85 (45%)Product Specifications- Other Name: Bumper, Rear Axle; Coil Spring Insulator; Spring Bumper; Lower Spring Insulator; Lower Insulator; Insulator, Rear Spring; Bumper, Rear Spring
- Position: Rear
- Replaces: 84181736, 84809090

Buick Spring Insulator, Rear Part Number: 23476272
$18.26 MSRP: $32.60You Save: $14.34 (44%)Ships in 1-3 Business DaysProduct Specifications- Other Name: Insulator, Rear Spring; Coil Spring Insulator; Lower Spring Insulator; Lower Insulator
- Position: Rear

Buick Spring Insulator, Rear Part Number: 84094299
$12.39 MSRP: $22.11You Save: $9.72 (44%)Ships in 1-3 Business DaysProduct Specifications- Other Name: Insulator, Rear Spring; Coil Spring Insulator; Lower Spring Insulator; Lower Insulator
- Position: Rear
Buick Spring Insulator, Front Part Number: 84729900
$5.31 MSRP: $8.31You Save: $3.00 (37%)Product Specifications- Other Name: Insulator, Front Spring; Coil Spring Insulator; Spring Seat; Lower Insulator; Upper Spring Insulator
- Position: Front
- Replaces: 84221505

Buick Dust Cover, Front Part Number: 42619135
$4.93 MSRP: $7.75You Save: $2.82 (37%)Ships in 1-3 Business DaysProduct Specifications- Other Name: Insulator-Front Coil Spring; Dust Shield; Insulator, Front Spring
- Position: Front


Buick Spring Seat, Front Part Number: 13384157
$20.31 MSRP: $32.24You Save: $11.93 (37%)Ships in 1-2 Business DaysProduct Specifications- Other Name: Insulator, Front Spring; Coil Spring Insulator; Lower Insulator
- Position: Front

Buick Upper Insulator, Front Part Number: 84056865
$67.42 MSRP: $107.03You Save: $39.61 (38%)Ships in 1-2 Business DaysProduct Specifications- Other Name: Insulator-Front Coil Spring; Coil Spring Insulator; Upper Spring Insulator
- Position: Front

Buick Spring Insulator, Rear Part Number: 42599306
$5.40 MSRP: $8.47You Save: $3.07 (37%)Ships in 1-3 Business DaysProduct Specifications- Other Name: Insulator, Rear Spring; Coil Spring Insulator; Upper Insulator
- Position: Rear

Buick Transmission Mount Nut, Rear Part Number: 11589145
$1.41 MSRP: $2.21You Save: $0.80 (37%)Ships in 1-3 Business DaysProduct Specifications- Other Name: Insulator, Rear Spring; Mount Bracket Retainer; Impact Bar Stud Plate; Headrest Guide Nut; Skid Plate Nut; Spacer; Seat Belt Nut; Spring Nut.
- Position: Rear

Buick Spring Insulator, Rear Part Number: 42599305
$7.18 MSRP: $11.24You Save: $4.06 (37%)Ships in 1-3 Business DaysProduct Specifications- Other Name: Insulator, Rear Spring; Coil Spring Insulator; Lower Insulator
- Position: Rear

Buick Spring Seat, Front Part Number: 42481664
$9.25 MSRP: $14.49You Save: $5.24 (37%)Ships in 1-3 Business DaysProduct Specifications- Other Name: Insulator, Front Spring; Coil Spring Insulator; Spring Insulator
- Position: Front
| Page 1 of 5 |Next >
1-20 of 93 Results
Buick Coil Spring Insulator
Choose OEM Coil Spring Insulator, you're making the optimal decision for superior quality and perfect performance. You can feel confident because each component goes through stringent quality checks. Every part is carefully built to comply with Buick's factory specifications. You'll enjoy a smooth, worry-free installation that fits just right. At ChevyPartsGiant.com, you'll find it easy to get top-quality OEM Buick Coil Spring Insulator. You can shop at highly competitive prices and protect your budget. All our genuine Buick parts include a dependable manufacturer's warranty. You'll also appreciate our straightforward return policy and swift delivery services for extra convenience.
Buick Coil Spring Insulator Parts and Q&A
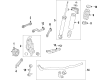
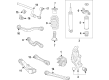
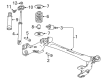
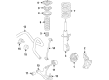
- Q: How to replace the coil spring insulators on Buick Lucerne?A:The first step to replace coil spring insulators consists of raising and supporting the vehicle. Start the replacement by lifting the wheel off the tire before placing your jack stand under the lower Control Arm. First disconnect the automatic level control air tube from the shock absorber before removing the lower shock absorber retaining bolts. The universal steering linkage puller (J 24319-B) will detach the adjustment link from the lower Control Arm after removing the adjustment link retaining nut. Drop the lower Control Arm onto the support assembly while slowly lowering it before using a pry tool to remove the lower Coil Spring Insulator and coil spring. To extract the upper Coil Spring Insulator you must pull downward. When installing components place the upper Coil Spring Insulator retainer into the vehicle body before mounting both the coil spring and lower insulator while making sure the insulator fully rests inside the lower Control Arm. Lift the lower Control Arm into position then bolt two shock fasteners to the Control Arm. Next install the lower shock absorber retaining bolts and tighten them to 24 nm (18 ft. Lbs.). Secure the adjustment link to the lower Control Arm by installing its retaining nut while tightening it to 50 nm (36 ft. Lbs.). To complete the repair place the automatic level control air tube onto the shock absorber before reinstalling the tire and wheel and dropping the vehicle to the ground.
- Q: How to Properly Install a Coil Spring Insulator on Buick LeSabre?A:Vehicle raising and suspension follow as the initial step to replace coil spring insulators. Begin by taking out the wheel and tire and after that support the lower Control Arm through using a jack stand. Remove the lower shock absorber retaining bolts while extracting the automatic level control air tube attachment from the shock absorber. Next follow these steps: take off the adjustment link retaining nut then use universal steering linkage puller (J 24319-B) to split the adjustment link from the lower Control Arm. While lowering the support assembly you can pry underneath the lower Coil Spring Insulator to remove the coil spring with its insulator. You should pull down to remove the upper Coil Spring Insulator. Start by inserting the vehicle body upper Coil Spring Insulator retainer before you add the coil spring and lower insulator below the lower Control Arm. Make sure that the insulator properly rests in the lower Control Arm. Insert the two shock bolts into the Control Arm before fastening the lower shock absorber retaining bolts to 24 nm (18 ft. Lbs.). Fasten the adjustment link to the lower Control Arm by adjusting the retaining nut to 50 nm (36 ft. Lbs.). Reconnect the automatic level control air tube to the shock absorber then install the tire and wheel before lowering the vehicle.


Related Buick Parts
 Buick Air Suspension Compressor
 Buick Axle Pivot Bushing
 Buick Ball Joint
 Buick Bed Mounting Hardware
 Buick Control Arm Bolt
 Buick Control Arm Bracket
 Buick Control Arm Bushing
 Buick Lateral Link
 Buick Leaf Spring
 Buick Rear Crossmember
 Buick Trailing Arm
 Buick Wheel Seal