ChevyParts
My Garage
My Account
Cart
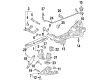
OEM Buick Rear Crossmember
Rear Suspension Crossmember- Select Vehicle by Model
- Select Vehicle by VIN
Select Vehicle by Model
orMake
Model
Year
Select Vehicle by VIN
For the most accurate results, select vehicle by your VIN (Vehicle Identification Number).
6 Rear Crossmembers found

Buick Suspension Crossmember, Rear Part Number: 84908416
$905.76 MSRP: $1360.27You Save: $454.51 (34%)Ships in 1-3 Business DaysProduct Specifications- Other Name: Cradle Assembly-Rear Suspension; Crossmember
- Position: Rear
- Replaced by: 42799310

Buick Suspension Crossmember, Rear Part Number: 84228787
$818.85 MSRP: $1229.75You Save: $410.90 (34%)Ships in 1-3 Business DaysProduct Specifications- Other Name: Cradle Assembly-Rear Suspension; Crossmember
- Position: Rear
- Replaced by: 42799687


Buick Crossmember, Rear Part Number: 42732352
$40.23 MSRP: $59.88You Save: $19.65 (33%)Ships in 1-3 Business DaysProduct Specifications- Other Name: Crossmember, Rear Frame Cross
- Position: Rear

Buick Crossmember, Rear Part Number: 42558092
$212.36 MSRP: $317.50You Save: $105.14 (34%)Ships in 1-3 Business DaysProduct Specifications- Other Name: Crossmember, Rear Frame Cross
- Position: Rear
- Replaces: 95096640

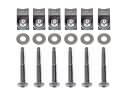
Buick Rear Crossmember Part Number: 367467
Product Specifications- Other Name: Crossmember, Rear; Member, Rear Frame Cross
- Position: Rear

Buick Suspension Crossmember, Rear Part Number: 15127512
Product Specifications- Other Name: Crossmember-Rear; Subframe; Crossmember; Crossmember, Rear Frame Cross
- Position: Rear
Buick Rear Crossmember
Want to cut long-term maintenance and repair costs? Choose OEM Rear Crossmember. Those parts deliver top durability you can trust. On our site, you'll find a huge catalog of genuine Buick parts. Prices are unbeatable, so you can keep more in your pocket. Every OEM Buick Rear Crossmember includes a manufacturer's warranty. You can also get an easy return policy that keeps buying risk free. Fast delivery, get your car on the road quickly. It's simple to search, compare, and order. Stop guessing about quality or fit. Order today and save with parts that last.
Buick Rear Crossmember Parts Questions & Experts Answers
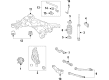
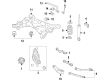
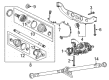
- Q: How to replace the Rear Crossmember on Buick Rendezvous?A:Start by lifting the vehicle before supporting it adequately before removing the wheel and tire. Raise the vehicle then support the rear Differential carrier using a utility stand before unbolting the rear Differential carrier mounting bolts which connect it to the Rear Crossmember. Start by removing the rear suspension knuckle and disconnecting the wheel speed sensor harness from both the lower Control Arm and Rear Crossmember. Then remove the rivets which attach the park brake cable to the Rear Crossmember. Start by removing the alc height sensor and link and after that take out the alc ball stud while safely storing the alc wiring harness out of harm's way. Support the Rear Crossmember with a utility jack as you scribe the mounting points between the crossmember and frame until you finish removing bolts from the Rear Crossmember to lower it to the ground. The installation requires removing of the rear stabilizer shaft along with the rear axle upper control arms and rear axle lower control arms and tie rods from the Rear Crossmember assembly. Begin installation by installing the tie rods first then assemble rear axle lower control arms and upper control arms onto the Rear Crossmember. Install the rear stabilizer shaft first and apply enough torque to raise the Rear Crossmember before aligning it with frame scribe marks. Put in the Rear Crossmember mounting bolts that need to be secured at 130 n.m (96 lb ft). The process of installation includes attaching both the alc height sensor and ball stud followed by reinstalling rear Differential carrier mounting bolts then attaching the Parking Brake Cable and connecting the wheel speed sensor harness. After installing the rear suspension knuckle and tire you should inspect the rear camber and toe measurements before adjusting them properly and then lowering the vehicle.