ChevyParts
My Garage
My Account
Cart
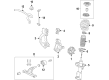
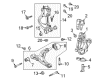
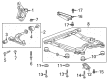
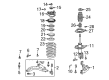
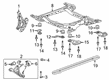
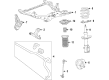
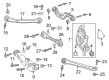
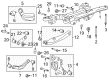
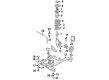
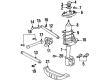
OEM Buick Steering Knuckle
Front Steering Knuckle- Select Vehicle by Model
- Select Vehicle by VIN
Select Vehicle by Model
orMake
Model
Year
Select Vehicle by VIN
For the most accurate results, select vehicle by your VIN (Vehicle Identification Number).
115 Steering Knuckles found


Buick Knuckle, Passenger Side Part Number: 20998091
$94.50 MSRP: $155.66You Save: $61.16 (40%)Ships in 1-2 Business DaysProduct Specifications- Other Name: Knuckle, Steering
- Position: Passenger Side


Buick Knuckle, Driver Side Part Number: 13219080
$148.53 MSRP: $235.81You Save: $87.28 (38%)Ships in 1-2 Business DaysProduct Specifications- Other Name: Knuckle, Steering
- Position: Driver Side


Buick Knuckle, Driver Side Part Number: 13409306
$115.80 MSRP: $183.83You Save: $68.03 (38%)Ships in 1-2 Business DaysProduct Specifications- Other Name: Knuckle, Steering
- Position: Driver Side


Buick Knuckle, Driver Side Part Number: 23130696
$388.19 MSRP: $639.48You Save: $251.29 (40%)Ships in 1-2 Business DaysProduct Specifications- Other Name: Knuckle, Rear Wheel
- Position: Driver Side
- Replaces: 19151396, 18022046, 25816705, 18060616


Buick Knuckle, Passenger Side Part Number: 23118286
$255.80 MSRP: $402.51You Save: $146.71 (37%)Ships in 1-3 Business DaysProduct Specifications- Other Name: Knuckle, Steering
- Position: Passenger Side
- Replaces: 13319483

Buick Knuckle, Passenger Side Part Number: 22990753
$265.66 MSRP: $421.79You Save: $156.13 (38%)Ships in 1-2 Business DaysProduct Specifications- Other Name: Knuckle, Steering (Machining)
- Position: Passenger Side
- Replaced by: 23127630
Buick Knuckle, Passenger Side Part Number: 23130695
$433.92 MSRP: $623.98You Save: $190.06 (31%)Ships in 1-2 Business DaysProduct Specifications- Other Name: Knuckle, Rear Wheel
- Position: Passenger Side
- Replaces: 19151397, 18022047, 18060617, 25816704

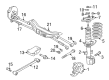
Buick Knuckle, Rear Passenger Side Part Number: 84196225
$119.79 MSRP: $203.94You Save: $84.15 (42%)Ships in 1-2 Business DaysProduct Specifications- Other Name: Knuckle, Rear Wheel
- Position: Rear Passenger Side
- Replaced by: 26503837

Buick Knuckle, Passenger Side Part Number: 23271316
$104.62 MSRP: $163.85You Save: $59.23 (37%)Ships in 1-3 Business DaysProduct Specifications- Other Name: Knuckle Assembly-Steering; Knuckle, Steering
- Position: Passenger Side

Buick Knuckle, Driver Side Part Number: 84180899
$94.86 MSRP: $156.26You Save: $61.40 (40%)Ships in 1-2 Business DaysProduct Specifications- Other Name: Knuckle, Steering
- Position: Driver Side
Buick Knuckle, Passenger Side Part Number: 84180900
$94.19 MSRP: $155.17You Save: $60.98 (40%)Ships in 1-2 Business DaysProduct Specifications- Other Name: Knuckle, Steering
- Position: Passenger Side
- Replaces: 13385778

Buick Yoke, Driver Side Part Number: 84146138
$95.17 MSRP: $156.77You Save: $61.60 (40%)Ships in 1-2 Business DaysProduct Specifications- Other Name: Knuckle, Steering; Knuckle
- Position: Driver Side
- Replaces: 23301179

Buick Knuckle, Passenger Side Part Number: 42757359
$203.25 MSRP: $319.81You Save: $116.56 (37%)Ships in 1-2 Business DaysProduct Specifications- Other Name: Knuckle, Steering
- Position: Passenger Side
- Replaces: 42481616
Buick Knuckle, Rear Driver Side Part Number: 84196224
$123.81 MSRP: $203.94You Save: $80.13 (40%)Ships in 1-2 Business DaysProduct Specifications- Other Name: Knuckle, Rear Wheel
- Position: Rear Driver Side
- Replaced by: 26503836

Buick Knuckle, Rear Passenger Side Part Number: 84196219
$108.59 MSRP: $184.88You Save: $76.29 (42%)Ships in 1-2 Business DaysProduct Specifications- Other Name: Knuckle, Rear Wheel
- Position: Rear Passenger Side
- Replaced by: 42803051

Buick Knuckle, Rear Driver Side Part Number: 13327458
$115.91 MSRP: $184.02You Save: $68.11 (38%)Ships in 1-2 Business DaysProduct Specifications- Other Name: Knuckle Assembly, Rear Suspension
- Position: Rear Driver Side
- Replaced by: 23432048


Buick Strut Part Number: 89047629
Product Specifications- Other Name: Knuckle & Strut Assembly-W/Ball Joint; Knuckle; Knuckle, Front And Rear Suspension; Knuckle, Steering
- Replaces: 22064571, 22064126, 22064157, 22064560


Buick Knuckle, Rear Passenger Side Part Number: 18060244
Product Specifications- Other Name: Knuckle, Rear Suspension; Knuckle, Rear Wheel
- Position: Rear Passenger Side
- Replaces: 10056762

Buick Knuckle, Rear Driver Side Part Number: 18060598
Product Specifications- Other Name: Knuckle, Rear Suspension; Knuckle, Rear Wheel
- Position: Rear Driver Side
- Replaces: 18019813
Buick Strut Part Number: 89047628
Product Specifications- Other Name: Knuckle & Strut Assembly-W/Ball Joint; Knuckle; Knuckle, Front And Rear Suspension; Knuckle, Steering
- Replaces: 22064570, 22064559, 22064156, 22064125
| Page 1 of 6 |Next >
1-20 of 115 Results
Buick Steering Knuckle
Want to cut long-term maintenance and repair costs? Choose OEM Steering Knuckle. Those parts deliver top durability you can trust. On our site, you'll find a huge catalog of genuine Buick parts. Prices are unbeatable, so you can keep more in your pocket. Every OEM Buick Steering Knuckle includes a manufacturer's warranty. You can also get an easy return policy that keeps buying risk free. Fast delivery, get your car on the road quickly. It's simple to search, compare, and order. Stop guessing about quality or fit. Order today and save with parts that last.
Buick Steering Knuckle Parts Questions & Experts Answers
- Q: How to service and repair the steering knuckle on Buick LeSabre?A:To perform the service and repair to the Steering Knuckle, start with lifting and supporting the vehicle first, and then remove the tire and wheel. Next, disconnect wheel bearing/hub from the vehicle and remove the outer Tie Rod End retaining nut. Using universal steering linkage puller (J24319-B) pull up the outer tie rod from the Steering Knuckle, the next thing taken off is the lower Ball Joint cotter pin and retaining nut. Use the Ball Joint separator (J43828) to release the lower Ball Joint from the Steering Knuckle and remove the front strut to the Steering Knuckle bolts and nuts in taking out the Steering Knuckle from the vehicle. For installation on the Steering Knuckle is fixed together with the lower Ball Joint, make sure the nut is tightened up to, but not more than 60 degrees of total rotation additional for cotter pin alignment without backing up the nut. Install the lower Ball Joint retaining nut- tighten to 10 nm (88 inch lbs) plus additional 180 degrees - 300 degrees (3 - 5 flats) and then install a new cotter pin. Next, attach the outer Tie Rod End to the Steering Knuckle and tighten the outer Tie Rod End nut to 70 nm (52 ft. Lbs.). Mount the Steering Knuckle on the strut to mounting bolts and nuts and tighten the nuts to 185 nm(136 ft. Lbs). Go ahead and install the hub and bearing to the Steering Knuckle/drive axle, and then install the brake rotor. Tighten the drive axle nut, using a drift or screwdriver to stop the rotor from turning with a torque of 160 nm (118 ft. Lbs). Lastly, put the tire and wheel back and align the car.
- Q: How to replace the steering knuckle on Buick Regal?A:First, lift and appropriately support the vehicle in order to replace the Steering Knuckle. Take out the bearing-hub assembly, and then take out front lower control arm ball stud, and the outer Tie Rod End from the Steering Knuckle. Scribe the strut to the knuckle, and then undo the bolts and nuts that attach the strut to the knuckle and remove the knuckle from the vehicle. For installation, place the knuckle back to the vehicle, make sure to install the bolts and nuts that hold the strut to the knuckle and make sure they tighten at an angle of 120 nm (89 ft. Lbs.) of torque. Next, secure the outer tie rod to the Steering Knuckle and the front lower control arm ball stud to the knuckle. Mounting the front wheal driving shaft bearing, closing the vehicle, and finally the front wheal alignment check, adjusting if necessary.
- Q: How to replace the steering knuckle on Buick LaCrosse?A:First, raise and support the vehicle to replace the Steering Knuckle. Take off the bearing/hub assembly, then remove two front lower control arm ball stud from the Steering Knuckle, and the outer Tie Rod End. Scribe the strut to the knuckle and remove the bolts and nuts securing the strut to the knuckle before removing the knuckle from the vehicle. For the installation, again place the knuckle on to the vehicle, and then install the through bolts and nuts that join the strut to the knuckle that are tightened to 120 nm (89 ft. Lbs.). Next, attach the outer tie rod to the Steering Knuckle and the front lower control arm ball stud to the knuckle and then set up the front wheel drive shaft bearing. Finally, decrease the vehicle and check the front wheels alignment, if there are any adjustments too.


Related Buick Parts
 Buick Alignment Bolt
 Buick Ball Joint
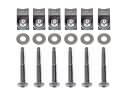 Buick Bed Mounting Hardware
 Buick Control Arm Bracket
 Buick Control Arm Bushing
 Buick Front Cross-Member
 Buick Lateral Arm
 Buick Shock Absorber
 Buick Spindle Nut
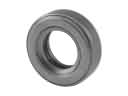 Buick Strut Bearing
 Buick Sway Bar Bushing
 Buick Wheel Cover