ChevyParts
My Garage
My Account
Cart
OEM Buick EGR Vacuum Solenoid
EGR Valve Vacuum Solenoid- Select Vehicle by Model
- Select Vehicle by VIN
Select Vehicle by Model
orMake
Model
Year
Select Vehicle by VIN
For the most accurate results, select vehicle by your VIN (Vehicle Identification Number).
8 EGR Vacuum Solenoids found


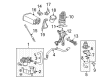
Buick EGR Valve Part Number: 89060435
$101.58 MSRP: $316.92You Save: $215.34 (68%)Ships in 1-2 Business DaysProduct Specifications- Other Name: Valve Assembly, EGR; EGR Vacuum Solenoid; Valve, Emission Control System
- Replaces: 88894013, 89017647, 12575313


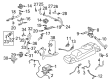
Buick EGR Valve Part Number: 12633889
$139.68 MSRP: $283.70You Save: $144.02 (51%)Ships in 1-2 Business DaysProduct Specifications- Other Name: Valve, Emission Control System; Exhaust Gas Recirculation (EGR) Valve; EGR Vacuum Solenoid
- Replaces: 12581876, 12565309, 12613270, 24508966, 12573722

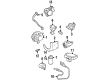
Buick Vacuum Control Solenoid Part Number: 1997223
$38.21 MSRP: $119.21You Save: $81.00 (68%)Product Specifications- Other Name: Solenoid Assembly-EGR Control Valve Relay; EGR Vacuum Solenoid; Solenoid; Solenoid, Emission Control System

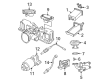
Buick Solenoid Valve Part Number: 1997207
$31.87 MSRP: $59.47You Save: $27.60 (47%)Product Specifications- Other Name: Solenoid Assembly-EGR Control Valve Relay; Vapor Canister Purge & Vent Solenoids; EGR Vacuum Solenoid.; EGR Solenoid; Vacuum Solenoid; Control Solenoid; Vacuum Control Solenoid; Solenoid, Emission Control System


Buick EGR Valve Solenoid Part Number: 1997173
Product Specifications- Other Name: Solenoid Assembly-EGR Control Valve Relay; EGR Vacuum Solenoid; EGR Valve; Solenoid; Solenoid, Emission Control System


Buick EGR Valve Part Number: 19210661
Product Specifications- Other Name: Valve Kit, EGR; EGR Vacuum Solenoid; EGR; Valve, Emission Control System(ECM Components); Valve, Emission Control System
- Replaces: 17110478, 17113434


Buick Throttle Position Sensor Part Number: 12576918
Product Specifications- Other Name: Valve, Emission Control System; EGR Vacuum Solenoid; EGR Valve; Valve, Emission Control System(EGR Control)
- Replaces: 17113278, 17113575, 12568582, 17093020, 17096188, 17113619, 17113618, 17113303, 17113615, 17113405

Buick EGR Solenoid Part Number: 1997674
Product Specifications- Other Name: Solenoid, EGR Re; EGR Vacuum Solenoid; Solenoid, Emission Control System
Buick EGR Vacuum Solenoid
Choose OEM EGR Vacuum Solenoid, you're making the optimal decision for superior quality and perfect performance. You can feel confident because each component goes through stringent quality checks. Every part is carefully built to comply with Buick's factory specifications. You'll enjoy a smooth, worry-free installation that fits just right. At ChevyPartsGiant.com, you'll find it easy to get top-quality OEM Buick EGR Vacuum Solenoid. You can shop at highly competitive prices and protect your budget. All our genuine Buick parts include a dependable manufacturer's warranty. You'll also appreciate our straightforward return policy and swift delivery services for extra convenience.
Buick EGR Vacuum Solenoid accurately measures intake vacuum back to EGR valve to maintain a cool and low emissions combustion. Over a century of innovation has earned Buick a reputation of combining a legendary ride with the quiet interior stimulation that is intended to give drivers a comfortable ride over the city streets or highways. The marque combines heritage with technology since 1903 with added features to target controls to the driver and refining the suspension systems to absorb the bumps without any difficulties. Changes in the recent past, like QuietTuning, mute exterior sound and the current infotainment systems are keeping passengers engaged. The previewed sculpted lines and all electric direction of the eye catching Wildcat EV concept demonstrates that the brand combines responsibility and excitement. The smooth styling coupled up with a sound build quality makes it convenient and fun to own. This is a small-sized valve that responds immediately. The mounting of the EGR Vacuum Solenoid can be done at home as long as one is organized. Disconnection of the battery should occur first to avoid shorts. Locate the solenoid close to the intake manifold and label each vacuum hose with the tapes to ensure that there is no confusion. Uninstall the electrical connector and screws holding the old part in place, lifting it out. Install the new unit, screw it, and force the hoses on their respective ports till firmly seated. Install the connector, re-insert battery, delete any coded in data, boot up the engine, listen to leakage, and complete with a brief test drive.
Related Buick Parts
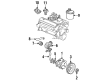
 Buick EGR Valve
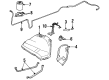
 Buick Muffler
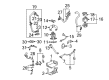
 Buick Air Inject Check Valve
 Buick Canister Purge Valves
 Buick Diverter Valve
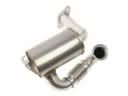 Buick EGR Filter
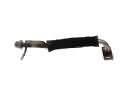 Buick EGR Tube
 Buick EGR Valve Gasket
 Buick Exhaust Manifold Gasket
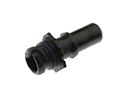 Buick PCV Valve Elbow
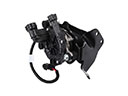 Buick Secondary Air Injection Pump
 Buick Vapor Pressure Sensor