ChevyParts
My Garage
My Account
Cart
OEM Buick LaCrosse Window Regulator
Electric Power Window Regulator- Select Vehicle by Model
- Select Vehicle by VIN
Select Vehicle by Model
orMake
Model
Year
Select Vehicle by VIN
For the most accurate results, select vehicle by your VIN (Vehicle Identification Number).
14 Window Regulators found


Buick LaCrosse Window Regulator, Front Driver Side Part Number: 22810016
$116.52 MSRP: $320.22You Save: $203.70 (64%)Ships in 1-2 Business Days
Buick LaCrosse Window Regulator, Front Driver Side Part Number: 84568359
$104.90 MSRP: $189.86You Save: $84.96 (45%)Ships in 1-2 Business DaysBuick LaCrosse Window Regulator, Front Passenger Side Part Number: 84568358
$97.38 MSRP: $182.89You Save: $85.51 (47%)Ships in 1-2 Business Days
Buick LaCrosse Window Regulator, Rear Passenger Side Part Number: 26209810
$45.22 MSRP: $84.93You Save: $39.71 (47%)Ships in 1-2 Business DaysBuick LaCrosse Window Regulator, Rear Driver Side Part Number: 26209809
$51.02 MSRP: $92.34You Save: $41.32 (45%)Ships in 1-2 Business Days
Buick LaCrosse Window Regulator, Rear Passenger Side Part Number: 22836743
$74.64 MSRP: $205.16You Save: $130.52 (64%)Ships in 1-2 Business Days
Buick LaCrosse Window Regulator, Rear Driver Side Part Number: 22836742
$110.88 MSRP: $215.20You Save: $104.32 (49%)Ships in 1-2 Business Days
Buick LaCrosse Window Regulator, Front Passenger Side Part Number: 22810017
$101.72 MSRP: $279.60You Save: $177.88 (64%)Ships in 1-2 Business Days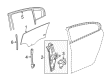
Buick LaCrosse Window Regulator, Rear Driver Side Part Number: 20883903
$47.93 MSRP: $90.00You Save: $42.07 (47%)Ships in 1-2 Business Days

Buick LaCrosse Window Regulator
Want to cut long-term maintenance and repair costs? Choose OEM Window Regulator. Those parts deliver top durability you can trust. On our site, you'll find a huge catalog of genuine Buick LaCrosse parts. Prices are unbeatable, so you can keep more in your pocket. Every OEM Buick LaCrosse Window Regulator includes a manufacturer's warranty. You can also get an easy return policy that keeps buying risk free. Fast delivery, get your car on the road quickly. It's simple to search, compare, and order. Stop guessing about quality or fit. Order today and save with parts that last.
The Window Regulator is a very important part that contributes to the reliability and functionality of the Buick LaCrosse so as provide the required smooth control of the window functions of the car. Bearing in mind that these window regulators will be used frequently, consumers can trust that the Buick LaCrosse models used are strong and rare to develop issues that will cause more hassles. Meant for either power or manual applications, these regulators use scissor or cable type to achieve stream compatibility regardless of the Buick LaCrosse model or trim level. This Window Regulator was especially designed to satisfy all superior requirements, which means that it will fit perfectly and look even like a brand new part. LiftMaster high-quality regulators that are precisely compatible with Buick LaCrosse automotive models can be bought to replace worn-out regulators as they help in maintaining the door glass in good working condition which in turn would reduce instances of door glass straining hence improving efficiency and safety. Thus, the Window Regulator represents not only the purpose within the car but also the focus on the quality of the product that Buick offers. The Window Regulator offers the newest features like successful materials and improved patterns, making it well-liked by drivers who want to keep their car in the maximum of its performance. Thus, it can be concluded that the Window Regulator has a significant function of keeping the Buick LaCrosse as a car that represents reliability and innovative thinking in auto industry.
Buick LaCrosse Window Regulator Parts and Q&A
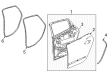
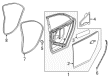
- Q: How to replace the rear side door window regulator on Buick LaCrosse?A:Starting the process requires removing the rear door trim panel and the rear door water deflector with care for avoiding paint damage. To reach the window guide retainer clips you need to rise the window enough before pushing the clip locks inward and lifting the window free from its retaining clip. Tape the window fully up first before disconnecting the power window electrical connector and freeing the bolt to the Window Regulator motor (2, 3, 4). Lift the motor out of its retaining slot after these steps. The first step involves removing both the Window Regulator and motor from the door unit and then proceeding to separate the power Window Motor from its connection to the Window Regulator. The installation process starts with walling the power Window Motor onto the Window Regulator before fastening bolts (2, 3, 4) between both components then inserting the assembly into slots found within the inner door panel. Reconnect the electrical connector to the power Window Motor after tightening all Window Regulator and motor bolts to the door at 10 n.m (89 lb in). After removing the tape proceed to lower the window to access the clips then inspect the window for proper function while also checking the programming sequence. The procedure ends by fitting the rear door water deflector and returning the rear door trim panel.
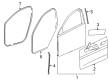
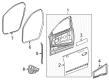
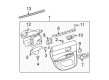
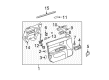
- Q: How to replace the front side door window regulator on Buick LaCrosse?A:Disconnection of the Power Window Switch begins the process to safely replace the front side door Window Regulator. Start the front door installation process by taking off the front door water deflector and trim panel after applying masking tape to the outer seal to protect the paint. Lift the window until you can access its guide retainer clip before pushing the clip locks inward to release the window from its place. Fasten the window at its maximum elevation by using tape maintenance. The power Window Motor electrical connector requires tab pull-up action for disconnection while the Window Regulator motor requires the bolt and nut (2, 4) from the studs to be removed. Remove the motor and regulator through the inner door panel opening by taking the power Window Motor away from the regulator. During the installment process attach the power Window Motor to the Window Regulator followed by inserting the complete assembly through the access opening. The Window Regulator installation requires you to fix in place both the nuts (2, 4) and motor bolts while tightening them to 10 n.m (89 lb in). Attach the power Window Motor electrical connector to its housing while verifying successful locking mechanism then discard the masking tape. To install the window proceed by opening the window enough to enter the interior panel and insert it into the retaining slot before verifying correct operation. The fitting process ends by reinstalling both components: the front door water deflector and the front door trim panel.


Related Buick LaCrosse Parts
 Buick LaCrosse Emblem
 Buick LaCrosse Door Armrest
 Buick LaCrosse Door Latch Assembly
 Buick LaCrosse Door Latch Cable
 Buick LaCrosse Door Lock Actuator
 Buick LaCrosse Door Lock Cylinder
 Buick LaCrosse Door Seal
 Buick LaCrosse Door Striker
 Buick LaCrosse Interior Light Bulb
 Buick LaCrosse Weather Strip
 Buick LaCrosse Window Channel
 Buick LaCrosse Window Motor