ChevyParts
My Garage
My Account
Cart
OEM Buick Lucerne Fan Shroud
Radiator Fan Shroud- Select Vehicle by Model
- Select Vehicle by VIN
Select Vehicle by Model
orMake
Model
Year
Select Vehicle by VIN
For the most accurate results, select vehicle by your VIN (Vehicle Identification Number).
1 Fan Shroud found


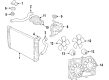
Buick Lucerne Fan Shroud Part Number: 21999691
Buick Lucerne Fan Shroud
Our website offers an extensive catalog of genuine Buick Lucerne Fan Shroud at unbeatable prices. Every OEM Buick Lucerne Fan Shroud comes with a manufacturer's warranty, an easy return policy, and rapid delivery service. Don't miss out on this great opportunity!
Buick Lucerne Fan Shroud Parts Questions & Experts Answers
- Q: How to replace the engine coolant fan shroud (LGD, LZ9) (3.9L) on Buick Lucerne?A: Connect to the replacement process of the engine coolant Fan Shroud (LGD, LZ9) (3.9L) you need first to disconnect the battery negative cable. Start the replacement process by taking out the condenser together with the upper tie bar and draining the entire cooling system. Proceed by lifting the vehicle before taking out the front air deflector. The hose clamp plier (J 38185) allows repositioning the outlet hose clamp before removing the Radiator outlet hose. Start by unbolting the transmission oil cooler pipe retention points on the Fan Shroud while simultaneously lowering the vehicle. Using hose clamp plier (J 38185) the operator should reposition the Radiator inlet hose clamp before disconnecting the Radiator inlet hose. The caps on the transmission oil cooler lines must slide to the back before removing the lines from the Radiator. Proceed with disconnecting the electrical connectors from Fan Motors as well as remove clips that attach the wiring harness to the Fan Shroud while also removing all mounting bolts. Keep the Fan Shroud assembly to the left while using an upward motion on the right side to extract it from the vehicle. The first step in Fan Shroud assembly installation should be to mount the cooling fan motors. The Fan Shroud assembly must receive positioning behind the Radiator while keeping the mounting tabs aligned and using Fan Shroud mounting bolts which need tightening to 6 nm (53 lb in). Predetermine the electrical connectors for the wiring harness to plug into the cooling fan motors before securing the wiring harness retaining clips onto the Fan Shroud. To install the transmission oil cooler pipe properly thread the pipe into the Radiator quick connect fitting until it clicks into place then add the plastic cap. Secure the Radiator inlet hose through using hose clamp plier (J 38185) to put a new clamp position on the hose. Raise and support the vehicle while installing transmission oil cooler pipe retaining bolts to the Fan Shroud and tightening them to 6 nm (53 lb in). Afterward install the Radiator outlet hose and reposition the Radiator outlet hose clamp using hose clamp plier (J 38185). Conclude the installation process with the front air deflector and a vehicle lower operation followed by upper tie bar and condenser installation then cooling system filling up followed by negative Battery Cable reconnection and transmission oil level inspection.

Related Buick Lucerne Parts
 Buick Lucerne Radiator
 Buick Lucerne Water Pump
 Buick Lucerne Coolant Reservoir
 Buick Lucerne Coolant Reservoir Cap
 Buick Lucerne Cooling Hose
 Buick Lucerne Fan Blade
 Buick Lucerne Fan Motor
 Buick Lucerne Radiator Hose
 Buick Lucerne Radiator fan
 Buick Lucerne Thermostat Housing
 Buick Lucerne Water Pump Gasket
 Buick Lucerne Water Pump Pulley