ChevyParts
My Garage
My Account
Cart
OEM Buick Park Avenue Radiator
Cooling Radiator- Select Vehicle by Model
- Select Vehicle by VIN
Select Vehicle by Model
orMake
Model
Year
Select Vehicle by VIN
For the most accurate results, select vehicle by your VIN (Vehicle Identification Number).
10 Radiators found

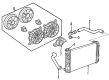
Buick Park Avenue Radiator Part Number: 25731389
$385.19 MSRP: $606.07You Save: $220.88 (37%)Ships in 1-3 Business Days
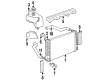
Buick Park Avenue Radiator Part Number: 52462630
Buick Park Avenue Radiator Part Number: 89018546

Buick Park Avenue Radiator Assembly Part Number: 52493406

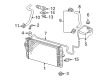
Buick Park Avenue Radiator Part Number: 52493120
Buick Park Avenue Radiator Assembly Part Number: 52468360
Buick Park Avenue Radiator Assembly Part Number: 52468359

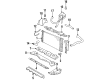
Buick Park Avenue Radiator Assembly Part Number: 52462631
Buick Park Avenue Radiator Part Number: 52402517
Buick Park Avenue Radiator Part Number: 52493121
$179.89 MSRP: $268.90You Save: $89.01 (34%)
Buick Park Avenue Radiator
Want to cut long-term maintenance and repair costs? Choose OEM Radiator. Those parts deliver top durability you can trust. On our site, you'll find a huge catalog of genuine Buick Park Avenue parts. Prices are unbeatable, so you can keep more in your pocket. Every OEM Buick Park Avenue Radiator includes a manufacturer's warranty. You can also get an easy return policy that keeps buying risk free. Fast delivery, get your car on the road quickly. It's simple to search, compare, and order. Stop guessing about quality or fit. Order today and save with parts that last.
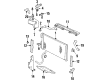
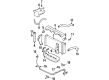
This Buick Park Avenue Radiator is an under-hood component that is very crucial for the proper running of the Buick Park Avenue, a full-size luxury car with a reputation for sophistication and comfort. This radiator plays the role of cooling the engine because it dissipates heat from the coolant and lets in cooler air from outside the vehicle to maintain proper temperature for the engine and improve the overall performance of the vehicle. Usually manufactured with aluminum cores and having plastic or aluminum tanks, the Buick Park Avenue Radiator has a inside framework involving fins and/ or tubes that enables extensive exposure of the air-flow, which is very crucial in the activity of cooling. Support with different models of the Park Avenue, including the first period and the following one, proves its importance in the lineup. Buick Park Avenue Radiators should be checked routinely, the units replaced when necessary to avoid issues such as leaks and clogs that can be common in a vehicle and lead to mishaps on the roads. However, truly outstanding components typical for the Buick Park Avenue car model include Dynaride system and premium interior complemented by the solid radiator of the car model. Relying on the efficient and qualitative radiator, the Buick Park Avenue presents its agreeable performance, safety, and luxury in one car and thus will remain one of the most appreciated vehicles by the extraordinary number of drivers.
Buick Park Avenue Radiator Parts Questions & Experts Answers
- Q: How to replace the radiator on Buick Park Avenue?A:Engine coolant draining should begin before removing upper two bolts from hood latch support as well as the upper Radiator seal. In the next step the technician disconnects inlet and outlet Radiator Hoses from the Radiator before safely positioning them aside. The plastic cap covering the transaxle oil cooler pipe quick connectors needs sliding off while the cooler quick connect tool (J 41623-A) should be used to disconnect the upper and lower transaxle oil cooler pipe connections from the Radiator. After disconnecting the A/C Condenser from the Radiator you must remove all the overflow hose and cooling fans. Start by detaching the upper mounting brackets of the Radiator before you can remove it from the car. Install the new Radiator by first positioning its bottom section into the lower mounts and afterward securing the upper mounting brackets and bolts which should be tight to 10 nm. Use only a 15 mm (0.6 inch) bolt for the condenser-to-end tank connection because it is the sole securement method that prevents damaging the Radiator end tank. Attach the A/C Condenser to the Radiator then fasten its mounting bracket bolts at 13 nm (10 ft. Lbs.). Use a gentle pull on the filler ports to check the cooler pipe fittings are secured after listening for a "click" sound during insertion of the upper and lower transaxle oil cooler components. Insert plastic joint covers onto quick connect fittings before you install the cooling fans together with both the overflow tube and inlet and outlet hose assemblies into the Radiator. Fasten the upper Radiator seal and the upper two bolts from the hood latch support by applying 9 nm torque (80 inch lbs.). Finally, fill the cooling system.

Related Buick Park Avenue Parts
 Buick Park Avenue Coolant Level Sensor
 Buick Park Avenue Coolant Reservoir
 Buick Park Avenue Coolant Reservoir Cap
 Buick Park Avenue Cooling Fan Bracket
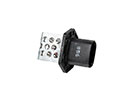 Buick Park Avenue Cooling Fan Resistors
 Buick Park Avenue Cooling Hose
 Buick Park Avenue Fan Motor
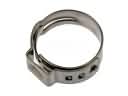 Buick Park Avenue Fuel Line Clamps
 Buick Park Avenue Radiator fan
 Buick Park Avenue Thermostat
 Buick Park Avenue Thermostat Gasket
 Buick Park Avenue Water Pump