ChevyParts
My Garage
My Account
Cart
OEM Buick Rainier Radiator
Cooling Radiator- Select Vehicle by Model
- Select Vehicle by VIN
Select Vehicle by Model
orMake
Model
Year
Select Vehicle by VIN
For the most accurate results, select vehicle by your VIN (Vehicle Identification Number).
2 Radiators found


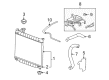
Buick Rainier Radiator Assembly Part Number: 15196385
$343.23 MSRP: $513.06You Save: $169.83 (34%)Ships in 1-2 Business Days
Buick Rainier Radiator Assembly Part Number: 15196386
$185.55 MSRP: $277.35You Save: $91.80 (34%)
Buick Rainier Radiator
Want to cut long-term maintenance and repair costs? Choose OEM Radiator. Those parts deliver top durability you can trust. On our site, you'll find a huge catalog of genuine Buick Rainier parts. Prices are unbeatable, so you can keep more in your pocket. Every OEM Buick Rainier Radiator includes a manufacturer's warranty. You can also get an easy return policy that keeps buying risk free. Fast delivery, get your car on the road quickly. It's simple to search, compare, and order. Stop guessing about quality or fit. Order today and save with parts that last.
The Buick Rainier Radiator is one of the significant parts of car that significantly defines the efficacy and efficiency of the Buick Rainier which is a mid-size luxury SUV manufactured between 2004 & 2007. As a component that is intended to dissipate heat from the engine coolant, Rainier Radiators incorporate a wide array of materials that boost the coolant's cooling capacity, which usually includes an aluminum core supported by plastic or more aluminum tanks. Such design facilitates beneficial heat exchange which is necessary for the proper functioning and long life of the engine. This is because the Buick Rainier is built to cohesively work with manifold other models so that each of these automobiles may enjoy the top-tier Radiator, which in turn underpins the car's muscular powertrain, ranging from the typical 4.2L Vortec I6 to the more potent 5.3L Small-block V8 engines. Situated at the front part of the automobile, the Rainier Radiators plays the role of a heat sink and greatly benefit from good flow of air because; the immediate stopping of the vehicle may lead to numerous accidents. For example, the Rainier Radiator being specifically for automotive use has notable features including light weight and new large tubes and better fin density for improved flow and higher heat transfer, overall. Such an approach positively affects the processing performance of the Buick Rainier while also enhancing a vehicle's protection levels, as demonstrated by the SUV's excellent safety scores. In conclusion, the Buick Rainier Radiator is one more proof of the brand's devotion to offering only high-quality components to maintain the Rainier as a great car with high performance, comfortable and safe for drivers.
Buick Rainier Radiator Parts Questions & Experts Answers
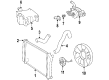
- Q: How to replace the radiator (LL8) on Buick Rainier?A:The first step to replace the Radiator (LL8) requires draining coolant from the Radiator while also recovering the refrigerant. Lift the automobile after which you should remove any existing lower Radiator support shield. Use hose clamp pliers (J 38185) to move the outlet Radiator Hose clamp and disconnect the hose from the Radiator. First remove the inlet Radiator Hose clamps and hoses from the Radiator and then disconnect the transmission cooler lines from their position. The work starts by lowering the vehicle before taking out the cooling fan and shroud and the Radiator support diagonal brace and coolant recovery line connected to the Radiator. The worker must disconnect side panels from the shroud before removing the Radiator and all bolts securing the condenser to the Radiator. The first step for installation requires the condenser to be attached to the Radiator while installing appropriate fasteners at their designated locations and torquing bolts up to 28 nm (21 ft. Lbs.). Position the Radiator and cooling fan together with the shroud followed by a vehicle lift. Secure the outlet Radiator Hose to the Radiator while you reposition its clamp by using hose clamp pliers (J 38185). The transmission cooling lines must be connected to the Radiator followed by installation of the lower Radiator support shield when present then vehicle lowering before attaching the coolant recovery hose to the Radiator and Radiator support diagonal brace for cooling system filling.

Related Buick Rainier Parts
 Buick Rainier Thermostat
 Buick Rainier Coolant Pipe
 Buick Rainier Coolant Reservoir
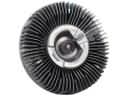 Buick Rainier Cooling Fan Clutch
 Buick Rainier Fan Blade
 Buick Rainier Fan Clutch
 Buick Rainier Fan Shroud
 Buick Rainier Radiator Hose
 Buick Rainier Radiator fan
 Buick Rainier Thermostat Gasket
 Buick Rainier Thermostat Housing
 Buick Rainier Water Pump Gasket