ChevyParts
My Garage
My Account
Cart
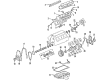
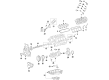
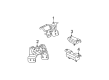
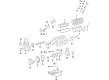
OEM Cadillac Escalade ESV Engine Mount
Engine Motor Mount- Select Vehicle by Model
- Select Vehicle by VIN
Select Vehicle by Model
orMake
Model
Year
Select Vehicle by VIN
For the most accurate results, select vehicle by your VIN (Vehicle Identification Number).
18 Engine Mounts found


Cadillac Escalade ESV Motor Mount Part Number: 15854939
$125.35 MSRP: $215.28You Save: $89.93 (42%)


Cadillac Escalade ESV Motor Mount, Green Part Number: 25828247
$132.41 MSRP: $227.41You Save: $95.00 (42%)


Cadillac Escalade ESV Motor Mount, Driver Side Part Number: 84175583
$111.09 MSRP: $189.13You Save: $78.04 (42%)


Cadillac Escalade ESV Motor Mount, Passenger Side Part Number: 84175582
$121.90 MSRP: $209.35You Save: $87.45 (42%)


Cadillac Escalade ESV Motor Mount Part Number: 15854941
$170.53 MSRP: $292.89You Save: $122.36 (42%)

Cadillac Escalade ESV Mount Bracket, Passenger Side Part Number: 15113847
$47.39 MSRP: $80.69You Save: $33.30 (42%)Ships in 1-2 Business Days

Cadillac Escalade ESV Motor Mount, Passenger Side Part Number: 85151356
$60.84 MSRP: $95.27You Save: $34.43 (37%)Cadillac Escalade ESV Motor Mount, Driver Side Part Number: 84924369
$60.64 MSRP: $94.96You Save: $34.32 (37%)
Cadillac Escalade ESV Motor Mount, Passenger Side Part Number: 85608076
$88.00 MSRP: $137.81You Save: $49.81 (37%)Ships in 1-2 Business DaysCadillac Escalade ESV Motor Mount, Driver Side Part Number: 85608075
$84.60 MSRP: $132.50You Save: $47.90 (37%)Ships in 1-2 Business Days
Cadillac Escalade ESV Motor Mount, Driver Side Part Number: 85608074
$78.63 MSRP: $133.87You Save: $55.24 (42%)
Cadillac Escalade ESV Motor Mount, Passenger Side Part Number: 85608073
$87.96 MSRP: $137.75You Save: $49.79 (37%)Cadillac Escalade ESV Motor Mount, Driver Side Part Number: 85151357
$60.64 MSRP: $94.96You Save: $34.32 (37%)Ships in 1-3 Business Days
Cadillac Escalade ESV Mount Bracket, Passenger Side Part Number: 85126631
$16.98 MSRP: $26.60You Save: $9.62 (37%)

Cadillac Escalade ESV Mount Bracket, Driver Side Part Number: 85126630
$17.26 MSRP: $27.03You Save: $9.77 (37%)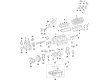
Cadillac Escalade ESV Motor Mount, Passenger Side Part Number: 84718753
$87.96 MSRP: $137.75You Save: $49.79 (37%)Ships in 1-2 Business DaysCadillac Escalade ESV Mount Bracket, Driver Side Part Number: 23353404
$17.26 MSRP: $27.03You Save: $9.77 (37%)Ships in 1-3 Business DaysCadillac Escalade ESV Mount Bracket, Driver Side Part Number: 15113849
$59.70 MSRP: $93.50You Save: $33.80 (37%)
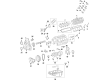
Cadillac Escalade ESV Engine Mount
Want to cut long-term maintenance and repair costs? Choose OEM Engine Mount. Those parts deliver top durability you can trust. On our site, you'll find a huge catalog of genuine Cadillac Escalade ESV parts. Prices are unbeatable, so you can keep more in your pocket. Every OEM Cadillac Escalade ESV Engine Mount includes a manufacturer's warranty. You can also get an easy return policy that keeps buying risk free. Fast delivery, get your car on the road quickly. It's simple to search, compare, and order. Stop guessing about quality or fit. Order today and save with parts that last.
Cadillac Escalade ESV Engine Mount Parts and Q&A
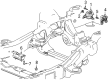
- Q: How to replace the right side engine mount on a 1500 with RPOs LC9/LMG/LY5/L76/L92 (5.3L, 6.0L, and 6.2L) on Cadillac Escalade ESV?A:The right side Engine Mount replacement process begins by removing the air cleaner outlet duct when working with trucks using rpos lc9/lmg/ly5/l76/l92 (5.3L, 6.0L, and 6.2L). You must detach both front drive axle components in addition to their bracket from vehicles equipped with 4wd. Move forward by taking away both the Exhaust Manifold as well as the air conditioning (A/C) compressor bracket. Prior to installing the Engine Mount to frame bolts remove the bolts while keeping the crankshaft balancer and Oil Pan free from any mount support or raising mechanics. Utilize a screw-type adjustable jack to support the engine block tab before accessing through the wheelhouse opening and undoing the Engine Mount to engine bolts. The adjustable jack needs to lift the engine to create suitable space to replace the mount. Install the new Engine Mount by positioning it to the engine while using the wheelhouse opening to fasten Engine Mount to engine bolts that should be tightened to 50 n.m (37 lb ft). Remove the adjustable jack while the engine rest in position at frame-mount level. Use a torque wrench to install the Engine Mount to frame bolts where the first step is tightening the middle bolt to 65 n.m followed by the side bolts to 65 n.m. The a/c compressor bracket returns into position before you install the front drive axle bracket and its bolts with a torque setting of 90 n.m (67 lb ft). After securing the front drive axle bolts, follow by installing the front drive axle. Finally, reinstall the Exhaust Manifold.
- Q: How to replace the left engine mount on a 1500 with RPOs LC9/LMG/LY5/L76/L92 (5.3L, 6.0L, and 6.2L) on Cadillac Escalade ESV?A:The maintenance of the left Engine Mount for 1500 vehicles with rpos lc9/lmg/ly5/l76/l92 requires starting from air cleaner outlet duct removal. Before proceeding with the replacement it is necessary to remove the front drive axle when the vehicle is equipped with four-wheel drive. Lift the vehicle downwards before taking out the generator bracket. Proceed by disassembling the Engine Mount to frame bolts before performing a halfway raise on the vehicle. Take out the left wheelhouse liner while avoiding the use of crankshaft balancer or Oil Pan to support the engine. Put a screw-type adjustable jack under the engine block tab, use the wheelhouse opening to uninstall the Engine Mount to engine bolts. The adjustable jack is necessary to lift the engine a short distance for access to detach the Engine Mount. Install the new Engine Mount to its position on the engine so you can apply Engine Mount to engine bolts while tightening them to 50 n.m (37 lb ft). Once the mount touches the frame naturally lower the engine and take out the jack. Begin by replacing the left wheelhouse liner then lower the car and finally install the Engine Mount with 65 n.m (48 lb ft) torque when using the middle bolt first. It is essential to reinstall the generator bracket and the front drive axle if applicable before lowering the vehicle to put in the air cleaner outlet duct.


Related Cadillac Escalade ESV Parts
 Cadillac Escalade ESV Crankshaft Pulley
 Cadillac Escalade ESV Crankshaft Seal
 Cadillac Escalade ESV Crankshaft Thrust Washer Set
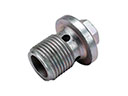 Cadillac Escalade ESV Drain Plug
 Cadillac Escalade ESV Oil Drain Plug Gasket
 Cadillac Escalade ESV Oil Filter
 Cadillac Escalade ESV Piston
 Cadillac Escalade ESV Pushrod
 Cadillac Escalade ESV Timing Chain Guide
 Cadillac Escalade ESV Timing Cover Gasket
 Cadillac Escalade ESV Valve Cover Gasket
 Cadillac Escalade ESV Variable Timing Sprocket