ChevyParts
My Garage
My Account
Cart
OEM Cadillac Escalade ESV Oil Pan
Oil Drain Pan- Select Vehicle by Model
- Select Vehicle by VIN
Select Vehicle by Model
orMake
Model
Year
Select Vehicle by VIN
For the most accurate results, select vehicle by your VIN (Vehicle Identification Number).
9 Oil Pans found


Cadillac Escalade ESV Lower Engine Oil Pan Part Number: 12669909
$48.94 MSRP: $83.30You Save: $34.36 (42%)Ships in 1-2 Business Days


Cadillac Escalade ESV Oil Pan Part Number: 12640746
$225.02 MSRP: $383.11You Save: $158.09 (42%)Ships in 1-2 Business Days


Cadillac Escalade ESV Oil Pan Part Number: 12609074
$216.08 MSRP: $367.87You Save: $151.79 (42%)Ships in 1-2 Business Days

Cadillac Escalade ESV Oil Pan Part Number: 55506665
$55.76 MSRP: $87.32You Save: $31.56 (37%)

Cadillac Escalade ESV Oil Pan Part Number: 12707243
$182.12 MSRP: $286.56You Save: $104.44 (37%)
Cadillac Escalade ESV Oil Pan Part Number: 24045035
$37.63 MSRP: $64.61You Save: $26.98 (42%)Ships in 1-2 Business Days
Cadillac Escalade ESV Oil Pan Part Number: 24043538
$52.66 MSRP: $89.64You Save: $36.98 (42%)
Cadillac Escalade ESV Oil Pan Part Number: 12684605
$221.78 MSRP: $348.96You Save: $127.18 (37%)Ships in 1-3 Business Days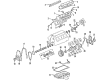
Cadillac Escalade ESV Oil Pan Part Number: 12579273
$313.43 MSRP: $538.29You Save: $224.86 (42%)Ships in 1-2 Business Days
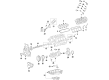
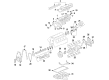
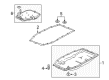
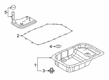
Cadillac Escalade ESV Oil Pan
Want to cut long-term maintenance and repair costs? Choose OEM Oil Pan. Those parts deliver top durability you can trust. On our site, you'll find a huge catalog of genuine Cadillac Escalade ESV parts. Prices are unbeatable, so you can keep more in your pocket. Every OEM Cadillac Escalade ESV Oil Pan includes a manufacturer's warranty. You can also get an easy return policy that keeps buying risk free. Fast delivery, get your car on the road quickly. It's simple to search, compare, and order. Stop guessing about quality or fit. Order today and save with parts that last.
Cadillac Escalade ESV Oil Pan Parts and Q&A
- Q: How to replace the oil pan on 4WD on Cadillac Escalade ESV?A:If you need to change the Oil Pan of the 4wd vehicles, first lift the 4wd up and support it. 1500 series; remove the Oil Pan skid plate bolts and skid plate if so equipped; for 2500 series, remove 2 rear Oil Pan skid plate bolts, and 2 front bolts and skid plate if equipped. Looseenting. Remove the front differential carrier, unbolt the steering rack and let the latter hang downward, thereafter, position an appropriate drain pan beneath the Oil Pan Drain Plug (430) and unscrew the Oil Pan Drain Plug and allow the oil to pour off and afterwards, reinstall the Oil Pan Drain Plug securely. Set the drain pan under the Oil Filter, remove Oil Filter (437) and wait for the oil to drain out before reinstalling the Oil Filter securely. Tap off the right and left side transmission cover bolts and cover, followed by the crossbar on both the 1500 and 2500 series vehicles. For the vehicle equipped with a 4l60-e/4l70-e automatic transmission, remove the 2 lower transmission bolts; for 4l80-e, remove the 2 lower transmission bolts; for 4l80-e, come off 2 lower together bolts; for 6l80-e, have to come off lower left together bolt and lower right together stud. Unplug the engine harness electrical connector from oil level sensor, remove the engine harness clip from transmission oil cooler line bracket, and remove the battery channel bolt. Slide the channel pin out from the Oil Pan tab, and with the oil cooler lines pulled from the clip for the subjected automatic transmissions. First remove the transmission oil cooler line clip bolt &clip from the Oil Pan, then the Oil Pan bolts, then the Oil Pan. Drill out any Oil Pan Gasket rivets if needed, remove and discard the Oil Pan Gasket and rivets. When installing, new Oil Pan Gasket apply a 5mm (0.20 in) bead of sealant 20mm (0.80 in) on the tabs of the front and rear cover gaskets on engine block and then install the Oil Pan and the remaining Oil Pan bolts and until fastened. For 6l80-e automatic transmission vehicles, install the oil cooler bracket and tighten the lower right transmission stud and lower left transmission bolt until tight; for 4l80-e and 4l60-e/4l70-e, install their respective lower transmission bolts until tight. Upgrade the peculiarity of the Oil Pan and Oil Pan-to-Oil Pan front cover bolts to 25 n.m (18 lb ft),peculiarity peculiarity of Oil Pan-to-rear cover bolts to 12 n.m (106 lb in),peculiarity peculiarity of transmission bolts/stud to 50 n.m (37 lb ft). Install and tighten the transmission oil cooler line clip with the bolt by measuring 9 n.m (80 lb in) on the Oil Pan. The oil cooler lines inspection on clip for the respective automatic transmissions, at the channel position, slide the channel pin into the Oil Pan tab, and on battery cable channel bolt tightening to 12 n.m (106 lb in). Fasten the engine harness electrical connector to oil level sensor and reinstall the engine harness clip to the transmission oil cooler line bracket. For both series, strip away any indication of the adhesive patch to start with, clean the bolt threads with denatured alcohol and apply threadlock gm p/n 12345493 (Canadian P/N 10953488) or equivalent to the threads of the bolts. Install crossbar and bolts/nuts for 2500 series by using nuts tightening torque at 120 n.m (89 lb ft) while for 1500 series use the nuts tightening torque of 100 n.m (74 lb ft). Install the left side transmission cover and the cover bolt with 12 n.m (106 lb in) followed by the right side cover bolt. If the old Oil Pan is to be reused, remove and extract an old Oil Filter and install a new Oil Filter (437), lubricating the seal with clean engine oil and tightening to 30 n.m (22 lb ft). Make sure the Oil Pan Drain Plug (430) settled at 25 n.m (18 lb ft), reinstalled the front differential carrier, lifted the steering rack and install the steering rack bolts, tightening the left side bolts to 200 n.m ( 148 lb ft) and the right side bolts to 100 n.m (74 lb ft). To 2500 series vehicles: install the Oil Pan skid plate and tighten the 2 rear Oil Pan skid plate bolts and install the 2 front Oil Pan skid plate bolts, if equipped, to 28 n.m (21 lb ft). For 1500 series vehicles, position the Oil Pan skid plate and install the bolts if equipped and tighten them to 28 n.m (21 lb ft). Finally, lower the car, and fill the engine with new engine oil, and switch on the engine to check for leaks.

Related Cadillac Escalade ESV Parts
 Cadillac Escalade ESV Cam Gear
 Cadillac Escalade ESV Camshaft Bearing
 Cadillac Escalade ESV Coolant Filter
 Cadillac Escalade ESV Engine Mount
 Cadillac Escalade ESV Intake Valve
 Cadillac Escalade ESV Lash Adjuster
 Cadillac Escalade ESV Oil Pan Gasket
 Cadillac Escalade ESV Timing Belt Tensioner
 Cadillac Escalade ESV Timing Chain
 Cadillac Escalade ESV Timing Chain Tensioner
 Cadillac Escalade ESV Timing Cover Gasket
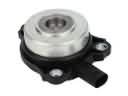 Cadillac Escalade ESV Variable Timing Adjuster Magnet