ChevyParts
My Garage
My Account
Cart
OEM Cadillac XLR Window Regulator
Electric Power Window Regulator- Select Vehicle by Model
- Select Vehicle by VIN
Select Vehicle by Model
orMake
Model
Year
Select Vehicle by VIN
For the most accurate results, select vehicle by your VIN (Vehicle Identification Number).
2 Window Regulators found


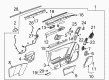
Cadillac XLR Window Regulator, Front Driver Side Part Number: 20823059
Cadillac XLR Window Regulator
Want to cut long-term maintenance and repair costs? Choose OEM Window Regulator. Those parts deliver top durability you can trust. On our site, you'll find a huge catalog of genuine Cadillac XLR parts. Prices are unbeatable, so you can keep more in your pocket. Every OEM Cadillac XLR Window Regulator includes a manufacturer's warranty. You can also get an easy return policy that keeps buying risk free. Fast delivery, get your car on the road quickly. It's simple to search, compare, and order. Stop guessing about quality or fit. Order today and save with parts that last.
The Cadillac XLR Window Regulator is one of the critical parts that defines the car's relevance to the luxury roadster segment incorporating reliability and performance. This Windows Regulator has been manufactured to perfectly fit Cadillac XLR automobiles from the year 2003 to 2009 and it enhances the sound operation of the windows by merely providing an easy way of lowering or lift the window glass while at the same time holding it with precision. The Cadillac XLR Window Regulator comes in scissor and cable models and is designed to fit the exact strict standard, which means that it can easily fit into any Cadillac XLR version. This feature is quite significant to ensure the effectiveness and safety of the vehicle since a defective Window Regulator causes the windows to be either jammed or stuck leading to a compromise on both functionality as well as the comfort of the driver. Cadillac XLR has fancy features like the electrically folding roof, and Magnetic Ride Control that act as an adjustable suspension system for smooth driving. The Window Regulator has an important function in this regard since the windows need to work perfectly and add to the luxurious sensibility of the vehicle. Besides, the Cadillac XLR Window Regulator has evolved clearly in the vehicle market concerning its construction and dependability, which are paramount for a car of this class. Thus, the Cadillac XLR Window Regulator guarantees the work on this car and becomes a guarantee of its good performance on the road while remaining a symbol of American luxury.
Cadillac XLR Window Regulator Parts Questions & Experts Answers
- Q: How to replace the front door window regulator on Cadillac XLR?A:Begin by lowering the front door window before disconnecting the battery as the first step to replace the front door Window Regulator. Begin by lowering the door window and disconnecting battery power. After that, remove the door trim panel and disconnect the door panel electrical connector. The large water deflector requires removal to access the back of the door before you remove small mastic seals near the top and a small plug at the bottom. This will provide access to both upper regulator mounting fasteners. Excise the water deflector before you detach the electrical harness by taking off both radio speaker fasteners and electrical lock. First disconnect the regulator motor electrical connector by unlocking its connector lock then sliding it upward. Create a mark for regulator location that indicates both regulator pad mounts and their proper depth for assembly. Use the inner door access opening to remove the regulator after disconnecting its lower channel studs and motor studs as well as upper channel studs while compacting the regulator. To replace the Window Regulator use the original jack screw adjustments on the new unit before compacting the assembly until ready for installation by inserting the complete component with motor first into the door. Guide the motor studs through the inner panel of the door. Insert the motor nuts covering them to a torque of 10 n.m (89 lb in). Afterward, position the regulator channel studs through the door holes before installing the loose nuts. Thread the electrical connector to the motor before securing the connector lock into position on the seated spot. Adjust the installed window until it sits correctly with the door opening. Use the battery power to secure the door window switch after guiding the Window Regulator clamps to reach the glass which must be tightened to 16 n.m (12 lb ft). Begin by securing nuts on the regulator channel studs as follows: upper forward and upper rearward and then lower forward and lower rearward turning each stud to 10 n.m (89 lb in). The small mastic seals must be placed in the window clamp sight access holes while connecting the harness electrical connector to the speakers before installing the connector lock. The speaker assembly receives its uppermost screws for mounting onto the door which also enables correct positioning of the speaker tab before installing the remaining screws at a torque of 3 n.m (27 lb in). First reinstall the water deflector and then complete the electrical connector connection of the door panel before putting back the door trim panel. Drill holes according to the specification to check window drainage before fitting and installing the access plug into the lower door section to inspect electric functions of all window(s), mirror(s) and door switch operation.

Related Cadillac XLR Parts
 Cadillac XLR Air Charge Temperature Sensor
 Cadillac XLR Brake Light Switch
 Cadillac XLR Crankshaft Position Sensor
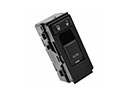 Cadillac XLR Door Lock Switch
 Cadillac XLR Ignition Coil
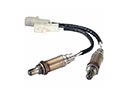 Cadillac XLR Oxygen Sensor
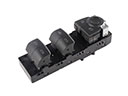 Cadillac XLR Power Window Switch
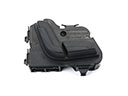 Cadillac XLR Seat Switch
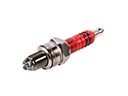 Cadillac XLR Spark Plug
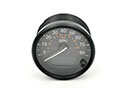 Cadillac XLR Speedometer
 Cadillac XLR Starter
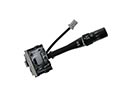 Cadillac XLR Wiper Switch