ChevyParts
My Garage
My Account
Cart
OEM Chevrolet Astro Tie Rod
Steering Tie Rod- Select Vehicle by Model
- Select Vehicle by VIN
Select Vehicle by Model
orMake
Model
Year
Select Vehicle by VIN
For the most accurate results, select vehicle by your VIN (Vehicle Identification Number).
7 Tie Rods found


Chevrolet Astro Tie Rod End, Outer Part Number: 26056100


Chevrolet Astro Drag Link Part Number: 26039568

Chevrolet Astro Tie Rod End, Inner Part Number: 7834224

Chevrolet Astro Inner Tie Rod Part Number: 26059036

Chevrolet Astro Outer Tie Rod Part Number: 26057017

Chevrolet Astro Tie Rod End, Inner Part Number: 26056098

Chevrolet Astro Drag Link Part Number: 26039645
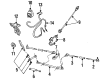
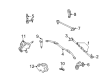
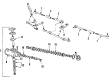
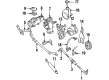
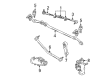
Chevrolet Astro Tie Rod
Want to cut long-term maintenance and repair costs? Choose OEM Tie Rod. Those parts deliver top durability you can trust. On our site, you'll find a huge catalog of genuine Chevrolet Astro parts. Prices are unbeatable, so you can keep more in your pocket. Every OEM Chevrolet Astro Tie Rod includes a manufacturer's warranty. You can also get an easy return policy that keeps buying risk free. Fast delivery, get your car on the road quickly. It's simple to search, compare, and order. Stop guessing about quality or fit. Order today and save with parts that last.
Chevrolet Astro Tie Rod Parts and Q&A
- Q: What tools are required to service and repair the tie rod on Chevrolet Astro?A:The tools necessary to service and repair the Tie Rod include Tie Rod puller (J 6627-A), steering linkage and Tie Rod puller (J 24319-B) and steering linkage installer (J 29193). Start by elevating the vehicle and disconnecting the cotter pin with castellated nut that secures the outer Tie Rod. Inserting a wedge into the joint-area prevents damaging the seal when you avoid breaking the steering linkage connection. You should use the steering linkage and Tie Rod puller (J 24319-B) to extract the outer Tie Rod from the Steering Knuckle before discarding the prevailing torque nut from the inner Tie Rod. The Tie Rod puller (J 6627-A) permits removal of the inner Tie Rod from the relay rod followed by loosening adjuster tube clamp bolts until the Tie Rod ends can be unscrewed from the adjuster tube. Check the Tie Rod threads as well as the ball stud threads and the adjuster tube for any signs of damage together with the Tie Rod End seals to verify their level of wear. The technician should clean both the ball stud threads and ball stud nut threads and the tapered surfaces. The steering adjuster tube requires lubrication with chassis lubricant when Tie Rod ends are separated from the structure. Attach the Tie Rod ends to the adjuster tube while keeping their threaded count equal to within 3 threads by loosening the clamps. Installing a new prevailing torque nut on the inner Tie Rod requires a torque of 47 nm (35 ft. Lbs.) using the steering linkage installer (J 29193) which fits the inner Tie Rod to the relay rod with the seal positioned correctly. Use a new prevailing torque nut to replace the removed installer on the inner Tie Rod while tightening it to 47 nm (35 ft. Lbs.). The new Steering Knuckle outer Tie Rod should be installed by placing the seal on the stud before tightening the castellated nut to 49 nm (36 ft. Lbs.), followed by insertion and flattening of the cotter pin ends on the nut flats. The last step includes lowering the vehicle while adjusting the toe-in.
- Q: How to replace the tie rod on Chevrolet Astro?A:Vehicle elevation is required as the first step to replace the Tie Rod. Before removing the outer Tie Rod's components you must detach both the castellated nut and cotter pin with great attention to protecting the steering linkage joint during removal. Before moving forward replace the Tie Rod and inner rod elements using these replacement tools: steering linkage and Tie Rod puller (J 24319-B) and the inner Tie Rod prevailing torque nut (J 46864). You will need the Tie Rod puller (J 6627-A) to eliminate the inner Tie Rod from its connection to the relay rod. Loosen the bolts securing the adjuster tube clamp followed by removing the Tie Rod ends which attach to the adjuster tube. Examine both Tie Rod thread patterns and ball stud threads as well as investigate whether the adjuster tube exhibits any damage and whether the Tie Rod End seals need replacement because of wear. Thoroughly clean the ball stud's threaded components and the related ball stud nut together with all tapered sections. You must apply lubrication to Tie Rod threads before installation when Tie Rod ends had to be separated from the adjuster tube. Install Tie Rod ends to the adjuster tube by loosening the clamps while maintaining equal threads on the inner and outer ends within three threads. Position the inner Tie Rod onto the relay rod using the steering linkage installer (J 29193) while placing the seal onto the stud before tightening it to 54 nm (40 ft. Lbs.) for taper seating. Install a new prevailing torque nut to the inner Tie Rod instead of j 29193 and tightly fasten it to 47 nm (35 ft. Lbs.). The outer Tie Rod installation on the Steering Knuckle must be done with the seal positioned correctly on the stud while tightening the castellated nut to 49 nm (36 ft. Lbs.) then inserting the cotter pin through the outer Tie Rod before nut adjustment. Finish the procedure by adding the new cotter pin while flattening its ends against the prevailing torque nut then lowering the vehicle before adjusting toe-in.


Related Chevrolet Astro Parts
 Chevrolet Astro Idler Arm
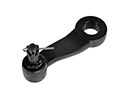 Chevrolet Astro Pitman Arm
 Chevrolet Astro Power Steering Pump
 Chevrolet Astro Center Link
 Chevrolet Astro Drag Link
 Chevrolet Astro Power Steering Hose
 Chevrolet Astro Power Steering Reservoir
 Chevrolet Astro Rack And Pinion
 Chevrolet Astro Steering Gearbox
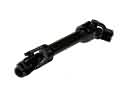 Chevrolet Astro Steering Shaft
 Chevrolet Astro Tie Rod Adjusting Sleeve
 Chevrolet Astro Tie Rod End