ChevyParts
My Garage
My Account
Cart
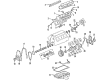
OEM Chevrolet Avalanche 1500 Oil Pan
Oil Drain Pan- Select Vehicle by Model
- Select Vehicle by VIN
Select Vehicle by Model
orMake
Model
Year
Select Vehicle by VIN
For the most accurate results, select vehicle by your VIN (Vehicle Identification Number).
1 Oil Pan found

Chevrolet Avalanche 1500 Oil Pan Part Number: 12579273
$313.43 MSRP: $538.29You Save: $224.86 (42%)Ships in 1-2 Business Days
Chevrolet Avalanche 1500 Oil Pan
Want to cut long-term maintenance and repair costs? Choose OEM Oil Pan. Those parts deliver top durability you can trust. On our site, you'll find a huge catalog of genuine Chevrolet Avalanche 1500 parts. Prices are unbeatable, so you can keep more in your pocket. Every OEM Chevrolet Avalanche 1500 Oil Pan includes a manufacturer's warranty. You can also get an easy return policy that keeps buying risk free. Fast delivery, get your car on the road quickly. It's simple to search, compare, and order. Stop guessing about quality or fit. Order today and save with parts that last.
Chevrolet Avalanche 1500 Oil Pan Parts and Q&A
- Q: How to replace the oil pan on Chevrolet Avalanche 1500?A:Initially, in case it has four wheel drive (4WD) then you should remove its inner axle housing nuts and washers from the bracket, then you should use a suitable jack to support its front drive axle. Next demount the tier differential lower and upper mounting and the bolts, nuts, lower the front drive axle, and demount the transmission cover bolt. Remove, if needed, bolts that attach the Oil Pan skid plate and the skid plate, as well as the bolts attaching the crossbar and the crossbar. Take off the transmission cover bolt and cover, drain the engine oil and remove the engine Oil Filter and then return the drain plug and Oil Filter until it is tight. If there is a vehicle using the 4l60-e automatic transmission, one should remove the transmission bolt and stud on the right side and the bottom left one. If you have 4l80-e automatic transmission, take out the cover bolts of the converter. Unplug the oil level sensor electrical connector, remove the Battery Cable channel bolt, and slide the channel pin out of the Oil Pan tab, remove the engine wiring harness clip, positive Battery Cable clip, and engine oil cooler lines from the positive Battery Cable clip, also remove positive Battery Cable clip bolt and clip. Unscrew all the bolts of the Oil Pan and the Oil Pan itself, whilst making sure no foreign object gets into the oil paths. Drill out the Oil Pan o. G. Retaining rivets if necessary, and then remove and discard the gasket and rivets. Check the engine Oil Pan for any cleaning and perform an inspection as necessary. For installation, apply a beaed of sealant gm p/n 12378190 er equivalent to the engine block ont he tabs o the front and rearower cover gcxkets that extend into the Oil Pan surface. Arrange the oil gallery passages in the Oil Pan and engine block correctly with the new gasket then fasten the gasket onto the pan and the bolts through the area of the gasket. Install the Oil Pan along with the gasket and bolts to the engine block ensuring the Oil Pan bolts are screwed in without overtightening them. If the vehicle has the 4l80-e transmission, tighten the transmission converter cover bolts loosely. For automatic transmission 4l60-e, before snugging the bolt down to a transmission bolt, attached on the right side as well as the bottom bolt is the left side. Tighten the Oil Pan and Oil Pan-to Oil Pan front cover bolts to 25 nm (18 ft. Lbs), Oil Pan-to-rear cover bolts to 12 nm (106 inch lbs), and the bellhousing,converter cover, and the transmission bolts/stud to 50 nm (37 ft lbs). Install the positive Battery Cable clip and bolt to the Oil Pan tighten bolt to 9 nm (80 inch lbs) and install the engine oil cooler lines then to the positive Battery Cable clip then the engine wiring harness clip and positive Battery Cable clip. Slide the channel pin into the tab of Oil Pan, install the Battery Cable channel bolt and tighten 12 nm (106 inch lbs.). Connect the oil level sensor electrical connector , install the transmission cover and bolt, tighten bolt 12 nm (106 inch lbs.) , and then install the crossbar and tighten the crossbar bolts to 100 nm (74 ft. Lbs.). If available, mount and tighten the oil skid pan plate with its bolts at 20 nm (15 ft. Lbs.), then the transmission cover bolts at 12 nm (106 inch lbs.). Lift the front drive axle to position and install the differential carrier upper bolt and nut to tight without installing, and then install the differential carrier lower bolt and nut and tighten to 100nm (75 ft. Lbs.). Finally install the inner axle housing washers and nuts to bracket, torque to 100 nm (75 ft. Lbs.), remove the jack from the front drive axle, and install a new engine oil and a new Oil Filter.

Related Chevrolet Avalanche 1500 Parts
 Chevrolet Avalanche 1500 Crankshaft Pulley
 Chevrolet Avalanche 1500 Crankshaft Thrust Washer Set
 Chevrolet Avalanche 1500 Dipstick Tube
 Chevrolet Avalanche 1500 Engine Mount
 Chevrolet Avalanche 1500 Harmonic Balancer
 Chevrolet Avalanche 1500 Intake Valve
 Chevrolet Avalanche 1500 Motor And Transmission Mount
 Chevrolet Avalanche 1500 Oil Filter
 Chevrolet Avalanche 1500 Oil Pan Gasket
 Chevrolet Avalanche 1500 Piston
 Chevrolet Avalanche 1500 Timing Cover
 Chevrolet Avalanche 1500 Timing Cover Gasket