ChevyParts
My Garage
My Account
Cart
OEM Chevrolet Avalanche 2500 HVAC Control Module
Heater Control Assembly- Select Vehicle by Model
- Select Vehicle by VIN
Select Vehicle by Model
orMake
Model
Year
Select Vehicle by VIN
For the most accurate results, select vehicle by your VIN (Vehicle Identification Number).
4 HVAC Control Modules found


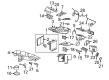
Chevrolet Avalanche 2500 Heater Control Part Number: 15763059

Chevrolet Avalanche 2500 Dash Control Unit Part Number: 19417446
$165.06 MSRP: $259.72You Save: $94.66 (37%)Chevrolet Avalanche 2500 Heater Control Part Number: 19370216
$174.14 MSRP: $274.00You Save: $99.86 (37%)
Chevrolet Avalanche 2500 Heater Control Part Number: 19370209
$169.27 MSRP: $266.33You Save: $97.06 (37%)
Chevrolet Avalanche 2500 HVAC Control Module
Want to cut long-term maintenance and repair costs? Choose OEM HVAC Control Module. Those parts deliver top durability you can trust. On our site, you'll find a huge catalog of genuine Chevrolet Avalanche 2500 parts. Prices are unbeatable, so you can keep more in your pocket. Every OEM Chevrolet Avalanche 2500 HVAC Control Module includes a manufacturer's warranty. You can also get an easy return policy that keeps buying risk free. Fast delivery, get your car on the road quickly. It's simple to search, compare, and order. Stop guessing about quality or fit. Order today and save with parts that last.
Chevrolet Avalanche 2500 HVAC Control Module Parts Questions & Experts Answers
- Q: How to Replace an HVAC Control Module on Chevrolet Avalanche 2500?A:To replace the HVC control module, first, take an instrument panel accessory trim plate and screws to secure the HVAC control module. Press the control assembly retaining tabs to remove the HVAC control module from the instrument panel, then disconnect the electrical connectors. For installation, plug electrical connectors into the HVAC control module, and reinstall it into the instrument panel with retaining tabs locking into position. Put the correct fasteners in their proper locations because replacement fasteners must be for the correct part number for the application. Do not use paints, lubricants or corrosion inhibitors on fasteners or their joint, as they may impact on torque and clamping force and may damage fasteners. Follow the correct tightening sequence and specifications to avoid parts and systems from getting damaged. Fasten the HVAC control module with screws to 1.9 N.m (17 lb in) and then reinstall the instrument panel accessory trim plate. Disruptions to the smoke control mechanisms may occur, as it is important not to calibrate any controls on the HVAC control module. Last but not least, start up the vehicle and let it run for a minute.

Related Chevrolet Avalanche 2500 Parts
 Chevrolet Avalanche 2500 A/C Accumulator
 Chevrolet Avalanche 2500 A/C Clutch
 Chevrolet Avalanche 2500 A/C Hose
 Chevrolet Avalanche 2500 A/C Switch
 Chevrolet Avalanche 2500 A/C System Valve Core
 Chevrolet Avalanche 2500 Blend Door Actuator
 Chevrolet Avalanche 2500 Blower Control Switches
 Chevrolet Avalanche 2500 Blower Motor
 Chevrolet Avalanche 2500 Blower Motor Resistor
 Chevrolet Avalanche 2500 Cabin Air Filter
 Chevrolet Avalanche 2500 Evaporator
 Chevrolet Avalanche 2500 Heater Core